Download
1 / 19
210 likes | 240 Views
Displays and Presentation Slideshows. critique ‘Brainstorm Your Own Lesson’. educational use of displays. types of presentation slideshows. effective slideshow techniques. brainstorm your own slideshow. Unit 2 Objectives. In this unit, we will.

E N D
Displays and Presentation Slideshows critique ‘Brainstorm Your Own Lesson’ educational use of displays types of presentation slideshows effective slideshow techniques brainstorm your own slideshow
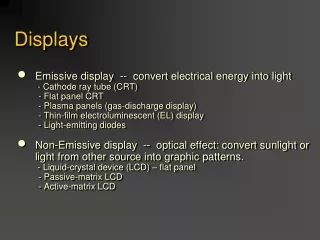
Unit 2 Objectives In this unit, we will... • explore pedagogical implications and practical methods as they relate to the use of displays and presentation slideshows • learn about appropriately presented content and language on a display (ex. poster, flip chart, felt board, pocket chart or bulletin board) • learn how to appropriately construct a pedagogically-sound presentation slideshow
Critique ‘Brainstorm Your Own Lesson’ Show your classmate your lesson, and discuss the following: What is the content (theme/topics), and is it appropriate for your target age/English level? What grammar structures do you wish for students to learn? What learning activities (S, L, R, W) will enable students to learn content and grammar? What vocabulary will the students learn?
Task 1: Educational Use of Displays What kinds of EFL content would be useful to display on a ... ? new vocab/content ideas organize content into categories practising grammar/vocab student practice of language (ex. prepositions of place, appearances, adjectives) poster felt board vocab from previous lessons instructions or communicative expressions organize language/content into categories brainstorming ideas TPR style activities flip chart pocket chart graphics illustrating TL (grammar/vocab) study tip or advice communicative expressions S practice of correct grammar structures (small flip charts)
Task 2: Use Displays to Practice Language Let’s see how displays can be used to practice language. Discuss the following: In what situations would the display be useful? How could you make the activity interactive? How could students use target vocabulary or grammar? pocket chart flip chart poster felt board
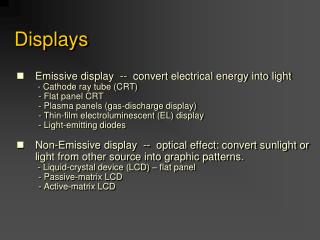
Types of Presentation Software There are numerous types of software available... Microsoft’s PowerPoint Apple’s Keynote OpenOffice’s Impress Prezi Pros: offers basic options most advanced free download visually stunning popular (on most computers) easy-to-use interface decent interface beautiful animations free Cons: hard to build nice animations only for Mac computers not popular visual overload expensive no support subscription service
Task 3: Educational Use of Presentation Slideshows What are some effective EFL purposes of utilizing a ... ? grammatical structures interesting content (websites/audio/video) presentation slideshow communicative expressions for tasks discussion questions instructions and guidelines for tasks key vocabulary terms activities/tasks that engage any of the 4 language skills
Task 4: Presentation Slideshow Techniques Let’s now look at various presentation slideshow techniques and consider their uses: grammar example instructions video/audio clip speech bubble cloze exercise word bank
For Next Class In our next class, we will construct our own presentation slideshows. Subsequently, please 1. consider the order of activities in which you would teach a 45-minute lesson. 2. finish the worksheet “Task 5: Sequence your lesson activities”. 3. your final slideshow will be 8 slides maximum including audio or video (so 1 or 2 slides for audio or video. You don’t need to include a ‘title’ slide (with your name, etc.) 4. bring a USB drive to class next week because you will need to save your work.
Displays and Presentation Slideshows presentation slides in action create your own slideshow
Lesson Objectives In this lesson, we will... • explore various visual principles and slideshow techniques to assist in creating attractive as well as educational presentation slideshows • create your own slide presentation to assist with teaching your lesson
Task 6: Presentation Slideshows in Action With a classmate, look at the following presentation slides on your worksheet, and identify potential weaknesses of each. Discuss possible solutions for improvement: Weakness: ‘ vocabulary dump’ - with no description, context, or use of language Tip 1: have students use vocabulary in context; have Q&A or activities so students can practice using new terms
Task 6: Presentation Slideshows in Action With a classmate, look at the following presentation slides on your worksheet, and identify potential weaknesses of each. Discuss possible solutions for improvement: Weakness: ‘ information dump’ - too much content Tip 2: present content in manageable chunks; introduce using point form or short sentences
Task 6: Presentation Slideshows in Action With a classmate, look at the following presentation slides on your worksheet, and identify potential weaknesses of each. Discuss possible solutions for improvement: Weakness: ‘no instructions’ - lack of clear purpose or guidelines Tip 3: ensure there is an educational purpose, with clear steps/instruction displayed
Task 6: Presentation Slideshows in Action With a classmate, look at the following presentation slides on your worksheet, and identify potential weaknesses of each. Discuss possible solutions for improvement: Weakness: ‘missing examples’ - grammar support needed Tip 4: give clear examples of language use; students are better able to model examples
Task 6: Presentation Slideshows in Action With a classmate, look at the following presentation slides on your worksheet, and identify potential weaknesses of each. Discuss possible solutions for improvement: Weakness: ‘design distraction’ - poor fonts/ choices, no consistency Tip 5: use font size 24-30 for most text; use clear, colorful, relevant images; avoid sensory overload
Task 6: Presentation Slideshows in Action With a classmate, look at the following presentation slides on your worksheet, and identify potential weaknesses of each. Discuss possible solutions for improvement: Weakness: ‘no interaction’ - lack of student discussion Tip 6: encourage interaction where possible; problem-solve, discuss issues, check answers
Task 7: Create Your Own Slideshow Now that we have discussed the educational use of presentation slideshow and explored effective techniques, let’s try to create our own slideshow. Remember our tips: 1. Use vocabulary in context 2. Present content in manageable chunks 3. Give clear guidelines and instructions 4. Give clear examples of language use 5. Use good, consistent design sense 6. Encourage interaction where possible
For Next Class In our next class, we will study a new topic on “Unit 3: Audio.” Subsequently, please: 1. print out the pdf file “Unit 3: Audio” from our website. 2. bring a written script of something that you want to record (such as a story, a joke, etc.). We will be looking how to edit audio and recording your own audio.