Download
1 / 87
870 likes | 1.14k Views
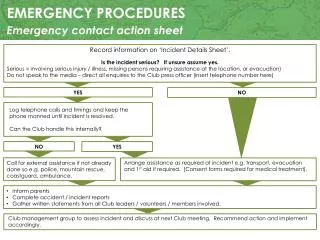
Emergency Procedures Module 3. Dr. Laney Nelson . Dressings . Occlusive Air tight seal for chest wounds Compressive Thick usually sterile for blood control Trauma 5 X 36 thick absorbent sterile, serious widespread injury Adhesive Strips Band aide Adhesive Tape Steri strip's .

E N D
Emergency Procedures Module 3 Dr. Laney Nelson
Dressings • Occlusive • Air tight seal for chest wounds • Compressive • Thick usually sterile for blood control • Trauma • 5 X 36 thick absorbent sterile, serious widespread injury • Adhesive Strips • Band aide • Adhesive Tape • Steri strip's
Gauze Pads • 2 X 2 • 4 X 4 • 4 X 8 • Pads and Rolls • Rolls usually non sterile
Bandages • Can use anything that has the capability to • Hold dressing in place • Apply pressure to dressing • Hold the edges of a wound together • Support a injured part in place • Prevent and reduce swelling
Pressure bandages • Always begin distal to bleeding • Always use bottom up philosophy • Capability refill technique • If bandage is painful its to tight • Appendage beyond bandage if cold to tight • Skin beyond bandages Is tingling • Victim cannot move fingers or toes
Cravat Bandages • Use any material and fold into a 4” bandage • Multiple layers to increase and evenly distribute pressure on wound
Triangle Bandages • Can be apply to just about any body part • Can also be folded to create a cravat • Examples of evenly applied cravat to body parts
Bandages Soaking Though • Add another bandage on top so as not to disturb clot • Spread out next layer to distribute more pressure • Make sure not to loose so to slip and disturb clot • No lose ends so it doesn't get caught on debris • Tips of fingers and toes showing to check for refill
Splints • Always bandage into the position you want the body part to remain • Anatomical positioning
Improvisation is Required • Hand inside shirt • Pillows / pillow cases • Towels • Bed sheets • Sanitary napkins • Diapers • Belts / neckties • Shirt tails pinning • Electrical wire wraps
Pressure Dressing • Big and bulky • Extend beyond the wound • Evenly distributed pressure • Small bandages • wires • Monitor pain, numbness and discoloration
Slings • Keep in anatomical position if possible • Keep apex at fulcrum of joint • Avoid increased angular velocity if moving • Make sure support of top strap is on uninjured side
MSK Injuries • ABpCDE • MNOPQR • RICE • Rest, Ice, Compression, elevation to heart level • Dislocation vs. Fracture • Manage all Dislocations as fractures
All traumatic Dislocation • Have a fracture somewhere • Therefore splint to protect the unseen • Rule is always a fracture until proven differently
Application of Ice • Immediately apply ice to a MSK wound • If no ice then cold or ice water for 20-30 minutes every 2 hours • Continue for 24-48 hours • Huntington's response • ice and heat at 20 minutes • Chemical activated cold pack • Caution for frost bite
Raynaud’s or Circulatory Disease • Ice is Contraindicated • victim has prior cold sensitivity • Prior Frost bite • Cold allergy • If you do not know then add ice
Dislocations • As Chiropractors do you posses a firm knowledge of all joint movement and function? • If you find yourself in a compromised position delivering emergency aid without a distal pulse what are you going to do? • What if they slip and fall outside your office
Metacarpal bone fractures • Nail bed is turned to side • Dislocation will always carry a flick of bone with it • Splint by “buddy tape” • Anatomical Snuff Box • Scaphoid
Priority of Fractures • Spinal • Fractures of head and rib cage • Pelvic Fractures • Lower Limb Fractures • Upper Limb Fractures
Fractures • Open • Closed • Observational Signs • Shortening of bones • Angular deformity • Shape and swelling • Pain and increased temperature at site • Crepitus • Joint Lock • Victim will guard
Multiple Trauma Victims • Bull riders drug hung up in the rope • Tornado Victims • Car pedestrian accidents • Motorcycle accidents • Be on the look out for more than one fracture
Pelvic Fracture • High Percentage of Fracture to the spine • Splint before ice • Splint before elevation • Keep closed from becoming open • Minimize damage to soft tissue • Diminish pain which reduce shock
What is you have not distal pulse? • Cut Clothing at seams without movement • Remove jewelry without movement • Wipe away any dirt or debris • Irrigate exposed bone with clean water • Cover any open wounds • Assess blood and neuro levels • Accelerator test, squeeze tests • Pulse and capillary refill • Decide angular deformity then apply traction • Do not correct deformity, restore blood flow
Positioning for blood flow • Do not push bones back into skin • Avoid excess pressure on the skin • You are not correcting deformity, you are restoring blood flow • 2-3 hours without blood flow will result in survival of limp • Do not attempt to unlock a joint
Colles’s and Smith • Collies: • Fall on palm with the wrist extended • Smith’s: • Fall on the back of hand with the wrist flexed • Use SAM splints • Splint writs and elbow • Capillary refill a must • Usually fracture carpal bone
No splint if increased pain Immobilize joint above and below In position you found it in Remove clothes Remove jewelry Cover all wounds Position for pulse Irrigate open bone ends Never replace protruding bones Splint to prevent pressure Longer than appendage When in doubt splint Rules for splinting long bones
Rules for Splinting Joints • News papers • Magazines • Pillows
Sports and Recreational Injuries • Fractured Clavicle • Figure 8 • Colles’s & Smith’s • AC separation • Grade 1,2,3 • Dislocated Shoulder • Dislocated Elbow
Shoulder Dislocations • Shoulder and arm longer • Outside of shoulder is flattened • Can’t lift the arm • Head of humerus in armpit