Download
1 / 23
230 likes | 454 Views
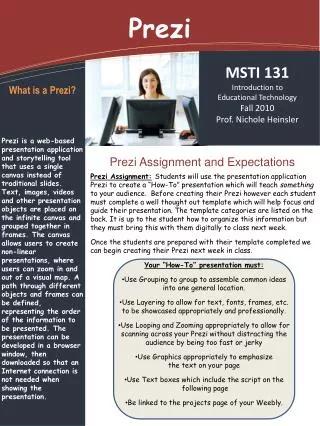
Prezi. A Powerful Way to present Multimodal Presentations. A Mind Map Presentation. A Prezi presentation is like creating a mind map. It is created on a blank canvas and you decide where the information goes on this canvas. Keep It Simple Less means more - 5 x 5 Rule (see below)

E N D
A Mind Map Presentation A Prezi presentation is like creating a mind map. It is created on a blank canvas and you decide where the information goes on this canvas.
Keep It Simple • Less means more - 5 x 5 Rule (see below) • Use of Images Presentations • A slide should only hold about 5 lines of information, each with about 5 words. Making several slides is better than fewer slides that have more writing on them.
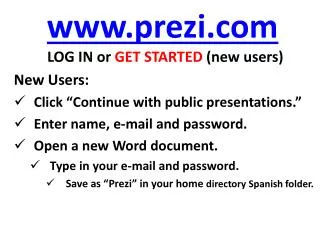
To begin you will need to create your own account. Go to http://prezi.com • Select Sign up in the top right corner • Sign up to the teacher/student account • Once you have finished signing up you will be sent a confirmation • email. • Watch the following video to learn some of the basic features within Prezi. Signing up to Prezi
Creating a Prezi Presentation • Once you are logged in select ‘New Prezi’ • Select the template you wish to use • To view the full presentation click on the first frame • Move between the different frames of your Prezi by clicking on the relevant frame in the menu on the left.
Click on the frame you wish to edit. Your Prezi will then zoom to this slide. Editing Frames • Adding/Editing Frames • Zoom to frame – allows you to zoom in on the frame • Delete - allows you to remove the frame • Frame symbol - allows you to change the style of the frame
Clicking the square in the corner of your frame allows you to drag the frame to the shape you wish to use • Clicking the hand allows you to move your frame around the canvas • The + and – allows you to set the size of the frame • You can also rotate the frame by hovering over the square until you see a circle. Click on the circle and rotate your frame
Click, ‘Click to add text’. A menu bar will appear where you can move between the different types of text set for your Title, Subtitle and your body text. • To change the colour of the text click on the colour square Adding text to your Prezi • By clicking on the arrow you will be given some more options – Bullet points, alignment and indent • To make your text box bigger, click the 2 arrows and drag • To increase the size of your font, click on the circle and drag.
To change the font within your Prezi click on templates and select Customize Current Theme • You can also choose a different template for your presentation if you have changed your mind about your original template. • Use the Theme Wizard to select your background, text, frame and arrow colours. Click the ‘Next’ button to move through the various options. Once you are finished, select ‘Done’.
To add more text boxes to your frame or canvas, left click where you want the text to appear and it will create a new textbox • To delete a text box you need to group the area you want to delete. Hold down Ctrl and click on the text. The following box will appear on your screen. • Click delete to remove the text box. You can also edit, rotate, resize the text this way. • To edit/delete multiple text objects at once, hold down Ctrl and click on each object so the box appears around all objects.
Adding Images, You Tube Videos, Music to Prezi • Prezi allows you to add images, You Tube videos, Music, files from your computer, PowerPoint presentations and diagrams to your presentation. Click on the Frame where you wish to add an object and then click on ‘Insert’ • Images – you can add these directly from Google by searching within Prezi or from your files
Symbols & Shapes – select the symbol or shape you wish to use from the various options • Diagram – select the template for your diagram from the different choices. • You Tube Videos – Once you have located your You Tube video, paste the URL into the required field and this will embed the You Tube video into your presentation. • Adding Background Music – Select appropriate music from your files to be inserted
Adding Voice-over to Path – Select the audio you wish to play over that frame from your files • From File – this allows you to add images, video files, PDF’s, PowerPoints that you have saved in your files • From My Collection – as you add images, videos, files etc. to your Prezi you can right click on an object and select ‘Add to My Collection’. This allows you to have access to these files within Prezi if you want to reuse them in different presentations. • PowerPoint – Insert a PowerPoint from your files • Any of these objects can then be rotated or resized just like frames. (See slide 8)
Adding more Frames to your Prezi • To add more frames to your presentation, click Frames & Arrows Select ‘+ Add Frame’ and Prezi automatically creates a frame for you and will add this frame to the end of your presentation. It will appear as the last frame in the menu on the left. • Alternatively you can draw your own frame by clicking anywhere on the canvas.
You can also create a Frame within a Frame to draw your audiences attention to certain aspects of your presentation. • From the Frames & Arrows menu, you will need to draw your own frame. • Select the type of frame you wish to draw and on the canvas draw the frame within an existing one. • Prezi will then insert this Frame in your Frame menu on the left in the next path position. Eg. If my rectangular frame was Path 3, the circle frame will be viewed at the Path 4 position
To change the position of a frame (the Path), click on the relevant frame within the menu on the left and drag it to the position you want. • To edit the path of your presentation click ‘Edit Path’. You can then click on the blue path points and drag them to the positions you want. • If you want to return to an earlier slide, (add an object to the path) click on the object within the canvas and the object will be added to the last frame. Once you are finished click ‘Done’. Editing your Prezi’s Path
To animate your objects, whilst editing the path, click on the star that appears next to the objects path number. • Click on the objects within the frame you wish to animate in the correct order. A green star along with a number will be placed beside these objects. • To view the animations, click the ‘Play’ button • Once you are happy with these, click ‘Done’
+ allows you to zoom in on objects • - allows you to zoom out from objects • If you hover your mouse over on the right of your canvas you will notice another tool bar • The Home button shows you the overview of your canvas – zooms out so you can see everything Other Features
To view your presentation click ‘Present’ Use the arrows that appear to move through the presentation. If you wish to zoom in on an object during your presentation, click on the object and Prezi will zoom in. When you click the arrow it will then zoom out before moving to the next frame. • To exit your presentation press Esc. Other Features • Your Prezi’s are automatically saved. Check the time your Preziwas last saved. You may also need to click the save button before exiting. • Use the Undo/redo button when editing your Prezi
By clicking on ‘Exit,’ Prezi will save your work and exit. • For more information on creating and improving your presentation see the Prezi Support area. • Share your presentation with others so they can edit/view your presentation Other Features
Select the Prezi you are presenting from the ‘Your Prezi’ section once you have logged in. • Present online – This feature will give you a URL for your Prezi. You can share the link with your audience if you wish for them to follow along while you present • Download – downloads your presentation to present offline • Save a copy – this will save a copy of your Prezi into ‘Your Prezi’ • Share – obtain a link for your Prezi or an embed code so others can view your presentation • Private - set your presentation to Public or Private • Delete your Prezi by clicking the Trash Can. To present your Prezi