Download
1 / 17
170 likes | 307 Views
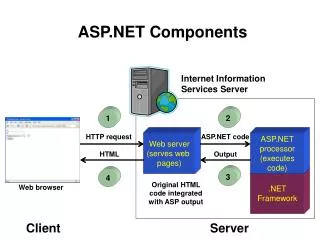
Configuring your computer as a web server to host ASP.NET pages. 02/14/03 3:00pm. Two Ways to Go About This. Install IIS Install VS.NET Visual Studio.NET will configure IIS for ASP.NET pages. Install VS.NET Install IIS It is your responsibility to properly configure IIS for ASP.NET.

E N D
Configuring your computer as a web server to host ASP.NET pages 02/14/03 3:00pm
Two Ways to Go About This • Install IIS • Install VS.NET Visual Studio.NET will configure IIS for ASP.NET pages • Install VS.NET • Install IIS It is your responsibility to properly configure IIS for ASP.NET • Iron out quirks related to permissions
Installation Step • Download URLScan 1.0 and 2.5 • Disconnect from network • Install IIS • Install URLScan 1.0 • Install URLScan 2.5 over 1.0 • Give correct permissions to wwwroot folder • If installing IIS after VS.NET, configure IIS for ASP.NET pages • Reconnect to network • Visit Windows Update
Downloading URLScan • URLScan 1.0 http://download.microsoft.com/download/iis50/Utility/1.0/NT45XP/EN-US/UrlScan.exe • URLScan 2.5 http://download.microsoft.com/download/iis50/Tool/Urlscan/NT45/EN-US/URLSCAN.EXE
How To Install IIS • Remember to be disconnected from the network at this point. Stay disconnected until URLScan 1.0 and 2.5 have been installed. • Start -> Settings -> Control Panel -> Add / Remove Programs -> Add/Remove Windows Components • Select the IIS checkbox (you can hit details to see if the FTP server / SMTP server will be installed) • Hit Next to finish the Wizard
Installing URLScan • Execute the downloaded files by clicking on them. • First install URLScan 1.0, then install 2.5 • The configuration files for URLScan can be found at C:\WINDOWS\system32\inetsrv\urlscan • Look for URLScan.ini Any change in URLScan.ini will require IIS to be restarted. This can be done by right clicking the computer name in the IIS management console, then selecting Restart IIS from the All Tasks menu. The IIS management console can be obtained from the Administrative Tools in Control Panel (look for the Internet Information Services Icon)
How to configure IIS for ASP.NET • Execute aspnet_regiis.exe -i • To execute this open the “Visual Studio.NET command prompt” from the “Visual Studio.NET Tools” • Give correct permissions to iusr_<machinename> to wwwroot folder • Give correct permissions to ASPNET to all folders in the path to framework folder
Permission Quirks • IIS needs to have security access to content in c:\inetpub\wwwroot\ folder • C# compiler needs to have access to framework folder when running under aspnet_wp.exe • C# compiler needs to have access to the web folder where the ASP.NET page is and all folders up stream until you hit wwwroot.
Before you can fix permissions Windows XP by default does not uses the permission mechanism explained in this presentation. To use this permission mechanism: Open up an explorer window (the folder is irrelevant) Go to Tools->Folder Options->View Scroll all the way down until you see "Use simple file sharing (recommended)" Uncheck it. Hit Apply, then hit Apply to All folders That's it, After that, the security tab should appear,
To Fix Security Issues with IIS Give IUSR_<machinename> the standard permissions to c:\inetpub\wwwroot (apparently only read is enough) • Open Explorer • Navigate to c:\inetpub\wwwroot • Right click the folder name, select properties, select the security tab • Click on Add ->Advanced -> Find Now • Find the IUSR_<machinename> account, click on it, click Ok to exit the search, then Ok to add the account. • Click Ok to close the properties window To enable IIS to execute ASP.NET pages, the ASPNET account will have to be granted accessONLY to the wwwroot folder and the folder where the ASP.NET pages reside. It is not necessary for the wwwroot permissions to inherit into subfolders. (see next slide for method) If you give ASPNET access to the whole wwwroot folder, the previous step is not necessary
To Fix Security Issues with IIS • Give ASPNET the standard permissions to each folder in the way to the framework. (Be careful to only give it permissions to each folder on the way to the framework and not the whole drive) • Open up explorer, click on the C: Local Disk • Apply Steps 3,4,5 from last slide to add ASPNET to the accounts list, DO NOT CLICK OK to close the properties window • Click on Advanced • On the new window, click on the ASPNET account, then click on Edit • For the “Apply onto:” field, select “This Folder Only” • Repeat the procedure for all the folders on the way to the Framework, which could be at : C:\WINDOWS\Microsoft.NET\Framework\v1.0.3705
How to configure a folder to execute ASP.NET Pages • If you simply copy .aspx pages into a folder, IIS will give you the content of the page instead of executing it. • For IIS to execute ASP.NET pages, the folder must be made a virtual folder.
How to create a Virtual Folder? 1) Open the IIS Management Console (Control Panel -> Administrative Tools -> Internet Information Services) 2) Expand the Web Sites branch until you get to the desired web site 3) Right click on the desired web site, select New -> Virtual Directory 4) Choose the Alias (that is the name for the web folder) 5) Choose the path to the actual disk folder. (The path need not reside inside c:\inetpub\wwwroot\ , in which case, IUSR_<machinename> and ASPNET will have to be granted permissions to that folder) 6) Select the permissions (add Execute for ASP.NET)
Virtual Folders, What is next? • Once the virtual folder has been created, ASP.NET pages created in another computer can be copied to the disk folder used as the virtual folder. • Now IIS will EXECUTE ASP.NET pages.
Troubleshooting Steps • It is a good practice to kill the aspnet_wp process, hit CTRL+ALT+DEL then TaskManager, click on the process tab, click on the name column, select the aspnet_wp task, then click “End Process” • Clearing the ASP.NET Cache helps sometimes, it can be found at: C:\WINDOWS\Microsoft.NET\Framework\v1.0.3705\Temporary ASP.NET Files
Contact Information • Alejandro Simon asc0_cate@hotmail.com http://asc0.dynup.net/dotnet/
Download Places • URLScan 1.0 http://download.microsoft.com/download/iis50/Utility/1.0/NT45XP/EN-US/UrlScan.exe • URLScan 2.5 http://download.microsoft.com/download/iis50/Tool/Urlscan/NT45/EN-US/URLSCAN.EXE