Wireless Configuration and Java-driven Remote Execution
190 likes | 327 Views
Recitation 2 April 2 2008. 15-496 Spring 2008. Wireless Configuration and Java-driven Remote Execution. Haowen Chan Carnegie Mellon University. Wireless network setup: driver. MadWifi: linux kernel device driver for wireless LAN chipsets from Atheros More information www.madwifi.org

Wireless Configuration and Java-driven Remote Execution
E N D
Presentation Transcript
Recitation 2 April 2 2008 15-496 Spring 2008 Wireless Configuration and Java-driven Remote Execution Haowen Chan Carnegie Mellon University
Wireless network setup: driver • MadWifi: linux kernel device driver for wireless LAN chipsets from Atheros • More information www.madwifi.org • Implemented as linux kernel module • Can use modprobe to load/unload the driver module • Load the driver module • modprobe ath_pci • Unload the driver module • modprobe –r ath_pci • Typically you never have to do this since the machines are booted and loaded with the module on swap-in
Assignments only make use of ad hoc mode Wireless network setup: layer 2 • With 802.11 a/b/g standards, wireless cards can operate in different mode • Infrastructure mode vs. Ad Hoc mode • Infrastructure mode (currently unavailable on emulator) • One master (access point), multiple slaves (wireless devices) • Wireless devices cannot communicate with each other directly, but only via the access point • Application: wireless LAN • Ad Hoc mode • Every node can communicate directly with every other node in range • Application: personal area network, mobile ad-hoc network, wireless mesh network
Wireless Configuration Commands • iwconfig, iwpriv • Configure Wireless Driver Settings (madwifi) • wlanconfig • Configure Wireless Lan settings • ifconfig • Configure the interfaces • For exhaustive documentation, see documentation here: • http://madwifi.org/users-guide/users-guide.html • For assignments, example commands will be given. • If you mess up your configuration, you can start over: • > reboot
Wireless Configuration Examples • Set the card operate in 802.11b • iwpriv ath0 mode 2 • Set essid • iwconfig ath0 essid my-adhoc-net • Operate in channel 6 • iwconfig ath0 channel 6 • Set transmission power • iwconfig ath0 txpower 19 • Set bit-rate • iwconfig ath0 bitrate 11M
Disclaimer • Since the nodeDaemon functionality was not active at the time of creation of these slides, the examples on these slides may contain errors • Updated (working) examples will be posted at: • http://www.cs.cmu.edu/~haowen/15491/Recitation02/code • No live demos today
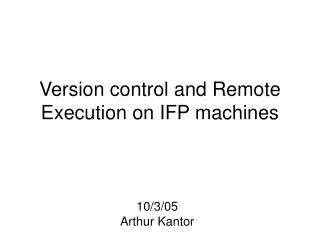
Remote Process Activation issue commands, e.g. “Ping 10.1.1.2” • nodeDaemon loaded on experiment nodes • Java script communicates with them via command network to execute commands reports results of execution nodew1 running nodeDaemon emucontrol-1 running emuRun
Loading nodeDaemon • Before emuRun, login to nodes and type: • haowen@nodew1> rmiregistry & • haowen@nodew1> nodeDaemon loads daemon and waits for emucontrol-1 • Note: if you terminate nodeDaemon and want to start it up again, you don’t have to load rmiregistry a second time since it is already resident from your first run. • Or, use “nodeDaemon &” to retain access to shell • Or, load it from emucontrol-1 with the script “startDaemon” • haowen@emucontrol-1> startDaemon nodew1
DaemonCommunicator Methods • Typically execProcess_XXXX etc. • See Javadoc under DaemonCommunicator class • DaemonCommunicator member variable in SimpleUserClass is dComm. • These methods are the only methods that refer to the actual machine name rather than the user-defined node name • Because they have to send commands to the actual machine • More on next slide...
Basic ExecProcess Method • execProcessAndWait( String nodeName, String cmd) • Connects to nodeName and executes cmd • Returns when the command process finishes • Example: • execProcessAndWait(“nodew1”,”sudo iwconfig ath0 channel 6”);
Remote Execution Example 1 public class RemoteExec extends SimpleUserClass { protected String nodew1machine; public void start(String[] args) { System.out.println(“Sending config command to node 1”); dComm.execProcessAndWait(“nodew1”, “sudo iwconfig ath0 channel 6”); System.out.println(“Config command done."); } catch (Exception e) { e.printStackTrace(); } } }
Logging Output of the Command • Can dump output of the command into a file on emucontrol-1 (CentralLogIO) or on node (NodeLogIO) • Example: • execProcessAndWait_CentralLogIO(node, command, output dump file, error file); • execProcessAndWait_CentralLogIO(“nodew1”, “iperf –c 10.1.1.1 -u”, “clientresults01.txt”, “clienterrors01.txt”); • Log files are created afresh (not appended) on each new run • Use different filenames for different runs
Executing in Background • Start a process on the node then continue to process the rest of the experiment • Without waiting for the process to terminate • Call a callback function when the process finally terminates • E.g. Start an iperf server and then start the iperf client • Example: • execProcess_CentralLogIO(node, command, output file, err file, ProcListener class with method processExited); • execProcess_CentralLogIO(“nodew1”, “iperf –s –u –i1”, “serverresults.txt”, “servererrors.txt”, this); • In the above example, the method processExited in the current class will be called when the server terminates • Can terminate nodeDaemon by hand on SSH terminal with node (CTRL-C)
Remote Execution Example 2 public class RemoteExec extends SimpleUserClass implements ProcListener{ protected String nodew1machine; protected ProcessID myProc; public void start(String[] args) { System.out.println(“Sending command to node 1”); myProc = dComm.execProcess_CentralLogIO(“nodew1”, “sleep 10s”, “results.txt”, “errors.txt”, this); System.out.println(“Command sent. Process started:“+myProc); System.out.println(“...now we can do other stuff..."); } catch (Exception e) { e.printStackTrace(); } } // When the “sleep” command completes, this method is called. public void processExited(ProcessID procID, int code) { System.out.println(“Terminated: proc: "+ procID + " with code "+ code); } }
Terminating Processes • Iperf server never stops... • Kill it by hand • “killall -9 iperf” • Can send this as a command to execProcess_XXXX
Parsing Iperf Output • Typically: • start one copy of iperf server on the destination node (with periodic reports –i 1), leave it running for entire experiment • change channel characteristics; run iperf client to test; repeat. • Creates one big log file on server side • If server does not detect end of a connection, it may munge multiple tests together • You have to parse it yourself by hand • Make sure sufficient time between tests to separate data • Example: • Two consecutive Iperf tests each 5s • Iperf server misses the end of the first test...
First connection Total transfer = 294.8 KB Data rate = transfer/5s = 58.96 KBps = 471 Kbps ------------------------------------------------------------ [ 3] local 10.1.1.1 port 5001 connected with 10.1.1.2 port 32771 [ ID] Interval Transfer Bandwidth Jitter Lost/Total Datagrams [ 3] 0.0- 1.0 sec 128 KBytes 1.05 Mbits/sec 0.041 ms 0/ 89 (0%) [ 3] 1.0- 2.0 sec 128 KBytes 1.05 Mbits/sec 0.192 ms 0/ 89 (0%) [ 3] 2.0- 3.0 sec 38.8 KBytes 318 Kbits/sec 0.121 ms 0/ 27 (0%) [ 3] 3.0- 4.0 sec 0.00 Bytes 0.00 bits/sec 0.121 ms 0/ 0 (nan%) [ 3] 4.0- 5.0 sec 0.00 Bytes 0.00 bits/sec 0.121 ms 0/ 0 (nan%) [ 3] 5.0- 6.0 sec 0.00 Bytes 0.00 bits/sec 0.121 ms 0/ 0 (nan%) [ 3] 6.0- 7.0 sec 0.00 Bytes 0.00 bits/sec 0.121 ms 0/ 0 (nan%) [ 3] 7.0- 8.0 sec 0.00 Bytes 0.00 bits/sec 0.121 ms 0/ 0 (nan%) [ 3] 8.0- 9.0 sec 0.00 Bytes 0.00 bits/sec 0.121 ms 0/ 0 (nan%) [ 3] 9.0-10.0 sec 0.00 Bytes 0.00 bits/sec 0.121 ms 0/ 0 (nan%) [ 3] 10.0-11.0 sec 0.00 Bytes 0.00 bits/sec 0.121 ms 0/ 0 (nan%) [ 3] 11.0-12.0 sec 126 KBytes 1.03 Mbits/sec 0.025 ms -88/ -118 (75%) [ 3] 11.0-12.0 sec 88 datagrams received out-of-order [ 3] 12.0-13.0 sec 128 KBytes 1.05 Mbits/sec 0.223 ms -89/ 89 (-1e+02%) [ 3] 12.0-13.0 sec 89 datagrams received out-of-order [ 3] 13.0-14.0 sec 128 KBytes 1.05 Mbits/sec 0.277 ms -29/ 89 (-33%) [ 3] 13.0-14.0 sec 29 datagrams received out-of-order [ 3] 14.0-15.0 sec 128 KBytes 1.05 Mbits/sec 0.121 ms 0/ 89 (0%) [ 3] 15.0-16.0 sec 128 KBytes 1.05 Mbits/sec 0.048 ms 0/ 89 (0%) [ 3] 0.0-16.0 sec 937 KBytes 479 Kbits/sec 0.038 ms -206/ 447 (-46%) [ 3] 0.0-16.0 sec 206 datagrams received out-of-order Time between connections Second connection Total transfer= 638 KB Data rate = 127.6 KBps = 1 Mbps Garbage! Don’t use this!!
Manual Path Controller • See Javadoc for class ManualPathController • Instantiate it with • mPathController = new ManualPathController(emulator); • Controls link properties between nodes • LossModel=Manual and FadingModel=Null must be specified in XML file • e.g. doesn’t work for logDistance loss models
ManualPathController Example • setPathLoss(src, dest, path, loss) • Set path = 0 (always) • sets the loss between src and dest nodes to be equal to loss Db. • This sets “loss” so loss is positive, bigger loss = weaker signal • Example • Set the loss from nodew1 to nodew2 to be 70Db. mPathController = new ManualPathController(emulator); srcNode = world.getNode(“nodew1"); destNode = world.getNode(“nodew2"); mPathController.setPathLoss(srcNode, destNode, 0, 70);