Download
1 / 23
240 likes | 278 Views
Types of Reactions. Year 6 2017. Summing Up States. Reversible (physical) changes are reversible as no new products are made. Irreversible (chemical) changes are irreversible as new products are made. Reversible and Irreversible Changes.

E N D
Types of Reactions Year 6 2017
Reversible (physical) changesare reversible as no new products are made. Irreversible (chemical) changesare irreversible as new products are made. Reversible and Irreversible Changes • Which of these changes are reversible or irreversible? • Burning • Evaporation • Rusting • Exploding • Freezing • Dissolving • Melting • Condensation
Home Learning Option A: Science Masterchef You are auditioning for ‘Science Masterchef’. You may choose to work with yourself or with a partner in Year 6. Film yourself cooking your winning recipe. Identify whenever a physical, reversible or chemical, irreversible change has occurred with an explanation for your identification. You may do this in your script or tagged using ThingLink. Ensure that your Science Masterchef movie: • Specifies the recipe name and the cook(s) • Includes at least one physical change and one chemical change • Does not exceed 10 minutes • Is uploaded onto the Class Blog under ‘Social Stream’ on the due date
Home Learning Option B: Science Mini-Lesson You are teaching your parents (or related adult) about physical, reversible versus chemical, irreversible changes. Your mini-lesson: • Should be planned in advance to suit the learning needs of your parent students • Should explain what are physical, reversible versus chemical, irreversible changes, including definitions, examples, similarities and differences • May include practical experimentations, props and/or test quizzes • Should not exceed 20 minutes • Will be given feedback by your parent students using the marking key given to you by your Science teacher
Reversible changes: Cooking Predict, then identify the reversible physical changes in these recipes. Gummi Bears Dehydrated bananas
Dissolving vs Melting Melting Solid changes into a liquid Dissolving One substance’s particles breaks apart and spreads out in another substance
Reversible changes: Dissolving Question: Which liquid will gummi bears dissolve most in: water, vinegar or oil? Hypothesis: If … , then… … because… Variables that were: • Changed (Independent) … • Measured (Dependent) … • Kept the Same (Controlled) … Results Table: Conclusion:
Reversible changes: Recycling Predict, then identify the reversible physical changes in these recycling processes. Plastic to Polyester Recycling Rubbish
Science as a Human Endeavour: Landfill Rubbish into Fuels The Solution? The Landfill Problem
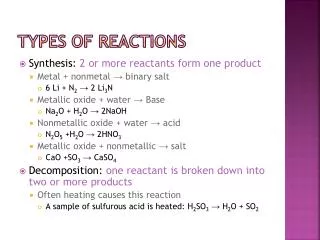
Signs of Chemical Reactions There are several signs that usually indicate a chemical, irreversible change is taking place: • Change in temperature • Change in colour • Gas given off (bubbles) • Solid formed (precipitate) This is as new productshave been produced.
Irreversible Change: Combustion To produce any fire three things are always needed: • FUEL: something to burn • OXYGEN: this comes from the air. • HEAT: Nothing will burn if the temperature is not high enough How would you extinguish a fire?
Chemical Reaction: Combustion Combustion occurs when a fuel substance burns with oxygen, releasing heat and light energy. It is said to be exothermic (gives off heat). PRODUCTS REACTANTS
Combustion: Bunsen burner Gas + Oxygen REACTANTS PRODUCTS Carbon dioxide + Water + Impurities If there is lots of oxygen, there will be less impurities [the Bunsen flame will be hot, clean and blue] If there is less oxygen, there will be more impurities [the Bunsen flame will be cooler, sooty and orange]
Science as a Human Endeavour: Burns What would you do as a first aider? What could you do as a burns surgeon?
Irreversible changes: Cooking Predict, then identify the irreversible chemical changes in these recipes. Bread Fish Fingers and Chips Butty
Review: Teacher Demonstration REACTANTS PRODUCTS Lead nitrate + Potassium iodide Lead iodide + Potassium nitrate
Review: Practical Stations Work Station 1 Instructions: Wear safety gear and clear a safe working area. Use the funnel provided to put 1 tablespoon of bicarbonate soda into the balloon. Take an empty conical flask and use the funnel to put 50mL vinegar into the bottle using the measuring cylinder. Carefully stretch the balloon opening over the bottle. Don’t let the bicarbonate soda spill into the vinegar until the balloon is firmly stretched over the bottle’s neck. Wait until all group members are watching then lift the balloon to let the soda fall into the bottle. Upon completion, rinse the funnel and measuring cylinder in preparation for the next group.
Review: Practical Stations Work Station 2 Instructions: Wear safety gear and clear a safe working area. Light a tealight candle on top of a heatproof mat. Observe the wick and the wax for 2-3 minutes. Blow out the flame. Pour the molten wax into a beaker of cold water. Observe the wax in the water.
Review: Practical Stations Work Station 3 Instructions: Wear safety gear and clear a safe working area. Half fill a jar with the cream provided. Add one-eighth teaspoon of salt. Tighten the lid as firmly as possible. Within the group, take turns shaking the jar. Shake in one direction (ie. up and down) for four full minutes. Set the timer and shake for one minute each. Open the jar. Butter should have formed. Ensure the workbench is tidy before leaving for the next station.
Review: Practical Stations Work Station 4 Instructions: 1. Wear safety gear and clear a safe working area. 2. Half-fill a beaker with hot, steaming, coloured, salty water. 3. Place a watch glass over the beaker. 4. Observe what has happened onto the watch glass.