Download
1 / 22
220 likes | 225 Views
Approving, Posting, Reopening NOV Requisitions For HR Professionals. Internal Resourcing. Agenda. 01 Creating an NOV Requisition 02 Editing an NOV Requisition 03 Closing or Cancelling an NOV Requisition. Creating an NOV Requisition. 1. Creating an NOV Requisition.

E N D
Approving, Posting, Reopening NOV Requisitions For HR Professionals Internal Resourcing
Agenda • 01 Creating an NOV Requisition • 02 Editing an NOV Requisition • 03 Closing or Cancelling an NOV Requisition
Creating an NOV Requisition • From the Hiring menu, go to Reqs > Add New Req > • choose a) Job req template: NOV Requisition • b) Language (s) from the drop down menu and • click Add New • NOTE: • Open Resourcing support the creation of requisition • in 4 languages: English (US), Dutch, French (Canadian) • and German.
Creating an NOV Requisition • To get started, choose the correct batch from the • Job Code (Batch) menu • Please choose appropriate selection for Position • Information whether it’s Shell Position or • NOV/3rd Party • Please enter Shell Position number • NOTE: Please ensure that you have the Shell Position • ID prior to creating the requisition.
Creating an NOV Requisition • By entering Shell Position number, it auto populates • Position Title, Job Title and Job Group • Please choose appropriate selection for Job Skill Pool • Group and Job Skill Pool • Please indicate number of positions • NOTES: • If you are posting for multiple positions, • please enter the Shell Position Number for one of the • positions in Shell Position Number field and enter • the total number of positions in the No. of Positions field • The HR advisor will have the ability to add the • remaining position numbers during the job offer
Creating an NOV Requisition • You can choose job description from job library • and it will auto populate the information on Purpose & • Accountability, Dimensions and Skill & Requirements • NOTES: • If you don not see the position that you would like to • use in the job library drop down, please kindly click on • “I” icon as there is another job library in Share Point with • additional information that you can copy and paste into • this req form • As for those auto pre populated information, you can • always edit by clicking and typing in on any field • and hit save • You may also enter Additional Information about the position
Creating an NOV Requisition • In Hiring Manager field, please enter your own • name • Please fill in the following information on Position • Information as necessary: • Country of Work Location, Work Location, Business, • Line of Business, Present Company, Question on • Additional HR checks, Question on Preferred candidate • NOTE: If posting for a virtual role, please type in • virtual on this field
Creating an NOV Requisition • Please enter Maximum Terms & Conditions • NOTE: If you choose Expatriate or STIA, there • will be additional field popup for you to fill in • on Principal Reason and Name Approver • Next, please fill in the Flexible Work Options • and work schedule / shift if any • Please enter the Expected Start Date and • Closing Date • NOTE: Please ensure the Closing Date indicated • in the job requisition is aligned with the Removal • Date that you will be indicated in the next posting • screen
Creating an NOV Requisition 15. Please enter HR Business Partner Name in HR Business Partner field NOTE: HRBP is responsible in performing HR checks 16. Next, pleaseenter Selection Panel field NOTE: • Be sure to add HRBP again and the GSPM to the Selection Panel field • Any name entered in the fields HR Business Partner or Selection Panel will receive an email notification when the job is posted and at key points along the process
Creating an NOV Requisition • Again, you have to enter GSPM name • for approval and posting purposes • Notify upon approval completion – • Please add in your name so that you • receive notification once GSPM approved • the requisition • Next, on the “Turn off Autofilter notification for • this req” – Please leave it as it is • Batch: Do not change this as it is auto • populate based on what you entered in the • job code field and click Save to proceed
Creating an NOV Requisition • On the next screen, you can add a message • to GSPM and route the requisition for approval. • You may also tick on: CC: Req team so that relevant • notifications will be sent to Req team/Selection Panel • Click on Open Reqto continue to the posting • options page • You will receive a confirmation that the req has • been sent to GSPM for approval > please then • Click OK • You have now completed the MOR req creation
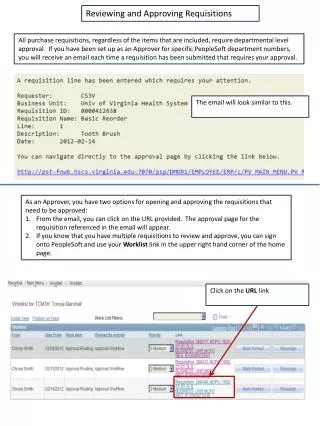
Notification Email • HRBP, GSPM and Selection panel members • will receive a system-generated notification upon • NOV req creation
KEY NOTES ON NOVREQUISITION CREATION • The GSPM will receive the notification that you have created a requisition • The GSPM will approve and post the requisition as per the MOR timelines • The requisition will appear under Pending until the GSPM approves it • After approval, the requisition will appear under Approved • Once the GSPM posts the requisition, it will appear under • My open reqs panel
Editing an NOV Requisition To edit an NOV requisition, go to your OR homepage > Quick Links > My Open Reqs. Tick the box at the side of the req ID you want to modify, then click the Actions drop down button and click Edit. You may also click the req ID hyperlink to view the requisition information and edit details. Change the information you want to update. Click Save button once done.
Editing an NOV Requisition Don’t forget to communicate any major change in the req to the candidates. NOTES: Only active (open) requisitions may be edited. Ideally, editing should occur before the Re-Org Approver has posted the requisition. An email is sent to the Hiring Manager, Shell HR Business Partner, Re-Org Approver and Selection Panel informing that the requisition has been edited.
Closing or Cancelling an NOV Requisition To close or cancel an NOV requisition, go to your OR homepage > Quick Links > My Open Reqs. Tick the box at the side of the req ID you want to close or cancel, then click the Actions drop down button and click Close or Cancel. You may also click the req ID hyperlink to view the requisition information and cancel the requisition on that page.
Closing or Cancelling an NOV Requisition Once you click Close or Cancel, you will receive a pop up window asking you to confirm your action. Click Yes button at the bottom of the page. Cancel button if you do not wish to proceed.
Closing or Cancelling an NOV Requisition You will receive an email that your requisition has been closed or cancelled. NOTES: You may only cancel or close a requisition if the applicants have been moved to the final status. If there is a pending status, the system will not let you close the requisition. All candidates under your MOR requisition must have one of the following HR Statuses: Re-Org- Regret Transfer initiated