Download
1 / 38
380 likes | 395 Views
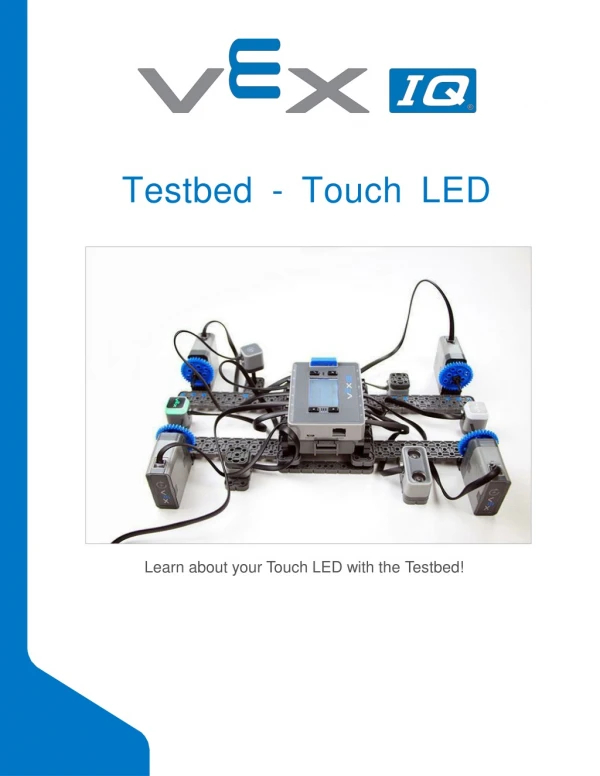
Testbed - Touch LED. Learn about your Touch LED with the Testbed!. Discover new hands-on builds and programming opportunities to further your understanding of a subject matter. The Completed Look of the Build. Testbed.

E N D
Testbed-TouchLED Learn about your Touch LED with theTestbed!
Discover new hands-on builds and programming opportunities to further your understanding of a subjectmatter.
The Completed Look of the Build Testbed The Testbed build will be used for investigating your SmartDevices.
Build InstructionTips • Steps 1–36: The blue box at the top of the step shows important information for the build. The number above the image of a part is the number of that part required in the step. There may be dimension information below the part to help identify which size touse. • Step 1: Count all pieces before starting your build, including sensors andmotors. • Step 4: Flip the build over after Step 3 to add the blue connector pins asshown. • Step 15: Flip the build over after Step 14 before adding the sensor as shown in thisstep. • Steps 21–26: These steps show you how to put together a single motor sensor group. You will build 4 of these intotal.
Touch LED 228-3010 Description This sensor can detect capacitive touch, such as the touch of a finger. It can also be set to display many colorvariations. • Touch LED228-3010 • CommonUses: • This sensor can be used to start or pause a program at the touch of afinger. • This sensor can be used to display different colors at different parts of aprogram.
Exploration • Now that you've finished the build and read about the function of the Touch LED, consider the Touch LEDfurther. • How do you think the Touch LEDworks? • How does a Touch LED Sensor improve the functionality of arobot? • How have you seen Touch LED's used in everydaylife?
Test your build, observe how it functions, and fuel your logic and reasoning skills through imaginative, creativeplay.
How it Works: Touch LED The Touch LED detects the physical properties of afinger Detecting Touches The Touch LED uses technology that detects small changes in the physical properties of its surroundings. It does this by measuring capacitance. Capacitance is a physical property of any object. It can be affected by what a thing is made of, or what it's shaped like. The air around us has a certain capacitance, an electrical circuit has a certain capacitance, and your body has a certaincapacitance. The Touch LED can detect this capacitance by sending an electrical signal and noting what comes back. In the image you can see that when the button is pressed, the purple response signal changes compared to the blue input signal. If the response signal is just right, it means there is a finger present, and the Touch LED sends a message back to the Robot Brain which means that it's being touched.
One advantage of checking for touch in this way is that a change in capacitance does not require that you touch the circuit directly, only that you get very close. As a result, the electronics in the Touch LED can be shielded with plastic and packaged along with more electronics, like the multi-color LEDs inside thedevice.
Touch LED Investigation Hardware/SoftwareRequired: 1. Preparing for theInvestigation VEXosUtility
Before beginning the investigation, use the Smart Device Check-up to ensure you have the latest firmware and that your devices are functioning properly. You can leave everything connected to the Testbed as is when updating yourfirmware. 2. Running theProgram Download and run the program found in the Hardware/Software requirements table above to your VEX IQ Robot Brain using ROBOTC orModkit. 3. Investigating the TouchLEDs LCD with Testbed - Touch LED programrunning • Look at the LCD on your Robot Brain while the program is running. The program is displaying one piece of data for each Touch LED on your TestbedBuild. • While paying close attention to theLCD: • Press each Touch LED multipletimes. • Are you able to determine what the data on the LCD screen represents? Record your results in your EngineeringJournal.
4. Determining theDifference Touching the Touch LED Sensor with afinger • The Touch LEDs are programmed to do something with their lights whenever they are touched, however each is programmed slightlydifferently. • While paying close attention to the lights on the TouchLEDs: • Touch the top of each Touch LED multipletimes. • Are you able to determine the difference in how each are programmed? Record your results in your EngineeringJournal.
5. Exploring CapacitiveTouch Touching the Touch LED Sensor withobjects • Similar to most touch screen displays, the Touch LEDs can sense capacitivetouch. • With the program running, pay close attention to the Touch LED lights and try: Touching the top of them with another piece in your VEXkit • Touching the top of them with apen • Touching the top of them with abattery • Touching the top of them with any other item you haveavailable • Did the Touch LEDs recognize any of the items you used? Record your results in your EngineeringJournal. 6. Creating Your Own CapacitiveItem Wrap half of your pen (the side with the flat end) in aluminum foil. Make sure the aluminum foil is compressed on the end of the pen so that it creates a flatsurface.
Touching a Touch LED Sensor with aluminumfoil • With the program running, pay close attention to the Touch LED lights and try: Touching the top of them with the pen while holding on to the half with aluminumfoil • Touching the top of them with the pen while holding on to the half without aluminum foil (make sure your hands aren't touching thefoil). • Did using the aluminum foil help the Touch LED recognize your pen? Try using the aluminum foil on pieces from your kit. Were you able to use the aluminum foil to help the Touch LED recognize those pieces as well? Record your results in your EngineeringJournal.
Become a 21st century problem solver by applying the core skills and concepts you learned to other problems.
Touch LEDs in the World A tablet with a colorful touch screen andstylus • Touch EnabledScreens • The Touch LED is both a sensor and a display. Technology similar to the Touch LED is used in many devices to display information to a person, and then allow them to make choices by touching the display. Touch enabled screens are very useful, since the information and controls displayed can pertain toanything. • Touch enabled screens are integrated into many other pieces of technology: Smartphones andtablets • Car and airplane entertainmentsystems • Securitysystems • Appliances • Restaurant ordering and paymentsystems
TheValueofaTestbed Electronics inspected at atestbed • Testing... One, Two,Three • A testbed is a tool used for simple and repeatable testing of ideas and technology. Testbeds may be comprised of software, hardware, orboth. • Testbeds are used in many different professional fields, and take on many differentforms. • In electronics companies, testbeds can be used to inspect the behavior of new or faulty circuits. • In the automotive industry, "development mules" are used to check the performance and reliability of a new car component in a standard testbedvehicle. • Engine manufacturers use machines called "environmental test chambers" to test how their engines perform over long periods of time, under intense heat and environmental factors.
IncorporatingaTouchLEDon a Competition Robot VEX IQ Team with Touch LED on arobot • Touch LED on aRobot • The VEX IQ Touch LED allows your robot to detect when it is touched by a finger, as well as display many different colors. This can be useful when it comes to designing a robot for competitions. • The Touch LED is helpful in many robotapplications. • The Touch LED can be used to start a running program with a fingerpress. • Team members can see when different sections of an autonomous program are running by programming the Touch LED to display a unique color for eachsection.
Using the Touch LED can also be used to help troubleshoot programming problems if issuesoccur.
Is there a more efficient way to come to the same conclusion? Take what you’ve learned and try to improveit.
PreparefortheQuickDraw Challenge Testbed build with the Quick Draw programrunning • Prepare for the Quick DrawChallenge • The Quick Draw Challenge tests your reaction time as you compete to see who can touch the Touch LED faster once prompted by a sound andcolor. • In order to compete in the challenge you'llneed: • Completed Testbedbuild • Quick Draw Challenge program (ROBOTC or Modkit) downloaded to your Robot Brain using ROBOTC or Modkit
Quick Draw Challenge Playing the Quick DrawChallenge Quick DrawChallenge In this challenge, you'll test your reaction time as you try to respond to sound and color faster than your opponent! This is a two player challenge. Player 1 should be positioned so that they can easily reach the Touch LED in Port 2. Player 2 should be positioned so that they can easily reach the Touch LED in Port 9. Once both players are in position, player 2 will run the Quick Draw program on the Robot Brain. After the program is running, the LCD will instruct the players to touch the Bumper Switch on Port 8 to start the game. Once started, a five-second countdown on the LCD will begin. Once the countdown has started, neither player is allowed to touch their Touch LED. After the countdown finishes, the players must wait until the Robot Brain makes a noise and their Touch LEDs light up. At this time, the players must touch their Touch LED as fast as possible. The winner's Touch LED will light up green. Challenge rules:
Both players must be positioned by one of the Touch LEDs on the Testbedbuild. • Both players should have their hands an equal distance away from their TouchLEDs. • Once the game is started with the Bumper Switch, neither player is allowed to touch their Touch LED until the Touch LEDs light up after the countdown timerfinishes. • Have fun!
ImproveandTinkerwithYour Build • Answer the following questions in your engineering notebook as you tinker with thebuild. • Now that you have played the Quick Draw Challenge, what do you want to change about the testbed? Explain at least one change. • What steps will you follow to change the build? Explain with details and/orsketches. • How do your changes to the testbed improve thechallenge?
Understand the core concepts and how to apply them to differentsituations. This review process will fuel motivation tolearn.
Review • The Touch LED candetect... • Capacitive touch. • Capacitive distance. • Color hue. • Light. • True or False : A Testbed is a great way to repeat testing of ideas and technology. • True • False • The Touch LED is both a sensor and adisplay. • True • False • You can use a Touch LED on a robotto... • Start or pause a running program with a fingerpress. • Display different colors when different parts of a program arerunning. • Create additional human controls for the robot, allowing you to make decisions for the robot while it is running aprogram. • All of the above
RemovingConnectorsfrom Beams and Plates Using a pitch shaft to remove a cornerconnector How to Easily RemoveConnectors You can easily remove corner connectors from beams or plates by placing a metal shaft through one of the holes of the corner connector and pulling outward while holding down the beam orplate.
RemovingPinsfromVEXIQ Electronics Removing a 1x1 Connector Pin from a SmartMotor How to Remove Pins that are Stuck in Electronic Components Connector pins can be removed more easily from Smart Motors, sensors, or Robot Brains by using a 1x1 Beam. Push the beam onto the pin and then twist the beam while pulling outward to remove the pin.
RemovingPinsfromVEXIQ Beams and Plates Removing a pin from a plate assembly using abeam How to Easily Remove Pins from Beams andPlates You can quickly remove connector pins from beams or plates by pressing a beam against the back of the pin, which partially pushes the pin out, so you can remove it with your fingers. You can use this technique to more easily remove pins from individual plates and beams, or from builtstructures.
Installing Rubber Shaft Collars Using your hand to warm a Rubber ShaftCollar Rubber Softens as it getsWarm Hold the Rubber Shaft Collars in your hand for 15-30 seconds before you slide them onto a shaft. Holding the Rubber Shaft Collar in your hand will warm and soften the rubber to make it easier to slide onto a shaft.