Download
1 / 42
450 likes | 477 Views
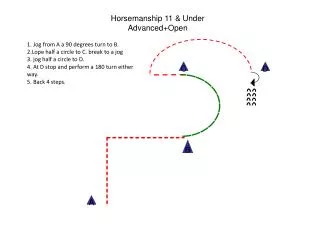
Training and Horsemanship. Objectives. Explain the basic principles of training a horse Describe basic horsemanship procedures. Resources. Modern Livestock and Poultry Production, 7 th Edition, James R. Gillespie. Understanding the Behavior of Horses.

E N D
Objectives • Explain the basic principles of training a horse • Describe basic horsemanship procedures
Resources • Modern Livestock and Poultry Production, 7th Edition, James R. Gillespie
Understanding the Behavior of Horses • Behavior of horses is based upon survival instincts • The ancestors of the horse survived by being alert, by hiding, or by running from danger, and by adapting to changing conditions • Horses’ eyes see independently • Can see to the front, side, and rear at the same time • The retina of the eye is arranged so that part of it is closer to the lens than other parts • Horses must raise and lower their heads to bring objects into focus • It is difficult for horses to judge height and distance • Horses’ eye adjust to changing light conditions slower than do human eyes • Believed that horses are colorblind
React quickly to sudden movement • This is why a horse will sometimes shy and throw a rider at a sudden movement of an object along a trail • Have good memories • Therefore, they can be trained and will remember what they learned • Horses remember the rewards and punishments they are given • Reward or punishment must be given immediately following the desired or undesired behavior so that the horse will associate the two
Horses band together • This is a survival instinct that originated when horses lived only in the wild • When horses ran wild, the horse in the center of the band was safer from attack • The banding instinct also means that horses imitate the behavior of other horses • This has application when riding in a group
Horses generally have good hearing • They are able to hear tones higher than the human ear can hear • A sound that the rider does not hear may frighten the horse • Horses have a good sense of smell • A stallion can detect a mare in heat from a great distance if he is downwind of the mare • The colt should be allowed to smell the saddle and blanket the first few times it is saddled • This helps to reassure the colt that these are not dangerous objects
Sensitive areas on the body • Mouth, feet, flanks, neck, and shoulders • These sensitive areas are used in training and controlling the horse • The rider communicates to the horse through the voice, hands, legs, and weight • The horse can learn and remember voice commands • The sensitive mouth responds to the control of the bit • The legs of the rider can direct the horse by applying pressure to sensitive areas of the skin • The horse is able to sense the security or lack of security of the rider • An insecure rider cannot obtain the best performance from a horse
Training the Young Horse • Training a horse requires skill, patience, and careful handling • Handling a foal while it is young makes the job easier • The foal should be handled each day for a short period of time • This helps the foal to overcome its fear • “Imprinting”
Haltering • A foal may be halter-broken when it is only a few weeks old • Crowd the foal into a corner of the pen and gently place the halter on its head • Let the foal become used to the feel of the halter by leaving it on for a short period of time • Petting the foal and giving it a small amount of grain will help it to associate the halter with a pleasant experience • Repeat this procedure for a week or two • After the foal has learned to accept the halter, it can be taught to lead
Leading • To teach the foal to lead, put a loop of rope over the foal’s rump • Fasten a lead rope to the halter • Have one end of the rump rope passed though the halter • Pull on the halter rope and the rump rope • This encourages the foal to move forward • Working with the foal for about 30 minutes a day for several days will teach it to lead
Working with the Feet • The foal should be taught to allow its feet to be picked up and handled • Work with the front feet first and then the hind feet • Keep working with the feet until the foal learns to yield its feet without struggling
Longeing • Training the horse a the end of a 25-30 foot line • The horse is worked in a circle • This training may be begun when the horse is a yearling • One end of the line is fastened to the halter • The trainer attempts to make the horse move in a circle • Training begins with a small circle • As the horse learns to respond to commands, the circle is enlarged • A light whip may be used to start the horse moving
Teach the horse to circle at a walk • After it has learned this, advance to the trot and slow canter • Work the horse in both directions equally so the horse learns skill in moving both ways in a circle • The faster gaits should be taught only in a large circle • The horse can be taught to respond to voice commands • The longe line can be used to train and exercise the horse
Saddling • The horse must be prepared for saddling several days before it is first saddled • Use a process known as sacking out • First, the horse is tied and rubbed with a soft sack or saddle blanket • Rub the sack over the head, neck, back, rump, and legs • The sack is then flipped over and about the body and legs • To further rid the horse of any fear of movement, a soft cotton rope can be placed over the back and pulled back and forth around the body and legs • Walk around the horse slowly twirling a rope
When ready to saddle the horse, first let it see and smell the saddle • Slide the saddle blanket on and off the horse several times until it becomes used to it • Before placing the saddle on the horse, the girths and right stirrup are laid over the seat of the saddle • Lift the saddle gently into place • Lower the girth and stirrup on the off side by hand • Do not push them off causing them to hit the side of the horse
Reach under the horse with the left hand and bring the girth up to the latigo • Slip the latigo through the ring in the girth and fasten into place • Walk the horse a steps and then draw the girth up again • Repeat the operation with the back girth • Do not let the back girth hang too loose or the horse will catch a foot in it • There should be room for a hand between the back girth and the horse • Leave the saddle on for a time to let the horse become used to its feel • The saddling procedure should be repeated for several days before attempting to ride the horse
Use of Hackamore and Bridle • Some horseowners use a hackamore when starting to ride young horses • The hackamore prevents injury to the horse’s mouth • A bridle with a snaffle bit may also be used to train young horses • Be sure that the reins are even in length and tie them to the saddle horn • The bit should be in contact with the mouth when the head is held naturally • Lead the horse around for a few minutes • Do this for several days to allow the horse to become used to it
Driving • Some trainers ground drive the horse before mounting and riding • Driving lines should be about 25 feet long • They are passed through the stirrups and attached to the halter, hackamore, or bit • A lead rope with a helper may be needed the first few times this is done • Use voice commands such as “whoa” and “back” to fit the action • Start and stop frequently • Ground driving helps the young horse relax
Mounting and Riding • When mounting, turn the left stirrup to receive the foot • Hold the reins in the left hand • Use the right hand to grip the saddle to boost yourself up • When the horse is used to the movement slowly swing your right foot up and over the horse • Dismounting is the reverse of mounting
When riding for the first time take things slowly • Walk for about 15-20 minutes • Repeat this for several days • Continue with training • Horse responds to voice, leg pressure, and weight • Advance to the trot then the lope • Use the reins to steer the horse • As training continues you can move to a larger area • Vary the gaits used during the session • Change directions for lead changes
Horsemanship • The art of riding a horse • Also called equitation • Two general types • Western and English • Basic principles are the same • Clothes and tack are different • Shows • Rules determined by the individual show • Learning to ride • A hands-on activity
Basic Principles • Mounting • Always mount on the near side • Use the same technique as mounting the beginner horse • Be gentle when mounting and get settled before moving • Dismounting • Reverse of mounting • Slip right foot free, swing leg around, step down, then release left foot from stirrup • Could release both feet and just slide down horse facing backwards • Method depends on rider and horse
Seat Position • Sit erect and relaxed in the center of the saddle • Stirrups should be adjusted so that the heel is lower than the toe • Balls of feet are placed on the tread of the stirrups • Keep toes pointed in the direction of travel • Maintain contact with the saddle with the calves, knees, and thighs • Elbows kept close to the body • Free hand is held relaxed • Move with the horse to stay in balance
Controlling the Horse • Basic aids used in controlling the horse are the voice, hands, legs, and weight • Speak to the horse in a soft, quiet, firm voice • Hold the reins with a small amount of slack • Be gentle when handling the horse • Neck-reining is used • The riders legs are used to change gaits, change leads, backing, and stopping
Showing at the Halter • Judged for conformation, soundness, and action • Proper grooming and training are essential • Different techniques are used depending on the breed • Showcase the horse to the judge • Always stand and lead on the near side • Show good sportsmanship throughout the show
Equitation Classes • Judged on ability to ride and control the horse • Position in the saddle, use of the hands, proper tack and dress, performance of the various gaits • Horse needs to be trained to perform correctly • Rules vary depending on the show
Western Equitation • Western tack and clothing • Proper posturing • Judged at walk, trot, and lope • Stay on the rail and keep voice commands minimized • Different types of events • Trail • Pleasure
English Equitation • English tack and clothing • Very specific depending on the class • Saddle seat, jumping, hunt seat • Upright, balanced position • Carry reins in both hands • Post during the trot • when the rider rises and sits in the saddle • Stay on the rail
Gymkhana • Term used for games on horseback • Typical events (timed) • Pole bending • Clover-leaf barrel race • Wheelbarrow race • Keyhole race • Rescue race • Musical chairs • Saddling race • Flag race • Team baton race • Varies depending on the show
Rodeo • Popular in all parts of the U.S. • Specially trained horses • Highly skilled riders • Typical events • Saddle bronc • Bareback bronc • Calf roping • Steer wrestling • Team roping • Barrel racing • Bull riding • Cutting horse contests
Trial Riding • Very popular equine activity • One day or many days • Must prepare both rider and horse for the endurance of trail riding • For fun and for competition • Rules and procedures for the event
Quiz 1. Leaving the halter on the foal for a short period of time will help him get used to wearing it. True or False 2. It is generally believed that horses are colorblind. True or False 3. The foal should not be handled each day in order help him/her overcome fear of the handler. True or False 4. The horse is able to sense security or the lack of security in the rider. True or False 5. A process called sacking out is used for several days before a horse is to be: 6. Longeing is training a horse at the end of a _____ to ____ foot line. 7. The _____________ prevents injury to the horse’s mouth. 8. Name four basic aids used in controlling a horse. 9. On which side should a horse be mounted? 10. Horses shown at halter are judged on what three things? 11. List the two general types of equitation.
Quiz- KEY 1. Leaving the halter on the foal for a short period of time will help him get used to wearing it. ANS: T 2. It is generally believed that horses are colorblind. ANS: T 3. The foal should not be handled each day in order help him/her overcome fear of the handler. ANS: F 4. The horse is able to sense security or the lack of security in the rider. ANS: T 5. A process called sacking out is used for several days before a horse is to be: saddled 6. Longeing is training a horse at the end of a _25____ to _30___ foot line. 7. The _______hackamore ______ prevents injury to the horse’s mouth. 8. Name four basic aids used in controlling a horse. Voice, hands, legs, weight 9. On which side should a horse be mounted? The near or left side 10. Horses shown at halter are judged on what three things? Conformation, soundness, and action 11. List the two general types of equitation. English and Western
Assignment • Bring in a horse and demonstrate the different techniques