Download
1 / 20
200 likes | 207 Views
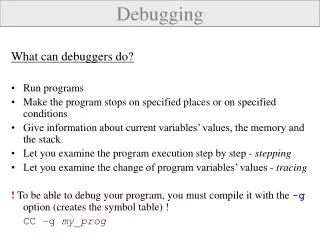
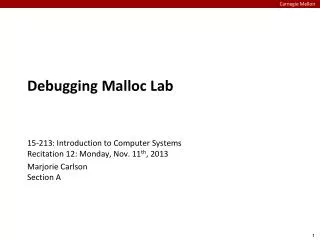
Debugging an Application Lab. Build/Debug Process. start. Start Debugger. Syntax Errs?. n. Load Closest Sample “debug” into MULTI editor. y. Download Application. Correct Syntax. Cut and Paste Changes into Sample. A. Set Needed Breakpoints. Build Modified Sample.

E N D
Build/Debug Process start Start Debugger Syntax Errs? n Load Closest Sample “debug” into MULTI editor y Download Application Correct Syntax Cut and Paste Changes into Sample A Set Needed Breakpoints Build Modified Sample Connect to Target Board B
Build/Debug Process (2) Covered Test Cases? B Locate Problem n Run Application (F5) y Modify Problem Code Build ROM Version Inject Test Input A Re-Test Ran OK? y Release Party n
Building the Project • This is the main builder window
Building the Project • Once all files are present in project workspace, building is readily done
The Baseline Application Project Configuration Files (*.bld); Source path, System include directories, etc. Included Libraries; ThreadX, TCP/IP Stack, Drivers, BSP Integration C and Assembly Source Files; Common to all Projects Linker File (*.lx); Map the Software to the Hardware Memory Map
Perform Final Initializations Spawn all BSP Threads tx_thread_create() In root.c netosStartup() applicationStart() Path to Application Entry Point Contains main() BSPROOT.C Creates Root Thread
“Hello World” From root.c…
Connecting to Target (1of 3) • In the Builder, choose Remote > Connect to Target.
Connecting to Target (2 of 3) • Enter OCDSERV command line.
Connecting to Target (3 of 3) • Two new windows • IN/OUT –Displays Printf’s • TARGET—can read/write to Memory/CPU
Starting Debugger • In the Builder select Debug > debug
Debugger Features • Set Break Points-Software and Hardware • Step through code • Examine C-code • Examine Interlaced Assembly • Examine values of variables, registers, memory
Debugger Windows • Interlaced Assembler displayed • Color enhanced buttons
Download code to Target • Click“play” button or (F5)
Run Program • Program is Running • Use breakpoints or step through code
“PEEK/POKEing” variables • Globals • Use “Browse/Globals” • Double-click the variable of interest to see contents • Address will appear in command window • If structure, click to display members, double click to see contents • Right-click the popup box to change value • Local variables • Use View/Local Variables • Works similar to “Browse/Globals” above • Double click a variable name from debugger C listing to get a watch popup box
“PEEK/POKEing” Memory • Click “View/Memory” • Enter address of interest in popup box • Select radix using button • Click on a row to change the contents • Explore other options of the popup box
“PEEK/POKEing” registers • Remember, most registers of interest on Net+ARM are memory-mapped. Consult your Hardware Reference Guide. • For ARM processor registers: • Use “View/Registers” • In the popup box, right-click a register number to change it. CAREFUL!