Download
1 / 29
290 likes | 301 Views
Debugging. EECS150 Spring2007 – Lab Lecture #4 Laura Pelton Greg Gibeling. Today (1). Simulation vs. Hardware Debugging Algorithm Goals Tips Administrative Info. Today (2). Lab #4 Bottom Up Testing (Peak Detector) Designing Test Hardware (Broken Adder)

E N D
Debugging EECS150 Spring2007 – Lab Lecture #4 Laura Pelton Greg Gibeling EECS150 Lab Lecture #4
Today (1) • Simulation vs. Hardware • Debugging • Algorithm • Goals • Tips • Administrative Info EECS150 Lab Lecture #4
Today (2) • Lab #4 • Bottom Up Testing (Peak Detector) • Designing Test Hardware (Broken Adder) • Exhaustive FSM Testing (Broken FSM) EECS150 Lab Lecture #4
Simulation vs. Hardware (1) • Debugging in Simulation • Slow Running Time • Fast Debugging • Waveforms • Text messages • Full Visibility • Can examine any signal • Easy to Fix • A few minutes to compile and resimulate • Modelsim assumes no gate delay EECS150 Lab Lecture #4
Simulation vs. Hardware (2) • Debugging in Hardware • Fast Running Time • Full speed in fact • Slow Debugging • Synthesis can take hours • Little or No Visibility • Very hard to probe signals EECS150 Lab Lecture #4
Simulation vs. Hardware (3) • Simulation • Functional Testing & Verification • Test everything at least minimally • Fully Verify what you can • This will save you many sleepless nights • Hardware • Debugging • Treat this as a last resort • It is painful EECS150 Lab Lecture #4
Simulation vs. Hardware (4) • What does this do in Simulation? • Out = Out + In • In Hardware? EECS150 Lab Lecture #4
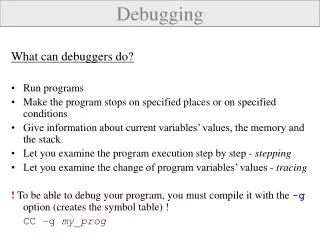
Debugging (1) • Debugging Algorithm • Hypothesis: What’s broken? • Control: Give it controlled test inputs • Expected Output: What SHOULD it do? • Observe: Did it work right? • If it broke: THAT’S GREAT! • If we can’t break anything like this then the project must be working… EECS150 Lab Lecture #4
Debugging (2) • Don’t debug randomly • Just changing things at random often makes things look fixed • It won’t really help • Debug systematically • Your first design may be the best • “1000 CS150 students at a 1000 typewriters…” • What can you do? EECS150 Lab Lecture #4
Debugging (3) • High Level Debugging • Localize the problem • SDRAM? Video? • Test Patterns • Lets you easily isolate the broken component • If you know exactly what’s going in you can check what’s coming out EECS150 Lab Lecture #4
Debugging (4) • Simulate the broken component(s) • Writing test benches takes less time than sitting around wondering why its broken • Everyone hates writing testbenches • (Even me) • Get used to it EECS150 Lab Lecture #4
Debugging (5) • Your best debugging tool is logic • If 3 out of 4 components work, what’s broken? • Question all your assumptions! • Just because you think its true doesn’t mean it is • 90% of debugging time is wasted debugging the wrong problem otherwise • Given solutions and modules may not work the way you expect! EECS150 Lab Lecture #4
Debugging (6) • Before you change anything • Understand exactly what the problem is • Find an efficient solution • Evaluate alternative solutions • After the change • Fixes may make things worse sometimes • May uncover a second bug • May be an incorrect fix • Repeat the debugging process EECS150 Lab Lecture #4
Debugging (7) • Ask around • Someone else may have had the same bug • They’ll probably at least know about where the problem is • Different bugs may produce the same results • TAs • The TAs know common problems • We’re here to help, not solve it for you EECS150 Lab Lecture #4
Administrative Info • Midterm I • Thursday 2/15, 2-3:30pm, Room 125 Cory • Reviews sessions are: • Tuesday 2/13, 8-10pm, 125 Cory • Wednesday 2/14, 8-10pm, 125 Cory • Partners • You MUST have one for this week • Try someone other than your best friend • Restrictions • You can change partners until the project starts • You must be checked off in the same lab • Project in 2 weeks!!! EECS150 Lab Lecture #4
Lab #4 - Debugging • Part 1: Bottom Up Testing • Part 2: Hardware Testing • Part 3: FSM Testing EECS150 Lab Lecture #4
Part1: Bottom Up Testing (1) Lab4Comp1 What if EqualOut = 1’b0 and GreaterOut = 1’b0? EECS150 Lab Lecture #4
Part1: Bottom Up Testing (2) • Exhaustive Testing • Ideal Testing Method • Circuit is 100% tested! • Requires us to test a LOT! • Can we do it here? (24 possible inputs) • Method • Make a truth table • Have the testbench generate all inputs • Make sure outputs match truth table EECS150 Lab Lecture #4
Part1: Bottom Up Testing (3) Lab4Comp4 Lab4Comp1 Lab4Comp1 Lab4Comp1 Lab4Comp1 EECS150 Lab Lecture #4
Part1: Bottom Up Testing (4) • Exhaustive Testing? • 28 = 256 Possible Inputs • Method • Use a for loop to generate all inputs • Loops allowed only in testbenches • They will not synthesize • Compare against a “>=“ • Print a message if they differ EECS150 Lab Lecture #4
Part1: Bottom Up Testing (5) Lab4PeakDetector EECS150 Lab Lecture #4
Part1: Bottom Up Testing (6) • Exhaustive Testing? • 24 = 16 Possible Inputs • 24 = 16 Possible States • 16*16 = 256 combinations • We could do it in this case • Can’t exhaustively test FSMs • Too many state/input combinations • Must rely on directed testing EECS150 Lab Lecture #4
Part1: Bottom Up Testing (7) initial begin end integer i; reg [3:0] TestValues[1:16]; $readmemh("TestValues.txt", TestValues); for(i = 1; i <= 16; i = i + 1) begin #(`Cycle); In = TestValues[i]; $display("In = %d, Peak = %d", In, Peak); end EECS150 Lab Lecture #4
Part1: Bottom Up Testing (8) • Read Test Vectors from a File • Designing Test Vectors • Make sure to cover most cases • We want 95%+ coverage • Designing test vectors is a “black art” • “$” Processes • Not synthesizeable • More information in IEEE Verilog Reference EECS150 Lab Lecture #4
Part2: Test Hardware (1) FailMode FailMode Lab4 Part2 Lab4Part2Tester EECS150 Lab Lecture #4
Part2: Test Hardware (2) • Test Procedure • Hit Reset (SW1) • Hit Go (SW2) • Record an error • DD1-8 show {A, B} • SW10[1] selects the sum on DD4-8 • Hit Go • Repeat until the tester stops EECS150 Lab Lecture #4
Part2: Test Hardware (3) • The Broken Adder • 16bit Adder • 232 ≈4 Billion Test Vectors • Can’t simulate this much • 2:40 to test this at 27MHz • Fail Modes • 0: No Errors • 2: Will claim 1 + 1 = 3 • 1-3: Can have anywhere from 0 to 4 errors EECS150 Lab Lecture #4
Part3: FSM Testing (1) • Exhaustive Testing Again! • Check every arc • Check every output • You don’t need to correct this one… • We’re not giving you the source code • Boring (and Easy) • You will have FSM bugs • Get used to debugging them EECS150 Lab Lecture #4
Part3: FSM Testing (2) EECS150 Lab Lecture #4