Download
1 / 20

E N D
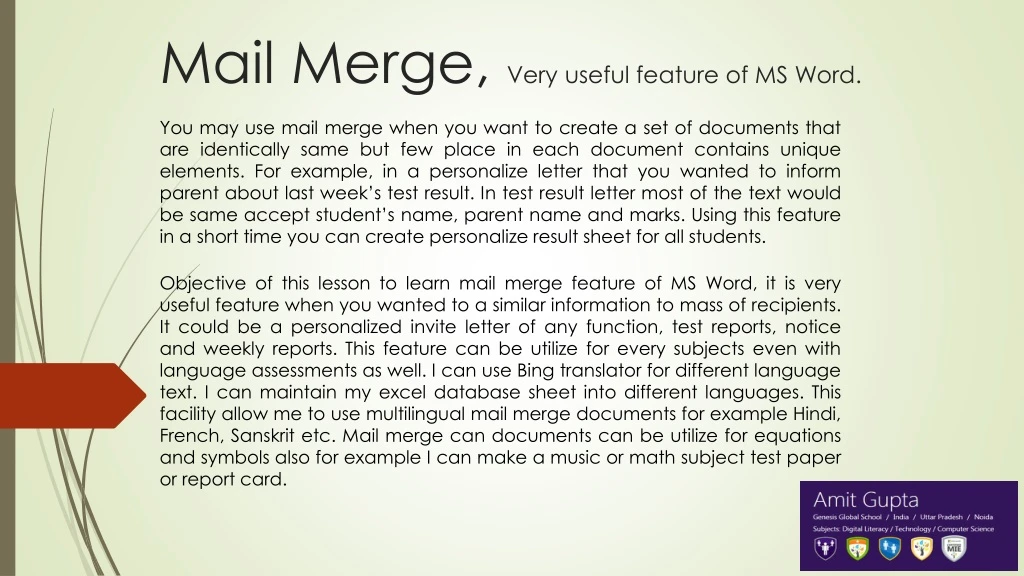
You may use mail merge when you want to create a set of documents that are identically same but few place in each document contains unique elements. For example, in a personalize letter that you wanted to inform parent about last week’s test result. In test result letter most of the text would be same accept student’s name, parent name and marks. Using this feature in a short time you can create personalize result sheet for all students. Mail Merge, Very useful feature of MS Word. Objective of this lesson to learn mail merge feature of MS Word, it is very useful feature when you wanted to a similar information to mass of recipients. It could be a personalized invite letter of any function, test reports, notice and weekly reports. This feature can be utilize for every subjects even with language assessments as well. I can use Bing translator for different language text. I can maintain my excel database sheet into different languages. This facility allow me to use multilingual mail merge documents for example Hindi, French, Sanskrit etc. Mail merge can documents can be utilize for equations and symbols also for example I can make a music or math subject test paper or report card.
There are two documents required to use this feature. A Main word document as result sheet and an excel sheet is required. Main document will contain common text (Weekly test report.docx) and database sheet (Student data.xlsx). We shall place all the variable field data into main document using merge fields and finally will merge both the documents to get report card for each students. Mail Merge, Very useful feature of MS Word.
1 Step: Choose option step by step mail merge wizard from Mailing Menu 1 2 I have attached both required files (.docx and .xlsx) in previous slide. You may refer those by double clicking on it. 3
2 Step: Choose document type (letter) from Mail merge Menu and click next starting document option 1 2
3 Step: I have chosen Start from existing document because I made my main document earlier, you may choose other 2 options also 1 3 2 4
4 Step: Here is my earlier drafted main document as a weekly test report of student, Click on Next select receipts option
5 Step: Here I have to choose my student data sheet as a database for mail merge, I choose Use existing list option 1 2 3 4 5
6 Step: Here select First row of data contain column headers for getting clear data column names from the selected data sheet (.xls)
7 Step: Here I have to select all records or few records from my selected data sheet (.xls) file and click ok I have to select those no of records here for those I wanted to make merge documents
9 Step: Now I have to put all merge fields in my main document where I wanted to have dynamic data from my data sheet file (.xls) Place your cursor where you wanted to place merge field and click on Mailing menu and follow 2 step 2 1
9 Step: Now I have to place all merge fields in my main document where I wanted to have dynamic data from my data sheet file (.xls) Place all merge fields from Insert Merge Field option in Main Document, it will be << field >> like this. As in document you may see subject names are placed as merging fields. 1
10 Step: Now I have document ready to merge with my data sheet file (.xls) After Placing all the merging fields, click on Next Preview your letters option 1
11 Step: Now I have merged document with my data sheet file (.xls), here I can review all the merged records in a separate weekly test report Now I have merged document with my datasheet file (.xls).
12 Step: Click on Next Complete the Merge I can see other record’s merge document by clicking on Recipient record navigation option. After having review of your record’s merged document click on Next Complete the merge option. 1
13 Step: Here I can take print, email and edit individual weekly test reports Now I can edit individual document if you wanted to do so. I can take prints all merged documents or I can send merged document to recipients through email.
14 Step: Here I am trying to email individual weekly test reports to student’s parent Now I click on To option and choose parent email merge field and put some text as subject in Subject line option
15 Step: Here I can take print, email and edit individual weekly test reports Here you can see all merge fields in To option
15 Step: Here I can take print, email and edit individual weekly test reports Here I have put all the required field values and selected all option to email every parent but I can choose single or custom range of parent email record. Finally click on OK. This will send a weekly test report to every student’s parent.
Congratulation: Here at the last I have successfully completed my task. I would love to receive your feedbacks THANK YOU