Download

1 / 21
210 likes | 290 Views
Explore the journey of creating a low-cost laser engraver using Arduino microcontroller. Learn about hardware integration, software programming, and troubleshooting tips. Watch the video demonstration for insights.

E N D
Aaron Eastham Network Security & Electronics Program Dept. of Applied Engineering & Technology Eastern Kentucky University
OUTLINE • Overview • Motivation • Introduction • Problem Statement • Assumptions • Proposed Solution • Results • Video • Conclusions • Future Work • References • Acknowledgements
MOTIVATION • Always wanted one. • To see if I could accomplish it. • Save money. • Fun to play with. • To incorporate a microcontroller into my project. http://www.mouser.com/arduino/
INTRODUCTION • Ever since I had something laser engraved for me I have been interested in them. • I researched the internet for different ways to control the machine, laser types and how the machine moves. • There were two different ways to control the machine: A raspberry pi or an Arduino and I started with the pi then switched to the Arduino. • An in depth knowledge of electronics and Arduino programming.
PROBLEM STATEMENT • The reason I started this project was to make a low cost laser engraver that I could use as for hobby. • Learning more about software and hardware integration.
ASSUMPTIONS • The laser and motor drivers are connected directly to the microcontroller and when a design is uploaded, it should output the correct directions. • An implicit assumption is that the person enjoys working with hardware and software, along with the time and money for the project.
PROPOSED SOLUTION • There were many steps to solve this problem. • I tried using a Raspberry Pi and an Arduino, along with two different types of motor drivers and laser drivers.
SOLUTION CONTINUED • Eventually picked the Arduino with EasyDrivers for stepper motor and a laser with a built in driver.
SOLUTION CONTINUED • The assembly of the machine was tricky as everything had to be perfectly straight or it wouldn’t work.
SOLUTION CONTINUED • Prototyping for the motor drivers and motors went as planned but the laser driver proved to be pretty difficult, one miscalculation and the laser goes up in smoke.
SOLUTION CONTINUED • Once everything was together and running I got to test it out and then troubleshoot the problems. • Motors didn’t go as far as they should have. • I had to calculate the steps/mm of my specific threaded rod and motor combo. Then recalibrate the machine. • Laser wouldn’t come on when command was given. • I found out that the Arduino is touchy with the ground pins and where they go. After I figured that out the laser started working. • Once the laser worked it just burned black spots instead of the design. • This had a pretty simple solution of just changing the speed until it performed as it should.
RESULTS • An Arduino controlled laser engraver that uses GRBL to execute G-Code commands. • A laser that can travel left to right across the X-Axis of the machine, which is connected to the Y-Axis to allow font to back travel. • Auto on/off for laser during engraving process.
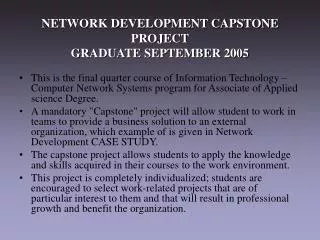
RESULTS CONTINUED AutoCAD Design Prototype Actual Laser Engraver
RESULTS CONTINUED AutoCAD Design Prototype Actual Laser Engraver
Click to watch video Arduino Laser Engraver Source: https://www.youtube.com/watch?v=9SRjOHVzrUA
CONCLUSIONS • In conclusion this project was a great learning experience of the Arduino platform and circuit design. • I learned a lot about Arduino programming, as this is something I didn’t have much background in, and my electronics knowledge has grown considerably.
FUTURE WORK • Implications: • Good learning experience on software and hardware integration. • This project helped with developing good time management skills. • Possible extensions to project • Change out the threaded rod with ball screws for smoother movement. • Add a Z-Axis for possible milling with a power tool such as a dremel • Invite audience for suggestions • Thank You for your time! • Aaron_Eastham2@eku.edu
REFERENCES • engravR (RPi Laser Engraver) [Video file]. Retrieved from https://www.youtube.com/ watch?v=xxQ33cNIXxU • Monk, S. (2012, June 6). Adafruit’s Raspberry Pi Lesson 4 GPIO Setup. Message posted to http://learn.adafruit.com/adafruits-raspberry-pi- lesson-4-gpio-setup/overview. • McMill, I. (N.D.). Frankenstein Laser Engraver. Retrieved from http:// www.instructables.com/id/Frankenstein-Laser-Engraver/ • TingaWinga5 (Why do laser diodes need driver circuits and how do they work?) [Video file]. Retrieved from https:// www.youtube.com/watch?v=eF1dSMcfteo • Monk, S. (2012, October 31). Arduino Lesson 16 Stepper Motors. Message posted http://learn.adafruit.com/adafruit-arduino-lesson-16-stepper- motors/overview • Skogsrud, S. (N.D.). Grbl is software for controlling the motion of machines that make things. Retrieved from http://bengler.no/grbl
ACKNOWLEDGEMENTS • I would like to thank my Dad for letting me use some scrap material and the machines at his work. • I would like to also thank Zack for putting up with me for all of our group projects.