Download
1 / 29
290 likes | 295 Views
Learn about the indications, techniques, advantages, and disadvantages of periapical and bitewing radiography in intraoral imaging. Discover how to achieve accurate and detailed dental radiographic images.

E N D
Intraoral Radiographic Technique1.Periapical Radiography2.Bitewing Radiography3.Occlusal Radiography
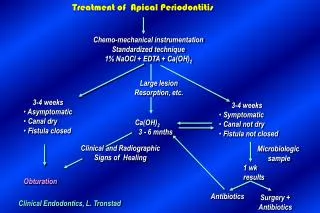
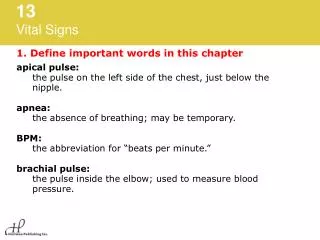
Periapical Radiography: Indication of this technique : 1-Detection of apical disease 2-Truma to the teeth and alveolar bone 3-During endodontics treatment 4-Presence or absence of unerrupted teeth 5-Assessment of root morphology during extraction 6-Evaluation of apical cyst and other lesions within the alveolar bone 7-Evaluation of implant 8-Assessment of periodontal status
The common Periapical Radiographic Technique: 1-Parallel Technique: or Right angle or Long cone Technique 2-Bisecting Technique The Basic Principles of the Paralleling Technique: 1.The film is placed in the mouth parallel to the long axis of the tooth being radiographed 2.The central ray of the X-ray beam is directed perpendicular (at right angle) to the film and long axis of the tooth 3.A film holder must be used to keep the film parallel with the long axis of the tooth 4.Long cone should be used to make the target – object distance as long as possible
To achieve parallelism between the film and the tooth ,the film must be placed away from the tooth and toward the middle of the oral cavity . The object – film distance must be increased to keep the film parallel with the long axis of the tooth .
Because the film is placed away from tooth , image magnification and loss of definition result , so to compensate for image magnification, the target –film distance must be increased to ensure that only the most parallel rays will be directed at the tooth and film ,as a result ,a long target – film distance must be used with the paralleling technique ,so this technique sometime is known as long – cone technique .
Film Holder The paralleling technique requires the use of film holding instrument to position the film parallel to the long axis of the tooth . A film holder : is a device that is used to position an intraoral film in the mouth and retain the film in position during exposure . Example of commercially available intraoral film holder is Rinn XCP instruments X=extension , C=cone , P=paralleling
Purpose of using film holder is : • to eliminate patient's hand exposure • when the patient has a broken arm • avoid cone cut the film • assist in identifying horizontal and vertical angulations
Advantage of paralleling technique: 1.Accuracy: produce a radiographic image without dimensional distortion . 2.Simplicity : the paralleling technique is simple and is easy to learn and use . The use of a film holder with a beam alignment device eliminates the need for the dental radiographer to determine horizontal and vertical angulation and eliminate the chances of dimensional . 3.Duplication : the paralleling technique is easy to standarized and can be duplicated , or repeated when serial radiographs are indicated .
Disadvantage : 1.Film placement :because of the film –holding device , the film placement may be difficult for the dental radiographer . 2.Discomfort : the film – holding device use , may be impinge on the oral tissue and cause discomfort for the patient . The Principles of Bisecting Technique : An imaginary bisector of the angle formed by the long axis of the tooth and the x-ray film ,the angle is formed where the film contacts the tooth crown . The operator need to direct the central ray of beam through the apex of the tooth in such a manner that it strikes the bisector at right angle , such angulation , if properly employed , result in a tooth image that is exactly the length of the object .
Advantage of Bisecting Technique : 1.It can be used without film holder . 2.Deceased exposure time , when using short cone (8 inch ) a shorter exposure time is recommended . Disadvantage of Bisecting Technique : 1.Image distortion :distortion occurs when a short cone resulting image magnification . Distortion also occurs when a tooth ( three dimensional structure )is projected onto a film ( two dimensional structure ) , structures that are further away from the film appear more elongated than those closer to the film 2.Angulation Problem :any error in vertical angulation will result in image distortion
Comparison betweenparallel and bisecting technique : 1.both procedures utilize the same source of radiation 2.the use of short cone in parallel technique is contra-indicated since the short target –object distance produce a high degree of image un-sharpness .The bisecting technique can be used with either short or extended distances 3.tooth – film distance in parallel technique is greater .This separation of tooth and film is due to anatomic limitation such as palatal curvature and muscle attachment 4.the parallel technique is more likely to portray an accurate anatomic representation of what actually exist
Positioning of the patient : When either the parallel or bisecting technique is used 1.The patient should be seated on the dental chair in a comfortable position .The patient should be placed in an upright position ,some operators feels thata procedure of tipping the patient's back on the chair gives them greater opportunity to observe film placement in relation to the long axis of the teeth . Recently ,many dentists have equipped their dental clinic with contour chair and have learned to do most operation with the patient in a supine position . 2.Occlusal plane of the jaw being examined should be parallel with the floor 3.Chair height should be higher when the lower arch is being examined .
Horizontal and Vertical Angulations Horizontal angulation :refers to the X- ray beam direction in a horizontal plan . X- ray beam should pass through the interproximalspaces to prevent faulty horizontal angulation (overlapping(.
Vertical angulation :it is the angle of the X- ray beam in a vertical plan .we have two type of vertical angulation : 1.Plus (+):mean the beam is tipped toward the floor . 2.Minus (-):mean the beam is tipped upward . The stated angulation is the amount away from zero.
Bite Wing Radiography : Indications of the technique : 1.To demonstrate interproximal carious teeth 2.To demonstrate the over hanged filling 3.To demonstrate the underlying periodontal condition (interseptal bone level )
Patients up to 12 years old , one bite wing film on each side is sufficient , while patients over 12 years old need 2 bite wing on each side . A vertical angulation from 5 to 10 is used with a horizontal angle direct X- ray beam through the interproximal spaces between the teeth being examined , to compensate the curvature of the palateand the slight bend of the upper portion of the film and the maxillary teeth. Faulty horizontal angulation give overlapping .
Positioning Technique : There are 2 main technique available: • using tab attached to the film and aligning the X- ray tube by eye • using a film holder with beam alignment device to facilitate the positioning and alignment of the X- ray tube
Occlusal Radiography : The occlusal film is some time referred to as a sandwich film , since it is retained by biting of the patient on the film . In edentulous arch ,the film is held against the maxillary ridge by the patient's thumb and on the mandibular ridge by the four fingers . Occlusal film is used to demonstrate an area of greater dimensions than is possible on a single periapical film .It is inserted in the patient ,s mouth with the longest dimension of the film in a anterioposterior position .
Indications of occlusal radiography : • Useful when larger area to be visualized . • To aid in the localization of a foreign object . • To locate retained roots of extracted teeth • To locate supernumerary , un-erupted , or impacted teeth • To evaluated the boundaries of the maxillary sinus • To evaluate fractures of the maxilla or mandible • To examine the area of a cleft palate • To measure changes in the size and shape of the maxilla and mandible
The basic principles of the occlusal technique : • The film is positioned with the white side facing the arch that is being exposed • The film is placed in the mouth between the occlucal surfaces of the maxillary and mandibular teeth • The film is stabilized when the patient gently bites on the surface of the film
Maxillary occlusal projections: 1.The maxillary topographic projection : Is used to examine the palate and the anterior teeth of the maxilla ,fractures of the anterior teeth and alveolar bone ,also determination of the bucco –palatal position of un erupted canine
2.The maxillary lateral occlusal projection: is used to examine the palatal roots of molar teeth . It may also be used to locate foreign bodies or lesions in the posterior maxilla ,fractures of the upper posterior teeth and alveolar bone including the tuberosity ,and determination of position of root displaced into the antrum during extraction of upper posterior teeth .
Mandibular occlusal projection: 1.Topographic projection: Is used to examine the anterior teeth of the mandible ,the presence and position of radioopaque calculi in the submandibular salivary duct ,and fracture in the posterior part of the body of the mandible in the horizontal plane
2.Mandibular cross – sectional occlusal projection: Is used to examine the buccal and lingual aspects of the mandible ,it is also used to locate foreign bodies or salivary stones in the region of the floor of the mouth .

![[Radiography] Technique - Exposure Factors](https://cdn0.slideserve.com/546181/radiography-technique-exposure-factors-dt.jpg)