Download
1 / 47
470 likes | 611 Views
Registry and Referral System HCW/PSW Staff User Manual. Type or-hcc.org into the Brower's Address line. Brower’s Address. Using the RRS. Main Page for the Registry and Referral System. Move your mouse and select your Service Group to access the system. Login Page.

E N D
Type or-hcc.orginto the Brower's Address line Brower’s Address
Using the RRS • Main Page for the Registry and Referral System. • Move your mouse and select your Service Group to access the system.
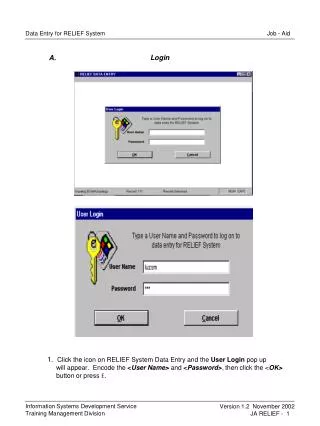
Login Page • In the Please login box, enter your Username and Password in the appropriate fields, and select Login. • You will be taken to the Staff section of the Registry.
Tabs for each functional area of the Registry Staff Info– This is information about the user who has logged in.
Tabs for each functional area of the Registry Employer– This lets the user search for and access Employers in the Registry.
Tabs for each functional area of the Registry Worker– This lets the user search for and access workers in the system.
Tabs for each functional area of the Registry Statistical Reports– This lets the user search for workers by Office, Registry Status, Availability, Provider Database Status and Provider Database Level.
Tabs for each functional area of the Registry Specialty Reports– This lets the user search for workers by Language, Services offered, and other profile information.
Tabs for each functional area of the Registry CRIMS Check– This lets the user manage the CRIMS background check for workers.
Tabs for each functional area of the Registry Help Wanted– This lets the user see a list of Employers who have posted a help wanted ad.
Staff Info page • It shows information about the user and also about the Registry. • Please enter your information in the provided fields and press Update to save the data.
Employer Tab • Move your mouse to select the Employer tab. • From the Service Groupdropdown, scroll and select with your mouse which Service Group you want to view. • Then select Find Employeesbutton with your mouse.
Seniors and People with Disabilities • When selecting the Seniors and People with Disabilities option you will see the Employers who are in this group.
UserID • The UserID, Last Name, First Name and MI, Service Group, Email and Phone are shown. Choose the one you are looking for by selecting the UserID.
Personal info • Personal info contains the information entered by the Employer.
Update Button • To correct and save information, make change and select the Update button. Please note: If the Update button is not selected on this tab your updated information will not save.
Preferences Tab • This tab includes what the Employer is looking for in a worker, and any conditions which might limit referrals
Tabs • To move among the tabs select one of the following: • Previous – You can move back to the tab you were at before this one. • Update – This saves any changes you just made on this screen. • Next – This moves you to the next screen.
Services Tab • This tab includes a list of the type of services that an Employer may select.
Schedule Tab • This tab includes the Type of Workand the Day of the week the employer needs a worker.
Training Tab • This tab has the employer desired worker training requirements.
Summary • Summary tab provides an overview of the employer preferences and service needs. • No changes are allowed on this page.
Referral Tab • Referral tab will show all of the workers who match the Employer’s preferences and service needs.
Post Ad • This tab includes a template for the Employer to completed a post on the Registry. • When completed, select Post Adbutton at the bottom of the page.
Find a Worker • To search for a Worker, select the Worker tab.
To Find a Worker • Select, Find Workers.
To Find a Worker • Type in the Provider Number for the Worker in the Provider number field, • Or Enter all or part of the Worker’s Last Name in Last Name field, • Or Select a Service Group. **NOTE** User can specify any or all letters in a field for any option.
To Find a Worker • Example: Last Name : Jo. • Service Group: select the service group you work with. • This will give the user all workers whose Last Name starts with “Jo”.
Service Group • Or select a Service Group type from the dropdown list, then select the Find Workersbutton.
A List of Workers • A List of Workers will appear. • Select the worker you want to review from the list.
Personal Info Tab • The Personal Info tab shows the personal info for the worker you have selected. • To review additional info about the worker select the following tabs; Preference, Services, Availability, Schedule, Summary and Office Use. **NOTE**: When making any changes to information already in the Worker’s tabs, select the Update button with your mouse after making the changes. If you do not select the Update button, your changes will not be saved.
Tabs • To move among the tabs select one of the following: • Previous – You can move back to the tab that you were on before this one. • Update – This saves any changes you just made on this screen. • Next – This moves you to the next screen.
Work Location • Work Locations displays the counties and cities (areas) where worker is willing to work. • Workers are limited to three (3) counties, exceptions are allowed for five (5), six (6), or seven (7) day live-in services.
Preferences Tab • This tab includes all of the workers selected preference and restrictions. **NOTE**Gender and Smoking questions must be answered for the workers to be completed to be eligible for referral.
Service Tab • This tab shows the services the worker is “Willing”to provided and/or has“Experienced”providing.
Availability Tab • This tab displays workers availability status. • Workers must answer the Online Referral and Private Pay Referral questions.
Availability Tab • If the Worker selects on the online referral questions “No”, the Worker’s name will only appear in a search or a report done by a Staff User. The worker will not be matched in an Employer search. Transportation Method; worker must select at least one of the options.
Work Type • At least one Work Typemust be checked if the worker is looking for work. • It is the worker responsible for uploading their info every 30 days on the Registry.
Schedule Tab • This tabshows when the workers is available to work.
Summary Tab • This tabprovides a worker summary which can best described in a “mini” resume.
Office Use Tab • This tab may be used by Homecare Worker Coordinators and CEP Specialists to track the application approval process and additional information, if applicable. Orientation Verifiedfield is checked if the information has been entered on the Worker Orientation/ Certified Training screen .
Office Use Tab • Certified Training (CPR and First Aid)can be entered here as well as on the Worker Orientation/Certified Training screen. • Check Abuse Investigationbox is checked if the worker has been investigated. • Fingerprints Needed from Worker. • Fingerprints Needed from Salem. • Workers Needing Orientation.
Statistical Reports • Worker Statistical Reportsprovide lists of workers based on any combination of Oregon ACCESS Status, Worker Level, and Registry Process Status – Availability. In Addition to the Local Office, User may create reports for County Work Force. Please note that this is a flexible report so you can modify the suggestions we have made above.
Select the Office you wish to run the report for • Select Oregon ACCESS of Interest • Select Registry Status • Select OACCESS Status and Level Statistical Reports • Creating Statistical Reports • Creating Statistical Reports • Choose Service Group
CRIMS Check • The CRIMS Check report creates a list of Workers whose criminal background rechecks are due within a specified range. • Select Local Office • Enter Date Range (default is 30 days before and 90 days after the present date)
Matching Employers with Workers • There are two ways to create matching lists. • Search as Staff . • Search as Employers. • Search as Staff . • After logging into the RRS using User ID and Password, click Employer tab. • Select Service Group. • Select Find Employers button. • Search as Employers. • After clicking the Registry log in button, choose the Employer tab. • If you know the Consumer/Employer’s User ID and Password, enter it into the User ID Box and Click Log In. • If you are creating a New Consumer/Employer, on the Login page the on the Main Page of Registry, select the appropriate Service Group, then click the New Employer.