Download

1 / 13
330 likes | 706 Views
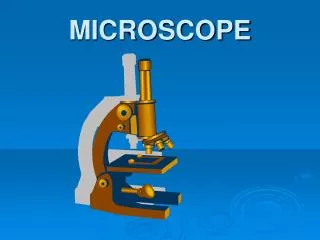
MICROSCOPE. A microscope allows you to observe objects which are too small to be seen with the naked eye. To maximize your laboratory experience in the study of cells and tissues you must master the use of a microscope. Here are a few rules which will protect the microscopes from damage:

E N D
A microscope allows you to observe objects which are too small to be seen with the naked eye. To maximize your laboratory experience in the study of cells and tissues you must master the use of a microscope.
Here are a few rules which will protect the microscopes from damage: 1-Always Use Two Hands to Carry the Microscope. One Hand Should Be on the Base and One Hand on the Arm. 2-Never Touch the Lenses of the Microscope with Anything. 3-Turn Off the Light and Return the Lenses to the Lowest Power Position before Returning the Microscope to the Storage Area.
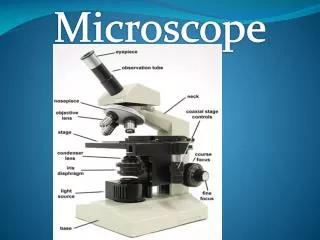
PARTS OF THE MICROSCOPE • Your microscope is a compoundmicroscope; that is, it has two sets of lenses which focus the light into your eye and magnify the object being observed. • The lens closest to your eye is the eyepiece which is scientifically known as the ocular. Some microscopes have two oculars and are thus binocular. Your ocular magnify objects ten times (10X).
The lens closest to the object being observed is an objective. • Each objective has amagnifying power which is printed on the lens. In Anatomyand Physiology you will use the 10X or low power objective and the 40Xhigh power objective. Theother lens(es) will not be used.
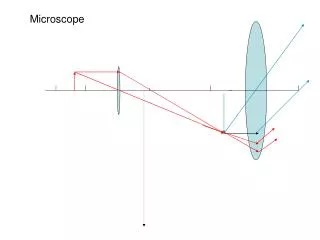
The Total Magnification of a Microscope • The total magnification of a microscope is calculated by multiplying the magnification of the ocular (10X) by the magnifying power of the objective. Thus the total magnification using the low power objective is 100 times (100X). This is calculated by multiplying 10 (ocular) times 10 (low power objective).
The sturdy bottom of the microscope is the base. Built into the base is a light source. Always turn the light off before you put your microscope away. • The armextends upwards from the base and holds two concentric adjustment knobs, the stage, and the lenses. • The larger adjustment knob is the coarse adjustment knoband is used only with the short, low power objective.
The smaller fine adjustment knobisused to focus when you are using the high power objective. • The slide to be observed is placed on the stage. Some microscopes have a mechanical stage which allows you to move the slide without touching it. Such a stage has a mechanical stage control. On other microscopes the slide must be moved manually. • Slide clipshold the slide and steady it when you move it.
Beneath the stage is another lens, the condenser, which condenses light onto the slide. • Below the condenser is the diaphragm. The diaphragm is controlled by the diaphragm leveror by a diaphragm ring. The diaphragm controls the amount of light that passes into the slide. In microscopy, the more light entering the specimen the less resolution or detail you can see. In order to see detail you must reduce the amount of light entering the slide. However, with too little light it will be too dark to see anything! Good microscopy depends upon adjusting the light level to an optimum level maximizing visibility and resolution.
Some microscopes have a rheostat to control the brightness of the light source. If your light has a rheostat, then you may use the rheostat and the diaphragm to control the amount of light.
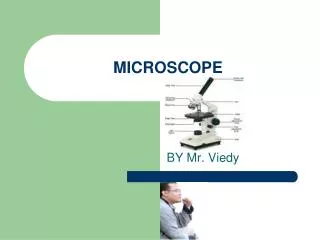
Exercise 2.1 • Write the name of each part of the microscope in the blanks in Figure 2.1 or Figure 2.2. (Label only the drawing which most closely matches your microscope).
8. Arm 13. Base 10. Coarse adjustment knob 12.Condensor 11.Fine adjustment knob 2.High power objective 5. Iris diaphragm 6.Light 3.Low power objective 7.Ocular 1.Revolving nosepiece 4. Slide clip Stage