Download
1 / 19
200 likes | 287 Views
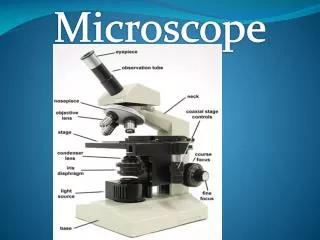
Microscope. Basics. T. Trimpe 2005 http://sciencespot.net/. MICROSCOPES. MAGNIFIES OBJECTS (MAKES OBJECTS LOOK BIGGER) HELP SCIENTISTS STUDY OBJECTS & LIVING THINGS TOO SMALL TO SEE WITH THE NAKED EYE. Diaphragm. Base.

E N D
Microscope Basics T. Trimpe 2005 http://sciencespot.net/
MICROSCOPES • MAGNIFIES OBJECTS (MAKES OBJECTS LOOK BIGGER) • HELP SCIENTISTS STUDY OBJECTS & LIVING THINGS TOO SMALL TO SEE WITH THE NAKED EYE
Diaphragm Base Always carry a microscope with one hand holding the arm and one hand under the base. Ocular lens(Eyepiece) Body Tube Nosepiece Arm Objectives Stage Stage Clips Coarse Adjustment Fine Adjustment Light
3 Types of Microscopes • simple microscope has only 1 lens. compound microscope has 2 sets of lenses. It can magnify things 100 - 200 times larger than they really are. • electron microscope can magnify objects up to 300,000 times. They do not use lenses, but use electrons to enlarge the image.
PARTS OF A MICROSCOPE • ocular (lens) eyepiece • the lens of the microscope that you look through • course adjustment • the large knob on the microscope that you turn to bring the object into focus • fine adjustment • the small knob on the microscope that brings the image into focus
PARTS OF A MICROSCOPE • arm • the part of the microscope supporting the body tube • body tube • the part that holds the eyepiece and the objective lenses. • nosepiece • the part at the bottom of the body tube that holds the objective lenses and allows them to be turned
high power objective lens • the lens that magnifies the object the greatest amount. (usually 40x) • Low power (scanner) objective lens • the lens that magnifies the object the least amount (usually used to find the object; magnifies only 3x or 4x) • middle power objective lens • the lens that usually magnifies the object more than the scanner lens, but less than the high power lens (usually 10x to 20x)
10. stage • the flat part below the objectives lens where the slide is placed 11. clip • the part that holds the slide in place so it doesn’t move 12. diaphragm • the part that controls the amount of light entering the field of view
13. light source • the lamp (or mirror) under the stage that sends light through the object being viewed. 14. base • the bottom part that supports the rest of the microscope
Diaphragm Base Always carry a microscope with one hand holding the arm and one hand under the base. Ocular lens(Eyepiece) Body Tube Nosepiece Arm Objectives Stage Stage Clips Coarse Adjustment Fine Adjustment Light
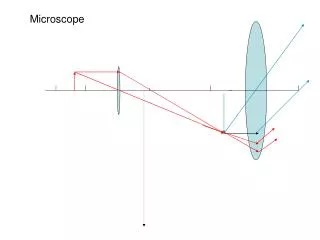
Field of View • Field of view is the area (circle) that you see when looking through the eyepiece
We can see better details with higher the powers of magnification, but we cannot see as much of the image. Which of these images would be viewed at a higher power of magnification? Comparing Powers of Magnification
What’s my power? To calculate the power of magnification, multiply the power of the ocular lens by the power of the objective. What are the powers of magnification for each of the objectives we have on our microscopes? Fill in the table on your worksheet.
Calculating Magnification 1. Find the power of the lens. It is found on the side of the lens. Magnification power of a lens is always identified by the label of x (10x, 1000x) 2. Multiply the power of the eyepiece by the power of the objective lens. 3. Examples: eyepiece obj. lens 10x times 100x 10x times 50x 10x times 40x
Appearance of the Specimen • Objects appear upside-down & backward • Movement appears to be in opposite direction than actual movement 1 2 move slide slide appears to move 2 1
3 – Once you have the image in view, rotate the nosepiece to view it under different powers. Draw what you see on your worksheet! Be careful with the largest objective! Sometimes there is not enough room and you will not be able to use it! Let’s give it a try ... 1 – Turn on the microscope and then rotate the nosepiece to click the red-banded objective into place. 2 – Place a slide on the stage and secure it using the stage clips. Use the coarse adjustment knob (large knob) to get it the image into view and then use the fine adjustment knob (small knob) to make it clearer. 4 – When you are done,turn off the microscope and put up the slides you used.
Recording Observations • Draw specimen large enough to fill “field of view” circle • Draw as many details as possible • Drawing should be neat • Label specimen • Label power of magnification • Name & date on paper
Making a Wet Mount Slide 1. Use dropper to place a drop of water on the center of a clean slide. 2. Use tweezers to lay specimen on the drop of water. 3. Gently touch the cover slip to the edge of the drop of water to cover the specimen & the water.
4 - Slowly lower the cover slip on top of the drop. Cover Slip Lower slowly 5 – Place the slide on the stage and view it first with the red-banded objective. Once you see the image, you can rotate the nosepiece to view the slide with the different objectives. You do not need to use the stage clips when viewing wet-mount slides! How to make a wet-mount slide … 1 – Get a clean slide and coverslip from your teacher. 2 – Place ONE drop of water in the middle of the slide. Don’t use too much or the water will run off the edge and make a mess! 3 – Place the edge of the cover slip on one side of the water drop.