Download
1 / 18
180 likes | 287 Views
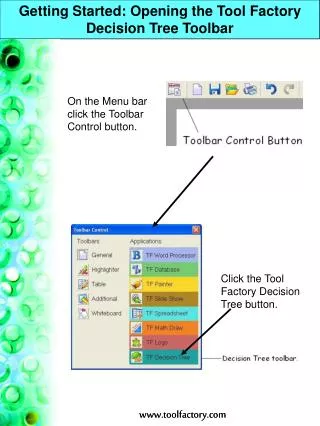
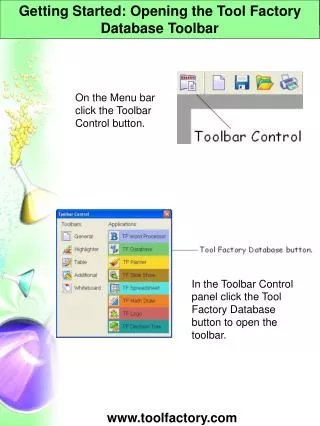
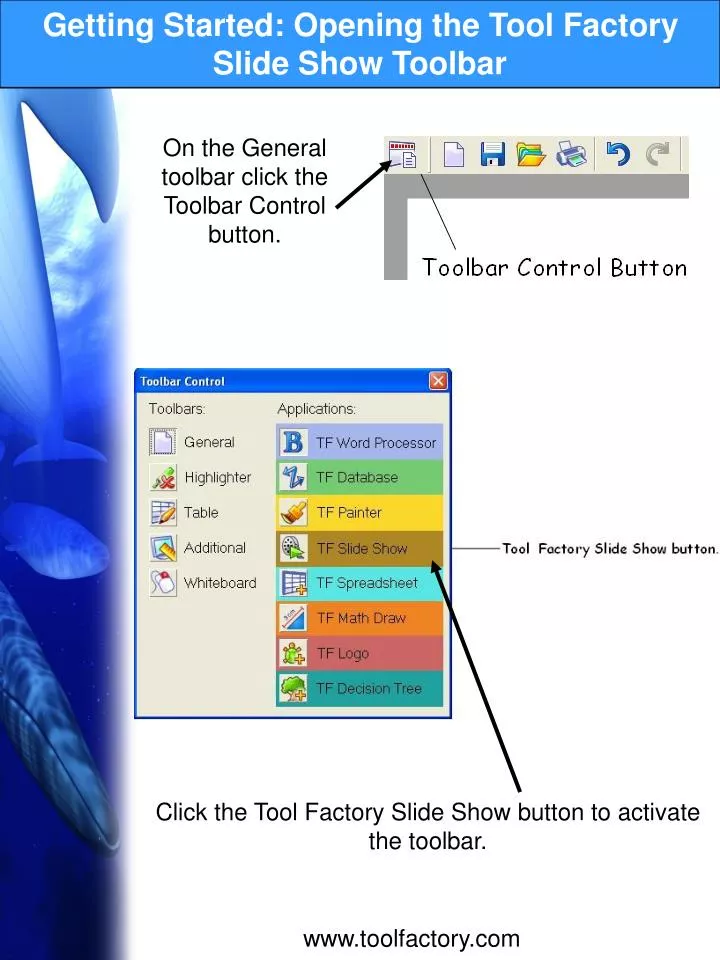
Getting Started: Opening the Tool Factory Slide Show Toolbar. On the General toolbar click the Toolbar Control button. Click the Tool Factory Slide Show button to activate the toolbar. www.toolfactory.com. Getting Started: Personalize Toolbars (CTRL+Shift+T).

E N D
Getting Started: Opening the Tool Factory Slide Show Toolbar On the General toolbar click the Toolbar Control button. Click the Tool Factory Slide Show button to activate the toolbar. www.toolfactory.com
Getting Started: Personalize Toolbars (CTRL+Shift+T) On the Menu bar click the Toolbar Control button. On the keyboard hit CTRL+Shift+T Select the icons that you want to appear on the toolbar. www.toolfactory.com
Creating Slides: Add a Text Frame On the Menu bar click Other>Add Text Frame. Click, hold, and drag out a text frame. Add text to your newly created text frame and click the Effects button on the General toolbar if you wish to add text effects. Optional: To lock your text frame to the page go to Tools>Lock to Page. www.toolfactory.com
Creating Slides: Add Identical Slides On the Tool Factory Slide Show toolbar click the Storyboard button. Select a slide by clicking it. On the General toolbar click Copy, and then click Paste to duplicate the selected slide. TIP: Once you hit Copy, you can click the paste button multiple times to paste the same slide over and over. You do not need to “re-copy” in between! www.toolfactory.com
Creating Slides: Edit Individual Slides In storyboard view, double click the slide you wish to edit. On the Slide Show toolbar click next slide to advance to the next slide. To delete the current slide, on the Menu bar go to Tool Factory Slide Show>Delete Slide. www.toolfactory.com
Creating Slides: Change Background of a Slide On the Menu bar click Tool Factory Slide Show>Choose backdrop. Sift through the folders and choose a backdrop. To change the Page Color click either the Page Setup button on the Additional toolbar or go to File>Page Setup. Select the Page tab and click the color you would like! www.toolfactory.com
Creating Slides: Change the Order of the Slides Click the Storyboard button on the Slide Show toolbar. Click on a slide to select it and then drag it to the correct order placement. www.toolfactory.com
Creating Slides: Show Slides on a Looped/Timed Run On the Menu bar click Tool Factory Slide Show>Settings. In the Slide Show panel adjust the Display Time settings. Timed Run - Determines the time interval between each slide. Slides will change without the need for a click! Loop - Slides will run continuously. The slide show will not end at the last show, but rather start again at the beginning! www.toolfactory.com
Creating Slides: Viewing a Presentation On the Tool Factory Slide Show toolbar click Run Show and enjoy! www.toolfactory.com
Show Settings: Bullet Point Animations On the Menu bar click Tool Factory Slide Show>Settings. Click this box to make the settings apply to the entire show. Choose a type of bullet animation from the Bullets drop down menu. www.toolfactory.com
Show Settings: Slide Fade From the Storyboard, on the Menu bar click Tool Factory Slide Show>Settings. Choose to apply the settings to the whole show. Select the type of fade from the Fade drop down menu. www.toolfactory.com
Show Settings: Sound From the Storyboard click, on the Menu bar, Tool Factory Slide Show>Settings. Choose to apply the settings to the entire show. Select a sound from the drop down menu. Record your own sound. www.toolfactory.com
Tools: Instant Slide Show from Digital Pictures Click the Storyboard button on the Slide Show toolbar. Drag images from the Resource Bank into the Storyboard view. You can now make instant digital picture slides! TIP: If you drag a folder of images to you’re the storyboard view it creates a slide for every image. It’s an instant Slide Show of Digital Pictures in seconds! www.toolfactory.com
Tools: Links Between Slides Select the image or text you would like to use as a link. Click the Links button on the Additional toolbar. Click the Hyperlink tab. Chose where you would like your selected image or text to link to. www.toolfactory.com
Tools: Storyboard Slide View On the Slide Show toolbar click the Storyboard Button. Select the slide you wish to resize by clicking it. Click, hold, and drag one of the red boxes to resize it. www.toolfactory.com
Tools: Use Bullet Points On the General Toolbar click the Effects button. Choose the desired bullet type. Click Edit Bullets to get more specific options. Finished bullet points! www.toolfactory.com
Special Features: Pencil Tool When viewing a slide show, right click>Pencil>Choose a color. You can now draw on the slide! TIP: You now have to use the arrow keys or enter to change slides. www.toolfactory.com
Special Features: Mouse Edits Slide During a presentation right click on the slide and click Settings. Click the Mouse Edits Slide check box. You can now edit the slide during a presentation! www.toolfactory.com