Download
1 / 50
500 likes | 610 Views
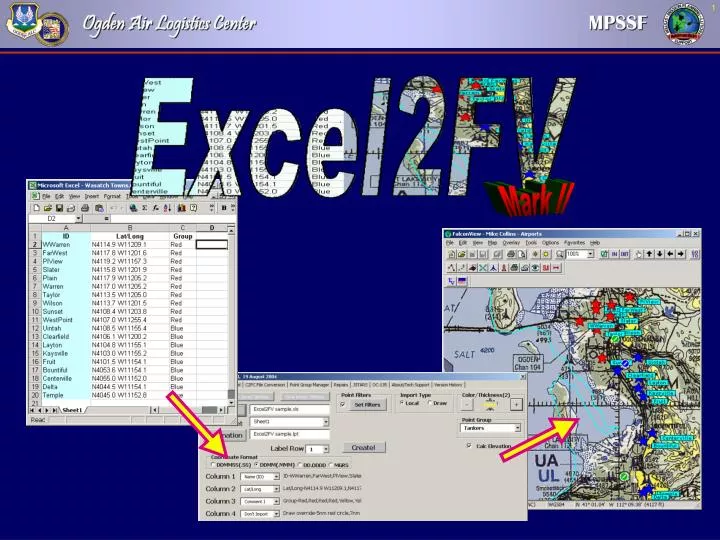
Mark II. Purpose of Excel2FV. Mark II. Many agencies produce point lists of different data (target lists, force locations, etc.) in either Excel or delimited text format. You can manually enter that data into FalconView or let the Excel2FV tool do the work for you. CAUTION

E N D
Purpose of Excel2FV Mark II • Many agencies produce point lists of different data (target lists, force locations, etc.) in either Excel or delimited text format. • You can manually enter that data into FalconView or let the Excel2FV tool do the work for you. CAUTION The tool is NOT certified. Verify your results!
Getting Started • The Excel2FV2.doc file is the program and runs by using an embedded macro. • PFPS Update Tool must be installed! • In MS Word, Ensure your Macro Security is set to Medium. • Excel2FV2 uses Macros to run the Visual Basic code. • Go to Tools > Macro > Security and ensure the setting is Medium.
Enable Macros • Open the Excel2FV2.doc to run the program • You must Enable Macros for the program to run • If you don’t get the option window to enable Macros, then your security setting is incorrect • It should be set to Medium If the Word .doc opens like this, then you need to change your Macro security.
Run Macro • New Mark II format uses tabs across the top vs. buttons from the Word Doc • Select the appropriate tab for what you want to convert • Excel2FV • Point Group Manager • Repairs Mark II Old Format
Main Menu • Click on any of the above tabs to go directly to that topic. Otherwise you will advance through each one in order. • Click the home button to take you back to this Main Menu screen End of Show
Import to FV • This is the idea that started the whole program! • Converts a spreadsheet of data (that contains coordinates) into a file displayable in FalconView
Select the Import Type • Local Point database or Drawing file • Click the Source button and browse for the file you want to convert. • Default format is an .xls file, but you can also choose a tab delimited text file. • Select the Destination (Save location) of the .lpt file. FalconView must be open to supply DTED
Once the .xls file is “read”, the number of columns will automatically adjust in the program to match the Excel file • The Coordinate Format your file is in should automatically be detected • Cardinal direction (N/S or E/W) can be at either the beginning or end of numeric value. • N45 15.6 W112 04.2 • 4515.6N 11204.2W • 4515.6N11204.2W • MGRS • Specify what data is in each column • Use the dropdown to match ID, Lat-Long, Description, etc. • Use Comments as the designation for all non-specific fields • Select Comment # for your column that represents your Groups • We will specify the Groups using the Set Filters button later
Setting Filters • Click the Set Filters button to specify your groups. • In the Filter Column dropdown, select the column number that contains your groups. • Enter the Filter Text you want to filter by and the group name (Point Group) you want to assign it. • See next 2 slides for specifics on this. • Click Done! to apply and close.
The data you are working with might only contain descriptions of points and not actual group names. By filtering for specific text within that Description column you can designate specific groups. Ex. All items in Comment 1 column that contain the text “red” (Redding, Stored, etc.) would be assigned to the Targets group. Filtering • There is a hierarchy of filtering based on the Filter number (1, 2, 3…). • Ex. If your second filter was “store”, then the comment “stored” would also be assigned to the Red group because that filter was applied first.
You can search for several different strings by separating them with commas. i.e. “Church, Mosque, Synagogue” will group any record containing any of the three strings. You can do searches that are limited to the start of a string using the ~ character. i.e. A search for “74~” will find 74556 but not 56474. Similarly, searching for “~74” will search for records that end with 74 only. Filtering • The Auto Filter button will automatically fill in your filter fields based on all the different names it finds within the designated column. • Works for the first 1000 points.
Filtering • Use the Reset Filters and Groups buttons to return those field values back to the default ones. • Icon Set 1 button lets you cycle through 4 preset icon settings • The Done! button will apply all settings and close the window. • Clicking on the in the top, right corner will do the same thing.
Save & Open Settings • Data that’s distributed on a regular basis will almost always stick with the same format • Use the Save Import Settings to save your settings for filters, column format, and coordinate format • Files get saved as *.t2l files • *.t2l = Text 2 Local Point – original program • Use the Open Saved Settings to open previously saved *.t2l files
Create! • Click the Create! button to create the *.lpt file. • Import Summary Window • Will tell you how many points were imported into the new *.lpt file, how many failed, and how many were skipped. • Adding to existing file • If you are saving to a file that already exists you will get this window. • You have 3 options (adding, deleting old file first, or renaming to new file)
Verify Your Data! • Open PFPS Database Admin • Go to File > Local Database > Set Active Database… • At the DBA32 window, select Yes to change to new database • Select the *.lpt file you just created • Browse if saved to another location • Highlight a group and select Edit • Verify point data, check for incorrect Lat/Longs, etc. • Repeat for remaining Groups
Display Points in FalconView • Open Overlay Options in FalconView • Go to Local Points “Tab” • Check the Group Names you want to display on the map • Default is none checked • Adjust Display Threshold as desired • Recommend setting to NEVER to locate any stray points on the world TIROS view • Check the Local Points On box and click OK to display points on map
A point’s Name (ID) will be used as Tooltip text for both Local Points and Drawings • The Name and Description will show in the Status Bar Text for Local Points. Note: • A Local Point’s comment field is limited to 80 characters. This number decreases by 2 for each additional line of comments. (ex. 4 lines of comments are limited to a toal of 74 characters, including spaces)
Converting Drawing Files • This function will create small drawing objects at the points • The process of selecting a Source, Destination, and designating columns remains the same as with Local Points. • C2PC files (*.mgc) are converted using the next process. • Choose from many different shapes, colors, and fill types. • Embedded Text • Adds text within the sides of the drawing • Plot CenterPoint • A small circle designates the center of the object.
Drawing specific settings get applied • Fill Pattern, Symbol Size, Line Width, Symbol Type and Color • Symbol size can be manually entered too • (1200 FT, 4.53 KM, 223 Meters, etc.) • Symbol Color and Type only apply if no match is found under Set Filters • Click Set Filters to set specifics for each Group Click line to change color
Set Filter Text, Symbol Type, and Color for each Group • Click Done! when ready • Save settings in main GUI • Save Import Settings button • 2 new checkboxes for drawings • Rainbow Colors • Hide Border Lines
Drawing File Overrides • You can designate a column that will be used to override the drawing defaults or import settings. • Column can contain any or all characteristics of the object to override. • “5NM green pentagon crosshatch” in the designated column will override all defaults with these parameters. • If you just enter “Yellow crosshatch”, the default size and shape will be used and only the color and fill characteristics will be modified. • Override parameters can be entered in any order. If multiple entries are present (blue 5NM green), then the last one (green) will be used.
Click Create! to generate the drawing file. • When complete you will be asked if you want to open the new file in FalconView. • Will launch FVW if not already open.
Draw File Areas • If you have multiple Lat/Longs or MGRS coordinates in the same cell an area will be generated. • Ex. If you have a Lat/Long cell with 3 coordinates a triangle will be created.
Using Highlighter Fill • Be cautious when using Highlighter to fill the drawing areas, especially if processing a large number of points. • There is a substantial loss in performance when highlighter is used.
Connecting Same Name Pts • Use Connect Same Name Pts to create a Polyline drawing • Points in separate fields • Selecting Close Multipoint Records will connect first and last points (polygon)
FV2Excel • This will convert a PFPS file to an Excel File • Local Point • Threat • Drawing • Man CHUM
Start by selecting what type of file you want to convert • Source File Type • Local Point, Threat, Drawing, or Manual CHUM • Select the Export File Type • Excel, comma delimited, or C2PC *.mgc file Future Improvements Note:Manual CHUM file conversion only converts the point data (towers, airports, etc.). It does not convert power lines.
Select the variables that effect the output format • Coordinate Format • Column Format • Optional Columns • Alternate line shading • Options may vary depending on what source file is selected Threat file options
Click Convert File! to generate the Excel (or text) file • Check output data for errors
Converting C2PC Files • You now have the option of converting C2PC Magic (*.mgc) files or C2PC Threat Export files • New Convert Multiple .mgc Files option
C2PC Magic Files • The GUI is very straightforward • Select your Source • (*.mgc file) • The Destination will fill in automatically based on the name and Save Location window selection.
If you want to use anything other than the default settings in FalconView drawings, check and set the 4 Font Overrides settings. • This will override the style settings from the C2PC file • Click the Convert File! button when ready.
You will need to run C2PC and save the threat file as an *.mdb file. • Select this file as your Source. • Enter a Destination for the resulting FalconView *.thr (or Drawing) file. • Use the Geo Filtering to “crop” the *.mdb file. • Click Convert File!
Point Group Manager • Allows you to move or copy groups between Local Point files • Keeps your Local Point icons and links intact • PFPS Database Admin does not • Changes are applied immediately • No save button
Use the Change button to select a Local Point file • The New button is used to create a new Local Point file • Use the arrow buttons to copy individual groups or all groups. The Move button will move the group from one file to the other • Number of point and links transferred will be displayed each time an arrow button is selected • The Rename button is used to rename groups that are highlighted • New buttons on the bottom allow you to Update Elevations From DTED for the points
Repairs Tab • Repairs gives you several administrative features that are helpful with PFPS • 2 of the buttons will only show if certain registry entries are missing (once selected they will disappear) • Fix PC to run Excel2FV • should always be run after install of Excel2FV • Fix TaskView Excel Export • fixes TaskView problem for Office 2003 and Office XP machines
Repairs – Reset FalconView Overlays • Reset FalconView Overlays will clear up any overlay problems that are preventing FalconView from opening. If FVW opens for an instant and then shuts down, use this reset button to fix the error.
Repairs – Reset All Current User Options • Reset All Current User Options will reset all PFPS settings back to the install default settings • ie., GENERIC AIRCRAFT at KVPS/A, plus everything else • Latest addition to the Repairs tab
Repairs – User Preferences • You can now easily capture all PFPS settings that effect the current user’s profile • Modify settings in PFPS (including all FalconView Overlay Options settings, start aircraft and location) and then Export to a PFPS Preferences (*.pp) file • Import to apply those settings to any user’s profile • Automatically creates backup of current profile
Repair - Merge FV Drawing Files • Allows you to merge up to 9 separate drawing files into one new one • Select File # 1 • This will create a File # 2 button • Select up to 9 drawing files • Enter a name for the merged file and select MERGE!
Repairs – Map Path Management • Files copied directly from a CD keep the “Read Only” attribute. These can’t be updated from the CSD. • Copying data outside of MDM may also give you duplicate files of the same frame (different versions) • Map Path Scrubber allows you to clean up your map paths that have been corrupted by manually moving files (not using the Map Data Manager)
Repairs – Map Path Management • Map Path Update will update your local coverage files to match those of you map data paths (if more current) • This is very useful for updating the coverage of ‘client’ computers after the servers maps have been updated. Without running Map Path Update you would have to run a Data Check on your maps which can take a long time.
Repairs – Map Path Management • Backup saves the current FalconView path configuration • Restore resets to the selected Backup path file configuration • If FalconView gets locked up and you suspect the problem is with your network map paths, Reset removes all but the two default paths • CD-ROM and C:\PFPS\falcon\data
JSTARS Mission Report Converter • Translates the JSTARS Mission Reports into a Drawing file • Save the JSTARS mission report Word document as a text file then use this tool to import all the JSTARS mission reports as a FalconView drawing file
Convert OC-135 INS Route • The OC-135’s Litton INS points are converted into a Local Point file • Helps you to rapidly create a route or display points in FalconView • Select the OC-135’s INS log file (*.ins) as your Source • Click Import Points!
Version History • Provides a list of all changes and fixes that have been made during the development / testing of Excel2FV – Mark II
Mark II Any Questions??? Tutorial Created by Send Questions or Comments to paul.hastert@pentagon.af.mil or paul.hastert@af.pentagon.smil.mil or Pablo@mc130.com (please send example files if any problems are found) Visit Pablo’s website at www.mission-planning.com EXIT