Download
1 / 31
310 likes | 471 Views
Introduction to CVS. Outline. Introduction to Source Code Management What is CVS? CVS for Project Submission Basic commands Checkout, Add, Commit, Update How to use CVS using Putty How to use CVS using Eclipse. What is Source Code Management.

E N D
Introduction to CVS UMBC CMSC 341
Outline • Introduction to Source Code Management • What is CVS? • CVS for Project Submission • Basic commands • Checkout, Add, Commit, Update • How to use CVS using Putty • How to use CVS using Eclipse UMBC CMSC 341
What is Source Code Management • SCM : Also known as revision or source control • So, why should you use one? UMBC CMSC 341
What is CVS? • Concurrent Versioning System (CVS) is one of the earlier SCM systems which gained wide adoption • Advantages • Open source • Easy to install and use • Simple command line client • Wide integration in a lot of development tools UMBC CMSC 341
CVS for Project submission • Terminology used • Repository • Server • Client • Working Directory • Some of the options available to connect to the repository • Command-line using Putty • Through Eclipse IDE UMBC CMSC 341
CVS Command • The general form of CVS commands is: • All CVS commands start out with “cvs” • Commands may also have flags and/or arguments which modify their behavior • For a more help… • General help: cvs --help • List of commands: cvs --help-commands cvs [cvs-options] command [command-options-and-arguments] UMBC CMSC 341
Basic commands • checkout : Pull resources from the repository and create a working copy • add : place a resource under version control • update : Pull down changes from the repository into your working copy • commit: Check files into the repository UMBC CMSC 341
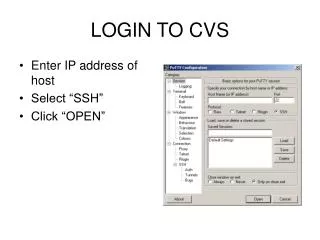
Command-line using Putty • Steps to be followed • Log in using Putty • Edit the .cshrc file : Add alias javac usr/local/bin/javac UMBC CMSC 341
Command-line using Putty • Step 1: cd changes your working directory to home directory • Step 2: cvs -d /afs/umbc.edu/users/y/p/ypeng/pub/cs341s11/Proj0 checkout -d MyProj0 your_username You will get two files copied to MyProj0: a junk and a build file UMBC CMSC 341
Command-line using Putty • Step 3: cd MyProj0 Change to your project directory • Step 4 : mkdir src • Step 5: cd src • Step 6: Create a java file called Proj0.java and type in a simple java code. Let the package name be ‘firstproject’. Save the file in the src folder. UMBC CMSC 341
Build file • Step 7: if the build file you checked out is build.txt, then mv build.txt build.xml • Step 8 : edit build.xml (change the value of main.class) Step 3: cd MyProj0 Change to your project directory Step 4 : mkdir src UMBC CMSC 341
Command-line using Putty • Step 9: Compile the code using ant compile • Step 10: Run the code using ant run UMBC CMSC 341
Command-line using Putty • Step 11 : Add files to the repository: • Step 11.1 cvs add build.xml • Step 11.2 cvs add src/ • Step 11.3 cd src • Step 11.4 cvs add Proj0.java • Step 11.5 cvs commit –m ‘some text’ UMBC CMSC 341
Command-line using Putty • Step 12: Check if Proj0.java is added to the repository • Go to src folder in MyProj0 • Remove Proj0.java • Run ‘cvs update’ • You should get back Proj0.java from the repository UMBC CMSC 341
Eclipse • Eclipse has a built-in perspective for CVS • All of the developer downloads come with it pre-installed (The following directions are for the Eclipse Ganymede Eclipse IDE for Java Developer release)
Eclipse – CVS Perspective • To open the CVS repository perspective select Window Open Perspective Other…
Eclipse – CVS Perspective • Select CVS Repository Exploring
Eclipse – Adding a Repository • To add a repository, right click on the CVS Repositories pane and select New Repository Location…
Eclipse – Connection Settings • Type in the parameters to connect to the remote repository • For example… • Host: linux.gl.umbc.edu • Repository Path: /afs/umbc.edu/users/y/p/ypeng/pub/cs341s11/Proj0/ • User: Your GL/myUMBC username • Password: Your GL/myUMBC password • Connection type: extssh • Save the password if you wish
Eclipse – Viewing Repositories • You should now see the repository under the CVS Repositories Pane
Eclipse – Checking Out • Expand the repository, expand HEAD, select your module (username) then right click and choose Check Out As…
Eclipse – Checking Out (continued) • Be sure to use the New Project Wizard, click Finish…
Eclipse – Checking Out (continued) • Select to check out the module as a Java Project
Eclipse – Checking Out (continued) • Name the project and click Finish…
Eclipse – Checked Out Code • Switch back to the Java Perspective and you will see the module checked out as a project • Note the little orange cylinders – that indicates that it’s under version control
Eclipse – New Resources • Just like with the command line, items that are not know to be under CVS control are marked with a “?” symbol • Such as the Eclipse generated src folder
Eclipse – Synchronizing • To commit to or update from the repository, right click on the project and choose Team Synchronize with Repository
Eclipse – Committing Resources • Here we see an outgoing arrow indicating that this needs to be pushed to the repository • Commits and updates can be performed by right clicking
Eclipse – Synchronized • If all is in sync, you should see the “No Changes” dialog as shown below…
Thank you! UMBC CMSC 341