Download
1 / 40
400 likes | 470 Views
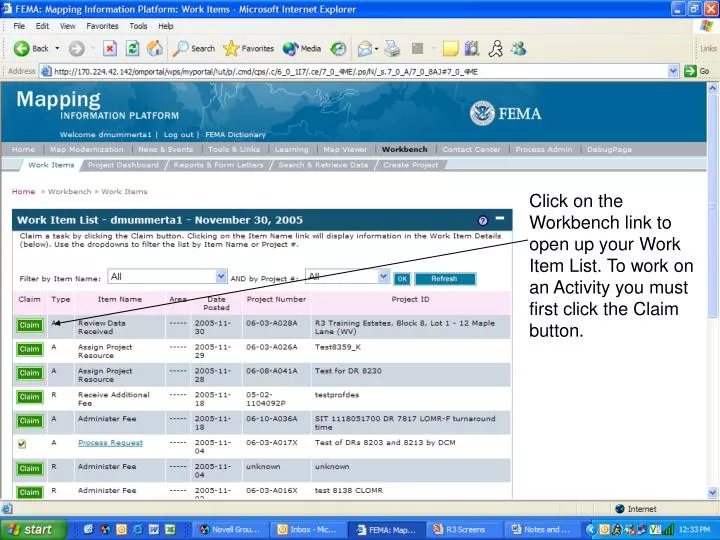
Click on the Workbench link to open up your Work Item List. To work on an Activity you must first click the Claim button.

E N D
Click on the Workbench link to open up your Work Item List. To work on an Activity you must first click the Claim button.
After you click the Claim button for the Activity you want to work on the page will refresh. The Activity Name is now a hyperlink. Click on the hyperlink to begin working on the Activity.
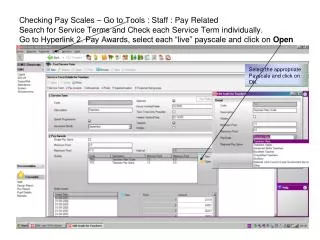
Review the information entered when the Project was created. The Lot Type and Fee Type are now required and may not have been enter by Project Administration.
Review the rest of the Project Data and then click the Continue button.
Legal Property Information is not required at this point but you may enter it if you choose. Then click the Continue button.
Review the Main Requestor Mailing Address and revise if necessary. Then click the Continue button.
If there are any Other Mailing Addresses entered review them and revise if necessary. Then click the Continue button.
The Flooding Source is not required at this point but you may enter it if you choose. If you do, click the Add Flood Source button. The page will refresh with the Flooding Course in a focus box at the bottom of the screen. Then click the Continue button.
On the Community Information screen scroll down and review the community that was entered by Project Administration. If the community needs to be revised or if the Map Panel Number was not added, click the Modify button.
After the page refreshes select the State from the dropdown.
After the page refreshes select the County from the dropdown.
After the page refreshes select the Community from the dropdown.
The CID will automatically populate. Next select the appropriate panel from the Map Panel Number dropdown.
After selecting the Map Panel Number click the Add Map Panel button.
The page will refresh and the Map Panel Number you selected will show up in the focus box. Next click the Add Community button.
The page will refresh and both the Community and the Map Panel Number you selected will show up in the focus box. Then click the Continue button.
On this screen you will inventory all of the data you received for this project. You will also document all of the required data that you did not receive, if necessary.
To record the data items that you received with the request first choose a data type from the dropdown.
Click the Yes button to indicate that you received the data item and that it is complete. In the case of a Recorded deed that means that it accurately describes the property and it includes the recording information (Book and Page, Document Number, etc.) from the Office of the Recorder.
Indicate the date the data item was received. This is the date that the project was received by Project Administration. You may enter any internal notes about the data item but it is not required. Make sure you click the Add Entry button or the Data Item will not be saved.
After you click Add Entry the page will refresh and you will need to scroll down to see the information that has been saved for that Data Item. If necessary, you can choose to Modify or Delete the Data Item. Repeat the process for all Data Items that were received with the original submittal.
If you have a Data Item that is not on the dropdown list you can choose Other.
Type in a short description of the Data Item in the Other Data Type field. Indicate that the Data Item is complete by clicking the Yes button, enter the date it was received, and click the Add Entry button.
After you have recorded and added all of the Data Items you received the focus box at the bottom of the screen will look like this.
If you did not receive all of the required data for the project you need to indicate which required Data Item was not submitted. If a required Data Item was submitted but it is not complete, you will record it the same way. Select the Data Item from the dropdown, click the No button, and enter the Date Requested (this is the date you will send a 216-AD asking for the Data Item). Make sure you click the Add Entry button to save the information. *PLEASE NOTE* You must record the incomplete Data Items on this screen to make sure the 216-AD letter asks for the correct information from the requestor.
If you need to record a Data Item that is incomplete and you want to use more descriptive text in the 216-AD letter select Other from the dropdown, type a short description of the incomplete Data Item in the Other Data Type field, enter the Date Requested, and type the more descriptive text in the Letter Text field. Make sure you click the Add Entry button. *PLEASE NOTE* The Letter Text field is limited to 1750 characters.
After you have added all of the Data Items (both complete and incomplete) the focus box at the bottom of the screen will look like this. Then click the Continue button.
If you received all of the required Data Items (and Fees when applicable) enter the ADR date here. If you indicated that there were any incomplete Data Items on the Supplementary Data screen you will not be able to enter an ADR date here. If you try to enter an ADR date when there are outstanding Data Items or Fees you will get an error message. Also, if you previously indicated that all of the Data Items were complete and you try to continue past this screen without entering an ADR date, you will get an error message.
If you entered an ADR date on the previous screen select No letter required/all data received from the dropdown. If there are outstanding Data Items or Fees select Request additional data/fee from the dropdown.
If you selected Request additional data/fee enter the date you will send the 216-AD in the Letter Date field and click Add Letter. *PLEASE NOTE* The Letter Date you enter will appear on the top of the letter so make sure it is not a weekend day or Federal holiday.
After you click the Add Letter button the page will refresh and you will see a history of the letters sent for this project at the bottom of the screen. Click the Continue button.
On this screen click the Expand All link to see all of the case specific data and verify that it is accurate before you complete the activity.
After you click the Expand All button the page will refresh and you can scroll down to see all of the case information. Make sure that it is accurate before you click the Continue button.
When you are sure all of the information is accurate click the Continue button. *PLEASE NOTE* If you see that any of the information is incorrect you can use the Back button to navigate to the appropriate screen and correct the error.
If you are sure the information is accurate and you are ready to complete the Review Data Received activity click the Complete Task button. Once you click the Complete Task button the Project will move to the next Activity in the Workflow and you will not be able to edit any of the information you entered.
After clicking the Complete Task button you’ll need to click the Maximize button to see your Work Item List.
When your Work Item List loads click the Refresh button to see if there are any new Activities.