Download

1 / 146
1.74k likes | 2.58k Views
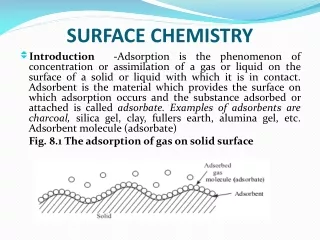
SURFACE FINISHINGS. The art of treating the surface of building materials with a suitable covering material to make them weather resisting and decorative is called surface finishing .

E N D
SURFACE FINISHINGS The art of treating the surface of building materials with a suitable covering material to make them weather resisting and decorative is called surface finishing. The covering material used for surface finishings are called surface finishes which are plasters, paints, washes etc.
PURPOSE • To protect the surface from the effects of weathering agencies. • To provide a smooth surface. • To provide pleasing appearance to the surface.
IMPORTANT TECHNICAL TERMS • Background :-The surface to which first coat of plastering is applied is called background. • Dubbing out:- The filling the hollow spaces of the back ground before applying the plaster is called dubbing out. • Finishing coat:- The final layer of the surface finish is called finishing coat. • Hacking:- The process of making the background rough to act as key for plastering is called hacking.
Important Technical Terms (-ctd-) • Gauging:- The mixing of various constituents of plaster is calledgauging. • Rendering coat:- The first coat of plastering is calledrendering coat. • Under coat:- The layer providing base for the application of remaining coats is calledunder coat. • Floating:-The process of providing a finishing coat with a float iscalledfloating.
Important Technical Terms (-ctd-) • Peeling:-The removal of the plaster from the background is calledpeeling. • Blistering:-The local swelling of a finished plastered or paintedface is known asblistering. This is due to lack of adhesion of the plaster or paint with the surface. • Cracking:-The development of angular fractures or cracks in a plastered surface is called cracking. In case of painting it indicates the presence of a soft under coat. • Checking:-The longitudinal split in a painted or plastered surface isknown aschecking.
Important Technical Terms (-ctd-) • Chalking:-The dull and powdery appearance of a painted or plastered surface is known as chalking. It indicates insufficient or inferior binding material used in the paint or plaster. • Crazing:-The irregular development of hair like cracks on a plastered surface is termed as crazing. • Dado:-The special treatment provided to plastered walls at their lower level usually in bathrooms is called dado. It is provided up to one meter height from the floor level. It may be consisting of rich cement mortar, glazed tiles etc.
Important Technical Terms (-ctd-) • Skirting:-The special treatment provided to plastered walls at their lower level usually in drawing and living rooms of a building is called skirting. It is provided up to 15cm height from the floor level. It is usually consisting of the material which is used for providing margin or boarder of flooring. It is provided to protect the walls from water in case of washing of floors
PLASTERING The art of covering the surface of masonry work with a suitable material is called plastering.
PLASTERING • A fine paste of mortar made by mixing cement with sand or fat lime with sand or surkhi in addition to sufficient quantity of water if called plaster. • When cement is used as a binding material, the plaster is called cement plaster and if lime is used as the binding material, it is called lime plaster. • An ideal plaster should be smooth, non absorbent and washable. It should not be affected by weathering agencies.
PLASTERING • The finished surface of walls constructed in bricks or stones are generally so coarse textured that they provide unsuitable finish for the internal walls of most of the buildings. • These surfaces are rendered smooth by the application of one or two coats of plaster. The ceilings are also rendered smooth with plaster.
PLASTERING • The object of external plastering is to cover the surface to enable it to resist the effect of weathering agencies. However, a good brick work made of sound, well burnt bricks or neat stone masonry constructed of durable stones does not require external plastering. • The object of internal plastering is to provide a smooth surface in which dust and dirt cannot lodge and to form a smooth surface for applying white or color wash, distemper or paint.
TYPES OF PLASTERING1. CEMENT PLASTERING • The mix ratio of mortar in case of cement plastering depends upon the nature of the work to be plastered. • For rich plastering work at sensitive places (e.g. in side bathrooms, W.C. etc.), 1:3 cement plaster mix is used. For general plastering of walls 1:5 to 1:8 cement plaster mixes are used.
CEMENT PLASTERING (-ctd-) • Preparing the surface Before applying the plaster, the surface should be prepared properly. • The joint of masonry are properly raked to a depth of 10 to 15 mm to provide key to plaster. • The surface is then thoroughly wetted with water, washed well and kept wet for six hours. • When the surface is ready, plaster is applied.
CEMENT PLASTERING (-ctd-) • Applying the plaster • Cement plastering may be applied in one or two coats. • In case of plastering of single coat, the mortar is dashed against the prepared surface into a uniform thickness with the help of trowel. • Wooden screeds 7.5 cm wide and of required thickness of the plasters are generally fixed vertically 2.4 to 3 m apart to act as gauges guides in order to keep the plaster to the required thickness. Careful plumbing should be done in fixing of these screeds.
CEMENT PLASTERING (-ctd-) • Surplus mortar is removed with the help of mason’s straight edge and then the mortar is pressed well with a wooden float so that mortar may fill in the joints of the masonry. • The surface is then finally polished with a trowel or iron float. • The thickness of this coat should not be more than 16 mm.
CEMENT PLASTERING (-ctd-) • In case plastering is to be done in two coats the first coat is applied as described above with the only difference that it is not polished. • Before applying the second coat, the first coat is allowed to set but it would not become dry and it is also roughened with a scratching tool to provide key to the second coat. • The second coat is then applied in a thin layer not exceeding 3 mm in thickness within 48 hours. • It is then well trowelled and rubbed perfectly smooth with the help of a steel float. It is then allowed to set for 2 days and cured for more than 7 days.
CEMENT PLASTERING (-ctd-) • Suitability • This type of plastering forms an ideal coating for external finishings. • It is also used for internal renderings of common as well as important buildings. • It is specially suited for damp conditions i.e. bathrooms, etc.
2. LIME PLASTERING • The proportioning of the ingredients of a lime plaster is adopted according to the number of coats to be applied. • If the plaster is to be applied in one coat, 1 part of lime to 1.5 parts of sand is used. • If two coats are to be applied, the proportion for the first coat is same as above while the second coat consists of two parts of lime and one part of sand.
LIME PLASTERING (-ctd-) • If three coats are to be applied, the proportion of the third coat consists of 4 parts of lime to one part of sand. • In actual practice, all the coats consist of 1 part of lime to 2 part of sand. • Thickness of the lime plaster varies from 15mm to 20mm.
LIME PLASTERING (-ctd-) • Preparing the surface The method of preparing the surface is same as described in case of cement plastering.
LIME PLASTERING (-ctd-) • Application of first coat • It is applied by dashing the lime plaster with the help of trowel against the wall surface between the screeds. • Plaster is pressed well in the joints. • Function of this coat is to fill all the irregularities of the surface. • Average thickness of this coat is 10 to 12 mm. It is then left to dry for 3 to 4 days.
LIME PLASTERING (-ctd-) • Application of second coat • Before applying this coat, the first coat is well washed and scratched over with the edge of a trowel. • The second coat is then pressed against the wall with mason’s trowel and rubbed with a straight edge. • Thickness of this coat is 6 to 10 mm.
LIME PLASTERING (-ctd-) • Application of final and finishing coat • This coat usually consists of fat lime which is called lime putty. • It is applied on the second coat, made perfectly plain and then rubbed first with wooden float and then with a steel float to polish the surface, • It is about 3 to 6 mm in thickness. • It is allowed to dry for two days and then the surface is cured for 7 to 10 days.
LIME PLASTERING (-ctd-) • Suitability This type of plastering is suitable for internal renderings of buildings. But it is not commonly adopted these days.
3. MUD PLASTERING • The wall surface is first prepared as described in case of cement plastering. • The mud plaster is then evenly dashed against the wall surface with a wooden float. • After 24 hours, the surface is tamped. The function of tamping is to compact the layer and to drive it deep into the joints. It also helps to avoid developments of cracks due to hollows.
MUD PLASTERING (-ctd-) • After tamping, water is sprinkled slightly and the surface is polished with a steel trowel. • A thin wash of cow dung is then given and tamping is done again at the places where small cracks have formed. • Finally the surface is given a wash of fine white earth and cow-dung. • Sometimes, surface is given a wash of fine earth, cow dung and cement in proportion of 3 : 2 : 1.
MUD PLASTERING (-ctd-) • Suitability This type of plastering is done on walls of temporary sheds and country side buildings.
4. STUCCO PLASTERING • This is special type of plaster. • Stucco is the name given to a decorative type of plaster which provides an excellent finish like that with marble lining. • After preparing the surface, stucco plastering is applied in three coats. • Each coat should be permitted to dry thoroughly before applying the next coat.
STUCCO PLASTERING (-ctd-) • For internal surface, the first coat also known as scratch coat consists of lime plaster 12 mm in thickness. • The second coat or brown coat consists of rich lime plastering in 10 mm thickness. • The final coat or finishing coat consists of a mixture of very fine lime and white ground stone ( marble or quartz), 3 mm in thickness. • It is carefully polished with a bag of linen containing moist chalk in the first instance and then chalk and oil. • The surface is then finally finished by rubbing it with only oil as to make it smooth and bright.
STUCCO PLASTERING (-ctd-) • For external surfaces, the first and second coats are 10 to12 mm thick and the finishing coat is 3 to 6 mm thick. • The proportion of ingredients for the first two coats is 1 part of cement to 3 parts of sand with 10% by weight of hydrated lime. • The finishing coat consists of 1 part of cement and 2 pars of sand in which some coloring pigment is added or colored cement is used.
STUCCO PLASTERING (-ctd-) • Method of applying this plaster is same as described in case of cement or lime plastering. • Suitability This type of plastering is suitable for external as well as internal surfaces of buildings to provide an excellent finish.
5. MOUGHAL PLASTERING • It is generally applied in two coats of lime mortar by mixing lime, sand and surkhi in the ratio of 4:3:1 along with glue and powdered gull nut. • The surface is well wetted and the second coat of about 1.25 mm thickness is applied when the first coat is hardened. • The finished plastered surface is kept wet for 3 weeks.
MOUGHAL PLASTERING (-ctd-) • Suitability This type of plastering is suitable for internal surfaces of high class buildings but it is not commonly applied these days.
POINTING • Final treatment with cement or lime mortar made to the joints of the masonry to provide neat appearance is termed as pointing. • The joint on the face of stone or brick masonry are roughly filled in while the walls are being raised. • They are after wards neatly finished off to make them water tight. • The joints thus finished, give a better appearance to surface and prevent rain water from entering the interior of the masonry.
PURPOSE • To prevent the moisture and the rain water from entering the interior of masonry through joints and to make them durable. • To improve the appearance of the structure.
SUITABILITY • Pointing is preferred to plastering under following conditions. 1. When a smooth and even surface is not essentially required. 2. Where it is desirable to exhibit to view the natural beauty of the materials (bricks or stones) used in construction. 3. When the workmen ship is neat and good.
TYPES OF POINTING The selection of particular type of pointing depends upon the types of bricks or stone used and the appearance required..
TYPES OF POINTING (-ctd-) 1. Flat or flush pointing • In this pointing, the mortar is pressed tightly and the joints are filled up and made flush with the face of the wall. • This is the simplest type of pointing and is provided extensively. • It is economical and durable because it requires less labor than all other pointing. • It does not afford a lodging place for dust.
TYPES OF POINTING (-ctd-) 2. Struck pointing • In this pointing the face of the mortar joint instead of keeping it vertical, its upper side is kept about 12 mm inside the face of the masonry and the bottom is kept flush with the face of the wall as shown in fig 14.2. • This pointing has a better effect of throwing rain water. • This is also known as ruled pointing. • This pointing is the best in ordinary circumstances.
TYPES OF POINTING (-ctd-) 3. Recessed pointing • In this pointing the face of the mortar joint is pressed inside by means of a suitable tool and is left vertical instead of being made inclined. • This pointing is provided when face work of good textured bricks with good quality mortar is used.
TYPES OF POINTING (-ctd-) 4. V-pointing • This type of pointing is provided by forming a v-shaped groove inside the mortar of the joint with a special tool (steel or iron jointer). • This pointing is commonly recommended for brick work in case of governmental buildings.
TYPES OF POINTING (-ctd-) 5. Weather pointing • This is similar to V-Pointing but in this case instead of pressing a v shaped groove inside, it is provided by forming a v shaped projection outside the wall’s surface. • This pointing is generally recommended for superior brick work.
TYPES OF POINTING (-ctd-) 6. Keyed or grooved pointing • In this case, the joints are first filled up flush, and then a circular piece of steel or iron is pressed in and rubbed in the middle of joints. • Grooved pointing has a big groove in the face than keyed. • Keyed pointing gives an attractive appearance to the structure and is generally used for superior work.
TYPES OF POINTING (-ctd-) 7. Tuck pointing • In this pointing, the mortar joints are filled with the face of the wall. Then 6 mm wide and 3 mm deep groove is immediately and carefully formed in the centre of the joint and the groove is filled with or tucked in with white lime putty. • The lime putty is given a maximum projection of 6 mm. • Tuck pointing has a neat attractive appearance. But the lime putty is not durable and in due course of time becomes defective.
JOINTS IN BUILDINGS • The separations or planes of weakness introduced at different locations in a building are known as joints in the buildings. • When joints are provided in a building, reasonable care has to be exercised for the location, design, detailing of joints and selecting materials for forming and filling the joints.
JOINTS IN BUILDINGS • All building materials expand or contract with change in temperature and variation in moisture contents. Thus, major dimensional changes are caused in structures due to expansion or contraction of materials used in their construction. • The magnitude of these changes varies with the type of material used. • To overcome this problem, the large and multi-storied buildings may either be constructed monolithically with heavy reinforcement to link each of their component parts or they may be provided with a number of joints • Joints are usually provided in large or multistoried buildings. But joints should not be provided in shell structures and certain other rigid structures where provision of joints interferes with the rigidity of structure.