Download
1 / 34
340 likes | 514 Views
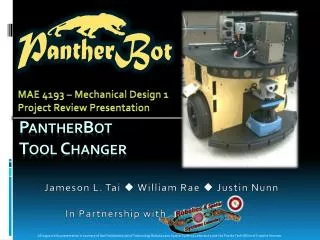
MAE 4193 – Mechanical Design 1 Project Review Presentation. Panther B ot T ool C hanger. Jameson L. Tai William Rae Justin Nunn In Partnership with .

E N D
MAE 4193 – Mechanical Design 1 Project Review Presentation PantherBot Tool Changer • Jameson L. Tai William Rae Justin Nunn • In Partnership with All logos in this presentation is courtesy of the Florida Institute of Technology Robotics and Spatial Systems Laboratory and the Florida Tech Office of Creative Services.
Introduction • Project Background • Design Objectives • Design & Analysis • Detailed Drawings • Fabrication and Testing Plan • Budget • Team Organization • Scheduling • Conclusion
Project Background • The PantherBot, also known as the PowerBot made by MobileRobots, Inc., is a multifunctional robot • autonomously mapping terrain • equipped with sonar and laser range finder • robotic arm fitted with a parallel gripper and webcam • has a 802.11b WiFi antenna for wireless communications (Image Source: RASSL)
Project Background (Image Source: RASSL)
Project Background • This team will create an autonomous tool changer such that the PantherBot will be able to perform the following functions inside the Olin Engineering Complex: • Open doors via twisting door handles • Open front door via pressing the handicap accessible button • Press appropriate buttons to recall and operate an elevator (Image Source: Robotics and Spatial Systems Laboratory (RASSL))
Design Objectives • Safety of people, building and robot • Functional tools for tasks • Autonomous tool changes • Positive control of tools • Secure storage • Store tools away from sensors and access areas
Design and Analysis Plan Combination of CAD and physical prototypes • CAD • 3D models allow testing of mechanisms • Test designs for fit and easily produce drawings • Prototyping • Evaluate concepts with real world interactions • Low cost testing
Design and Analysis Plan • CAE • Direct import of CAD models for structural testing • Find areas of weakness and excessive strength • Determine forces exerted on components in normal operation
Design and Analysis Plan Material Selection • Cost, Strength, Machineablilty, Surface Finish • Priority goes to Cost and Surface Finish due to the fact that our machined components are simple and exposed to relatively small forces. • A major project goal is ensuring that all components meet the visual standard of the existing robot
Fabrication Plan • We will fabricate parts through Building 538 (Machine Shop) • We will obtain reasonable off-the-counter parts if it is more cost effective to purchase the part than to produce in-house, such as bearings.
Testing Plan • We have set aside a budget for a testing rig, which will provide a viable test platform • Opening doors • Pushing door panel button • Pushing elevator buttons • The testing platform will provide feedback to the team regarding the repeatability of the tools, ease of operation, and storage functions. • Also, it will help determine if there are any problems with the tools before the PantherBot performs the predefined functions inside Olin Engineering Complex.
Project Timeline Fall 2008 • Complete research in door opening techniques • Pushing door (September 2008) • Pulling door (September 2008) • Present tool design (October 2008) • Present tool changer rack design (October 2008) • Preliminary Design Review • Presentation (22 October 2008) • Report (22 October 2008) • Analysis on tools and tool changer (November 2008) • Final Presentation (03 December 2008) • Final Report (03 December 2008)
Project Timeline Spring 2009 • Fabrication (February 2009) • Testing (March 2009) • Showcase (April 2009)
Material Selection Chart • Minimum of three sources used for pricing • Lowest price used for comparisons • Multiple types of materials researched for each part • Typically common materials were researched as these are easiest to find • Weight factors vary for every part based on what is needed
Budget Overview • Prototyping will be done with low cost easily machined materials • Materials such as plywood and cardboard are examples of such materials • Test Stand will be built out of low cost materials that accurately portray school facilities • To save money we are trying to work with facilities to get parts such as a door handle
Budget Overview • Final design will be constructed from materials such as aluminum and steel • To save money we will be attempting to get donations for the material we require, as well as use left over material from previous years • Coatings will be required to prevent damage to both the robot and to the school facilities • Coatings will most likely be made out of rubber or plastic
Budget Overview • Our current budget was developed without consideration of possible donations • Design changes might drastically change what is required • A small buffer was made in the budget to compensate for this
Budget • Test Stand Hardware $ 150 • Shop Materials/Metals $ 400 • Bushings/Bearings/Shafting $ 100 • Surface finishing $ 50 • Prototyping $ 100 • Miscellaneous Hardware $ 50 • Total Budget $ 850
Conclusion • We have completed our design process and are currently working on analysis and optimization. • We have conducted initial cost analysis based on material selection charts and component availability. • We are on-schedule according to our Gantt Chart and will expect to complete the project on time by April 2009.