Download
1 / 12
120 likes | 236 Views
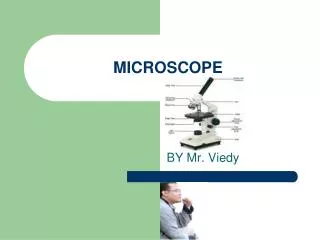
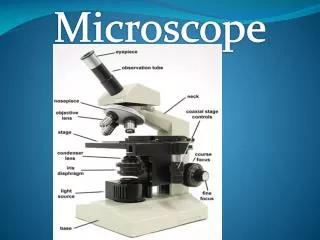
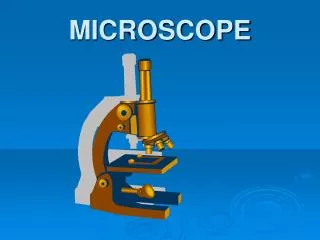
Microscope . The Pieces and Parts. Body Tube. # 1 in picture Allows light from objectives to pass upward to form first image. Eyepiece (ocular lens). # 9 on picture 10 x magnification of image. Revolving Nosepiece. # 2 in picture Holds the 3 objectives

E N D
Microscope The Pieces and Parts
Body Tube • #1 in picture • Allows light from objectives to pass upward to form first image.
Eyepiece (ocular lens) • # 9 on picture • 10 x magnification of image
Revolving Nosepiece • # 2 in picture • Holds the 3objectives • Allows objectives to rotate into position • (listen for the CLICK!)
Objectives • Low Power: 4 x magnification (#3) also called “scanning” • Medium: 10 X magnification (#4) • High: 40x or 43x magnification (# 5)
Total Magnification • Ocular lens x objective lens = total magnification • Ex: • Ocular x low power = 10 x 4= 40 x magnification • Ocular x medium = 10 x 10= 100 x magnification • Ocular x high power =10 x 40= 400 x magnification
Stage Clips and Stage • # 6 clips • # 11 stage • Clips- holds specimen in place on stage • stage- platform to hold the specimen on microscope
Diaphragm • # 7 • Regulates amount of light on the specimen. • Ranges from 1 to 5 (1 smallest….to 5 largest)
Light Source, Arm, and Base • # 8 light source • # 10 arm • # 14 base • Light source: helps image show better (Can be light or mirror) • Arm: used to carry microscope • Base: used to support when carrying microscope
Course Adjustment Knob • # 12 • Larger knob on microscope • Moves stage up and down • Used for initial focus of specimen • DO NOT USE ON HIGH POWER!!!!!!! (Or you will BREAK the slide!!!)
Fine Adjustment Knob • # 13 • Used to fine tune the image • Makes sharper/clearer
BE READY FOR A QUIZ!!!!TOMORROW!!*****You must pass to do the microscope lab…