1 / 1
10 likes | 16 Views
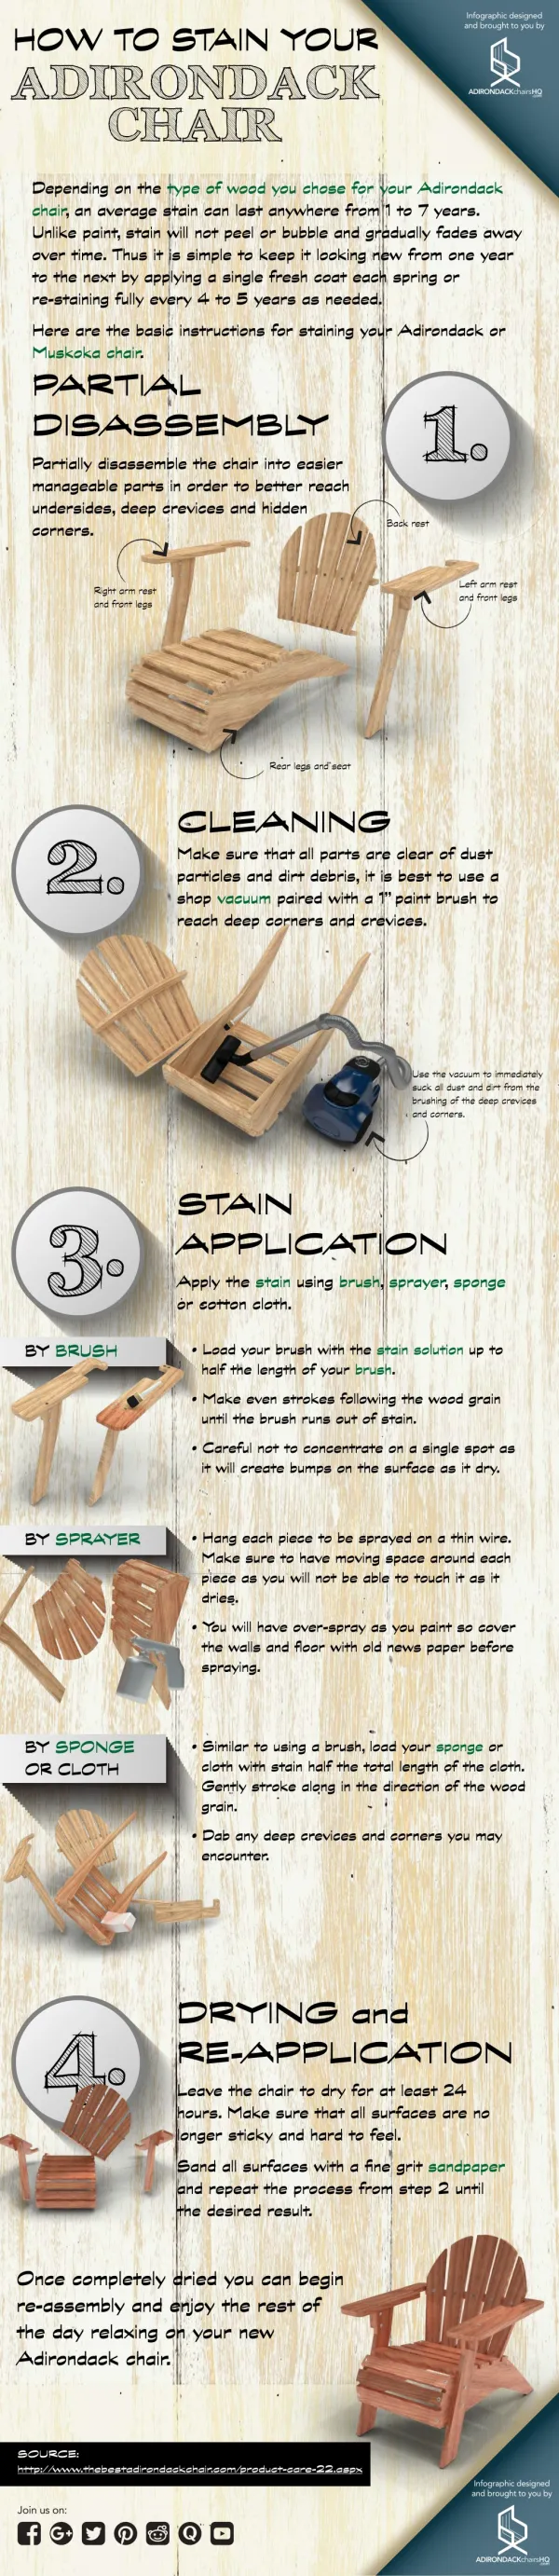
How to Build a Giant Adirondack Chair - A Step by Step Guide

E N D
Infographic designed and brought to you by HOW TO BUILD A ADIRONDACK CHAIR GIANT TOOLS YOU NEED: • Pencil and tape measure • Handsaw • Jack plane • Thickness planer • Edge jointing plane • Combination square • Double edged saw • Compass • Power jigsaw • Spokeshave • Two chisels • Big and small clamps • Drill • Hammer • Socket wrench for the bolts • Plug cutter MATERIALS YOU NEED: • Cedar wood or any equivalent wood type • Weather resistant wood glue • 1” long Wood Screws • 2” long Wood Screws • 3” long, 1/2” thick nut with bolt • Weather resistant wood fller • Weather resistant wood varnish • 220 grit sandpaper • 90 grit sandpaper • Weather resistant varnish 1 Cutting Shapes and Bevels Use the jigsaw to cut the curves and the handsaw straight edges. Planer to smoothen rough surfaces and sharp edges. TOP BACK RAIL 3’ 6” x 6 1/2” x 1” LOWER LEG RAIL 3’ 6” x 6” x 1” BACK SEAT BRACKETS (x2) 1’ 4” x 4’ x 1” FRONT LEGS (x2) 6” x 4’ x 2” BACK SEAT SLATS 3’ 6” x 5’ x 1” BOTTOM BACK RAIL 3’ 6” x 3 1/2” x 1” SEAT SLATS (x9) 3’ 6” x 6’’ x 1” REAR LEGS (x2) 3’ x 6’ 9 1/2’’ x 1” ARM BRACKETS (x2) ARM REST (x2) 1’ 6” x 5’ 9” x 1” 8” x 1’ x 1” 2 Backrest Assembly • Start assembling the seat by putting together the top and bottom rails with the backrest slats. • Beginning with the middles slat, space each slat at 1” in between. Add the Legs • Attach the left front leg to the left rear leg and do the same for the right legs. Brace both left and right sets with the lower leg rail. 3 • Attach the the backrest assembly. Constantly make sure that the distance between the rear leg is the same for the front and the back. Seat Slats • Attach a seat slat as far back as possible. Attach another slat opposite to the frst slat and average the distance between the remaining slats. Make sure to square the slats between the left and right rear legs. 4 5 Arm Rest • Position the right arm on top of the right front leg. Position the rear end of the arm atop the top back rail. Make sure to level the front end with the rear end and attach. • Position the right arm on top of the right front leg. Position the rear end of the arm atop the top back rail. Make sure to level the front end with the rear end and attach. • Square the right front leg with the attached right arm and attach the right arm bracket making sure it’s square perpendicular to the ground. • Do the same with the left arm. 6 Finishing • Sand-out any rough surfaces with a rough grit sandpaper and remove excess wood splinters off using your chisel. • Wipe off sandpaper dust and clean all surfaces and corners. • Using a soft brush, apply a weather resistant wood varnish. Leave to dry and repeat until the desired result. SOURCE: https:// adirondackchairshq.com/how-to-build-adirondack-chair/ Infographic designed and brought to you by Join us on: