Download
1 / 7
70 likes | 72 Views
RFID4U - TagMatiks Asset Tracking Lite | This article helps to understand how to create the part master for the group of items by adding Asset type, Category, Partnumber, and Asset properties

E N D
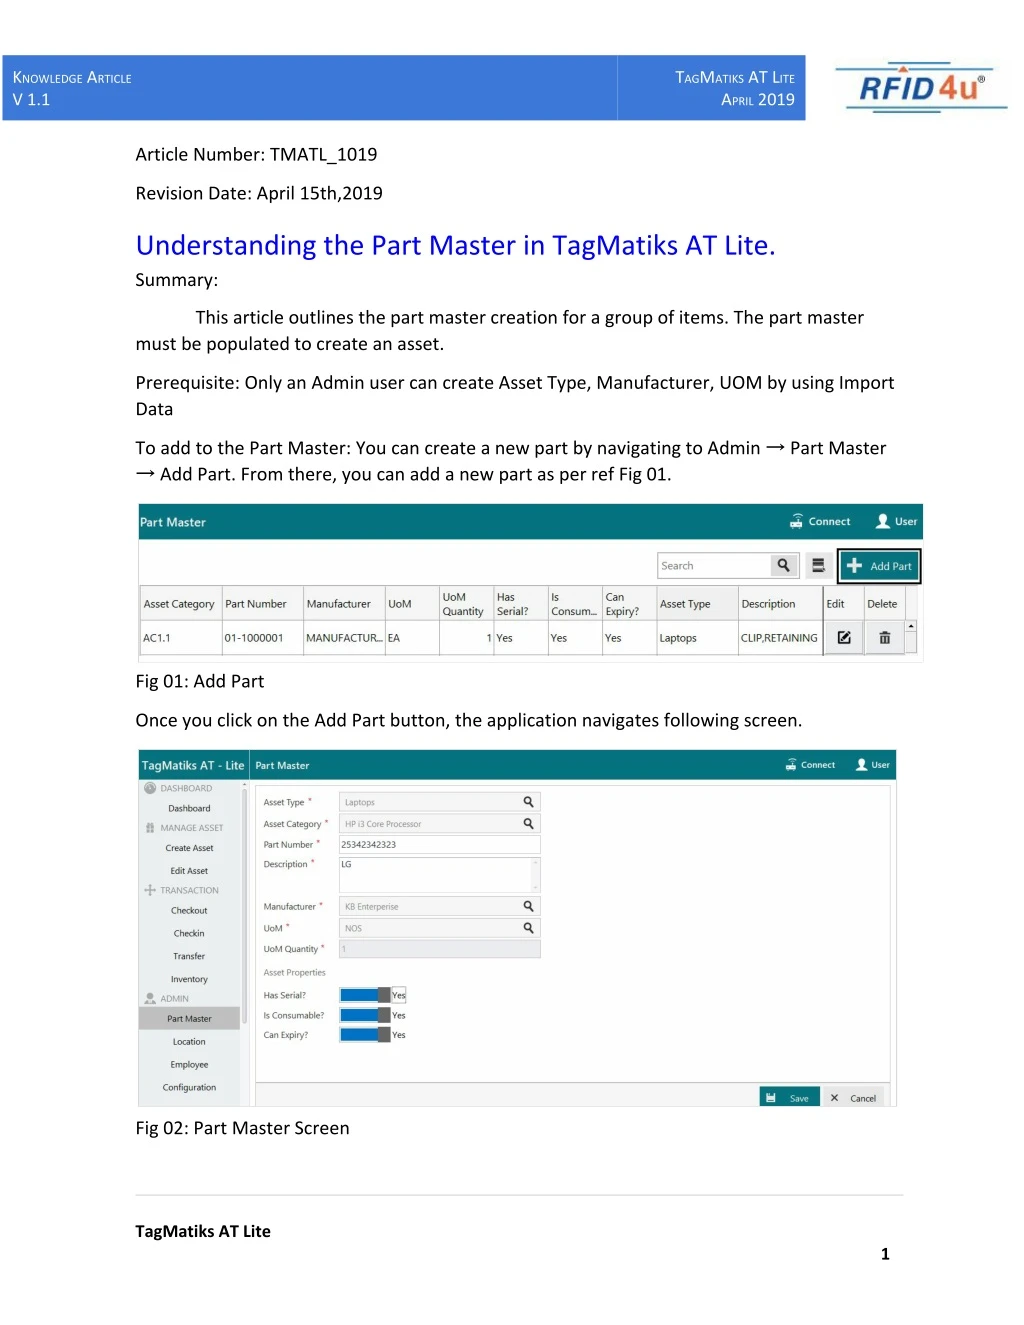
KNOWLEDGE ARTICLE V 1.1 TAGMATIKS AT LITE APRIL 2019 Article Number: TMATL_1019 Revision Date: April 15th,2019 Understanding the Part Master in TagMatiks AT Lite. Summary: This article outlines the part master creation for a group of items. The part master must be populated to create an asset. Prerequisite: Only an Admin user can create Asset Type, Manufacturer, UOM by using Import Data To add to the Part Master: You can create a new part by navigating to Admin → Part Master → Add Part. From there, you can add a new part as per ref Fig 01. Fig 01: Add Part Once you click on the Add Part button, the application navigates following screen. Fig 02: Part Master Screen TagMatiks AT Lite 1
KNOWLEDGE ARTICLE V 1.1 TAGMATIKS AT LITE APRIL 2019 Asset Type Selection/Add New. The user can select the asset type by clicking the search button. Popup will be shown and can be selected based on previously stored in the database. If you need to create a new asset type, Click Add Asset Type Fig 03. Fig 03: Asset Type Fig 04: Add Asset Type TagMatiks AT Lite 2
KNOWLEDGE ARTICLE V 1.1 TAGMATIKS AT LITE APRIL 2019 Asset Category Selection / Add New. After selection of asset type - Asset Category is to be selected based on asset type. The user can select the asset category by clicking the search button. A popup will be shown and can be selected based on previously stored in the database. Otherwise, you can create a new asset category by using Add Asset Category Fig 03. Fig 05: Asset Category TagMatiks AT Lite 3
KNOWLEDGE ARTICLE V 1.1 TAGMATIKS AT LITE APRIL 2019 Fig 06: Add Asset Category Part Number. It can be auto-generated or manually entered. Fig 05: Part Number Step 6: Description: Based on the Part Master - Description should be given as per user choice. Fig 06: Description TagMatiks AT Lite 4
KNOWLEDGE ARTICLE V 1.1 TAGMATIKS AT LITE APRIL 2019 Step 7: Manufacturer:- The user can select the manufacturer by clicking the search button. The popup will be shown and can be selected based on previously stored in the database. You can create a new manufacturer by using Add manufacturer Fig 02. Fig 07: Manufacturer Selection TagMatiks AT Lite 5
KNOWLEDGE ARTICLE V 1.1 TAGMATIKS AT LITE APRIL 2019 Step 8: UOM Creation- UOM may refer to units of measurementany kind of item needs to give the unit of measurement for storing the materials. The user can select the UOM by clicking the search button. A popup will be shown and can be selected based on previously stored in database ref fig 7. To create new UOM, click on UOM by using add UOM button. While adding a UOM, if the quantity is always 1, please use the checkbox ref Fig 8. Fig 08: UOM Screen Fig 09: Add UOM TagMatiks AT Lite 6
KNOWLEDGE ARTICLE V 1.1 TAGMATIKS AT LITE APRIL 2019 Step 9: Asset Properties Has Serial- If the item has any serial numbers , admin needs to choose the option “Yes” Has Consumables - If any item is consumed in it’s usage. Can Expire - Item which has expiry date, admin need to choose the option ‘Yes’ Fig 10: Asset Properties TagMatiks AT Lite 7