Download
1 / 2
20 likes | 25 Views
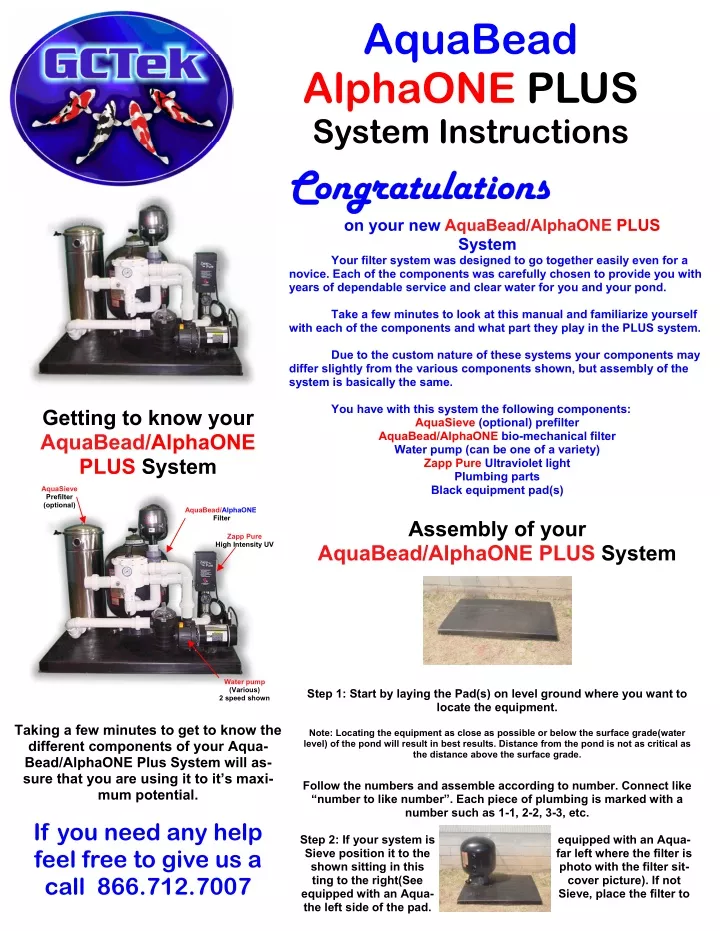
Congratulations <br> on your new AquaBead/AlphaONE PLUS <br> System <br> Your filter system was designed to go together easily even for a <br>novice. Each of the components was carefully chosen to provide you with <br>years of dependable service and clear water for you and your pond. <br> Take a few minutes to look at this manual and familiarize yourself <br>with each of the components and what part they play in the PLUS system. <br> Due to the custom nature of these systems your components may <br>differ slightly from the various components shown, but assembly of the <br>system is basically the same.

E N D
AquaBead AlphaONE PLUS System Instructions Congratulations Congratulations on your new AquaBead/AlphaONE PLUS System Your filter system was designed to go together easily even for a novice. Each of the components was carefully chosen to provide you with years of dependable service and clear water for you and your pond. Take a few minutes to look at this manual and familiarize yourself with each of the components and what part they play in the PLUS system. Due to the custom nature of these systems your components may differ slightly from the various components shown, but assembly of the system is basically the same. You have with this system the following components: AquaSieve (optional) prefilter AquaBead/AlphaONE bio-mechanical filter Water pump (can be one of a variety) Zapp Pure Ultraviolet light Plumbing parts Black equipment pad(s) Getting to know your AquaBead/AlphaONE PLUS System AquaSieve Prefilter (optional) AquaBead/AlphaONE Filter Assembly of your AquaBead/AlphaONE PLUS System Step 1: Start by laying the Pad(s) on level ground where you want to locate the equipment. Note: Locating the equipment as close as possible or below the surface grade(water level) of the pond will result in best results. Distance from the pond is not as critical as the distance above the surface grade. Follow the numbers and assemble according to number. Connect like “number to like number”. Each piece of plumbing is marked with a number such as 1-1, 2-2, 3-3, etc. Step 2: If your system is Sieve position it to the shown sitting in this ting to the right(See equipped with an Aqua- the left side of the pad. Zapp Pure High Intensity UV Water pump (Various) 2 speed shown Taking a few minutes to get to know the different components of your Aqua- Bead/AlphaONE Plus System will as- sure that you are using it to it’s maxi- mum potential. If you need any help feel free to give us a call 866.712.7007 equipped with an Aqua- far left where the filter is photo with the filter sit- cover picture). If not Sieve, place the filter to
AquaBead/AlphaONE PLUS System Assembly AquaBead/AlphaONE PLUS System Assembly Step 3: Set your Zapp Pure UV to the back right of the pad. (Zapp Pure UV not shown in Picture) Step 5: Attach Multiport valve to front of filter. (See Filter manual for more details) It is now time to start assembling the plumbing. Connect “like number to like number” as shown in the picture. Hand tighten unions until snug. Step 4: Set water pump to the front right side of the pad. AquaBead/AlphaONE PLUS System Assembly AquaBead/AlphaONE PLUS System Assembly Step 9:Place Bead Agita- tor onto AquaBead filter. Note: Do Not Glue. Nor- mally pressure fitting into place is sufficient. If it isn’t, secure with a set screw through Agitator into pipe. Step 6: Attach pipe from pump to top opening of Multiport valve. Step 7: Connect pipe from the lower Multiport opening to the lower UV opening. (If your system is equipped with an Aqua- Sieve connect lower AquaSieve fitting to front connection of pump.) Step 10: Install “ALISS” valve so that barb fit- ting is pointing down. Screw gauge onto Mul- tiport valve. After double checking all connections to make sure they are tight you are ready to prime and start the system. We recommend that a “SWING” check valve be installed below surface grade of pond on intake into the system. This will make the priming of the system a snap. To Prime system, fill AquaSieve (if so equipped) with water and pump with water. Close the units and start pump. If you should require help with your system. Call your dealer for assistance. If you need further help you can reach us toll free at 866-712-7007. We want to Help! Step 8: Place beads into filter. (See AquaBead manual) Tighten top onto filter using special wrench (included). Note: Make sure no beads are on or in the threads before installing and tightening.