DVD Covers
DVD Covers . By: Tito Akin- Aina. Black swan.


DVD Covers
E N D
Presentation Transcript
DVD Covers By: Tito Akin-Aina
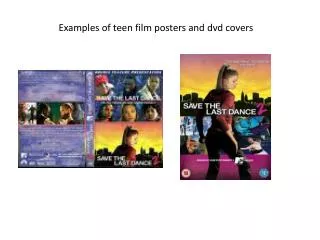
Black swan The crack on the face of the main actress is done by merging a texturized layer of crack with the main image. The blending mode is now changed from normal to multiply for the crack to be more visible. Lastly in other for the crack to look more realistic and soft on the surface, the layer is then spherize by going on-ImageDistort-->Spherize The feathers on the back page of the cover is made by firstly pasting a couple of feather on the background. Next the photo is then cropped, sized and rotated to make it like it falling from the sky. I can also tell that some of the feathers have been faded and blured to give it an effect. This image works because she already has a hat of feathers on her head This image has been retouched on photoshop. The skin looks to smooth to be real. Dust and scratches has been applied to this image to give it a plastic smooth looking skin. The Magic Wand Tool has been used to cut out the main image and then the edges has been refined by applying the refine edge tool. Refine edge tool has allowed the image to seat on the background neatly. The little white border going across has been done by using the rectangular tool to draw small boxes across the black background, and then copy and pasting it at the bottom line. The boxes is then painted white. The images inside the box has been made by creating a new page and then placing them side by side to create a collage. The text is written in a plan yet shape front. This is created by using the text tool, typing what you want on it and then playing with front, color and size of the text.
Transformers Again three images have been put together to create the back image. The robots are dominating the page, and the humans have been purposely reduced because it is a hint to what goes on in the movie. The sky looks grainy because noise has been added to the image. It also has a sunset right under the gray clouds and this is done by adding a glow to start from the top of the sky to the buildings. The building appeared to have been colour corrected because it is more defined. This can be achieved by selecting the bit you want to change the colour and then playing with the tone till your satisfied. This main image is a blend of three different images. The picture of the world has a glow filter on it with a transparency on it. The face of robot at the background has a gradient on it, this is what makes the robot look rough and old. The ray under net the eye led is created by brushing it on to the bottom, lastly the robot in front has been reduced in size to make the overall image look leveled. The exposure has also been reduced to make the image appear dark. The robots chest and arm has now been made to be see through. The image as a whole has now been darkened to set the mood. The special features is done by drawing a normal rectangular shape onto the black background. The shape has now been smudged and then distorted and messed about with on Photoshop to give it the vintage look it has. Lastly the colour of the rectangular box has bee changed to make the shape stand out.