Download
1 / 7
70 likes | 209 Views
This engaging laboratory activity allows students to investigate how temperature affects the density of water. By using two jars of colored water—one filled with cold ice water and the other with warm tap water—students will conduct an experiment to observe the behavior of the two layers when combined. The procedure includes teamwork roles such as Reader, Manager, Supervisor, and Recorder, ensuring a thorough understanding of the scientific method. Students will learn valuable skills while documenting their observations and results throughout the experiment.

E N D
Introduction • Density drives all currents, especially Deep-Water Currents. • Follow along on the lab procedure sheet.
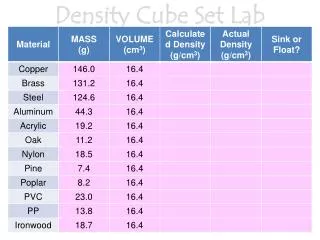
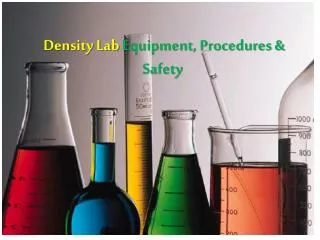
Introduction: Your teacher has prepared two colored water samples. One is ice water and one is warm water from the tap. In this experiment you will discover if and how temperature affects the density of water. Materials • Baby food jars (4–ounce; the rims of both jars must be the same size) — two • Colored pencils or crayons — one set • Index cards (3" x 5") — three • Paper (white, blank) — one sheet • Paper towels — two to three • Solution samples of different colors (one hot, one cold) — one of each • Smocks/old shirts for team members handling jars (food coloring stains clothes) • Tray or large bowl to catch overflow of water — one Preparation 1. The Reader reads the Experimental Procedure to the team all the way through once showing the pictures as he/she reads. 2. The Manager and the Supervisor go to the Prep Area to collect all the materials except the water samples. 3. The Manager and Supervisor take two jars to the Filling Station to fill one jar with warm water and a second jar with cold water. They should return to the teamwork area—careful not to spill the water. Place both jars on the table. 4. The Reader rereads the directions step-by–step as the experiment is done. 5. The Supervisor conducts the experiment with the assistance of the Manager. The Recorder watches and notes what happens during the experiment. Experimental Procedure Always work over the bowl or tray to catch any dripping water. 1. Hold the cold water jar in your left hand and place an index card over the top of the jar, covering the opening. (See diagram 1) 2. Place the palm of your right hand firmly on top of the index card. Do not curl your fingers or cup your hand. Keep the index card as flat as possible against the jar opening. 3. Hold the card firmly on the jar as you invert your hand and the jar. Flip the jar over so that it is sitting in your right palm with your hand holding the index card. Hold it firmly. (See diagram 2) 88
4. Ask the Manager to be ready to move the warm water jar under the cold water jar. 5. As the Supervisor slowly removes his/her right hand from under the index card, the Manager quickly places the warm water jar under the index card and holds it there. Note: Although the jar is upside down, the index card should remain on the jar long enough for the Manager to place the warm water jar where the Supervisor’s hand had been. (See diagram 3) 6. If the index card falls off and the water comes pouring out before the Manager’s hand can position the second jar, you will have to start again. Refill the jar, get a dry index card and start over. (This experiment may take a few tries. Always start with a good, dry, and flat index card.) 7. If you were able to position the jars successfully, the Supervisor holds the cold water jar and the warm water jar together againset the index card, pressing firmly. 8. The Supervisor turns the jars sideways. Make sure the rims line up as much as possible. (See diagram 4) 9. The Manager removes the index card slowly while the Supervisor keeps the rims lined up. As the card is removed the jars may move. It is very important that the Supervisor firmly holds the jars and lines up the rims with every move. (See diagram 5) 10. If water begins running out of the jars, line up rims quickly. 11. Once the index card is out and the jars are rim-to-rim, observe what happens and draw it. 12. Recorders use colored pencils or crayons to sketch the results as they occur. 13. When you are finished observing, carefully lower jars into the catch basin and dump the water. 14. If there is time conduct this experiment at least one more time. 15. Clean the work area. 16. Conduct a discussion with your team to talk about your findings/theories as to what happened.
Lab Complete • When you have completed the lab, work on the “Density Lab #1 Summary” • Recorder may write on the page, one page per group.
Safety • If glass breaks, notify the teacher! • Food Coloring may stain clothing! Be careful. • ABSOLUTELY NO HORSEPLAY! If you are off-task or messing around you will be taken away from your group and the activity.