Dramatic Dream Effect Tutorial
Learn how to create moody dreamy images in Luminar 2018.

Dramatic Dream Effect Tutorial
E N D
Presentation Transcript
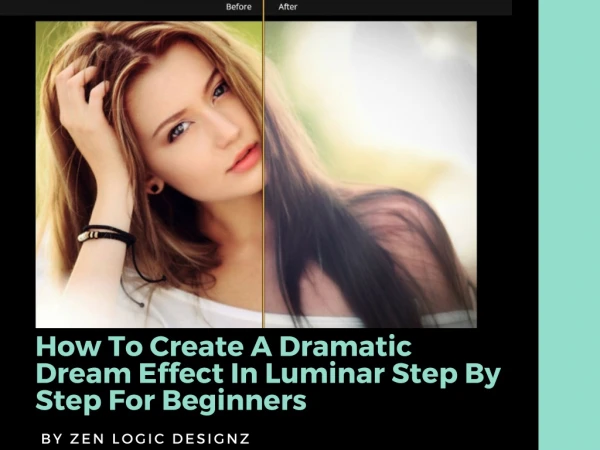
HowToCreateADramatic DreamEffectInLuminarStepBy StepForBeginners BYZENLOGICDESIGNZ
LetsGetStarted Hello, inthistutorialIamgoingtoshowyouhowtogiveanyimagea dramaticdreamyeffectwithjustafewsimplestepsinLuminar2018. I hopeyoulikethefinishedimageandenjoythistutorial. Letsgetstarted, firstthingyouneedtodoisopenLuminaranduploadyourphotograph. I haveselectedaphotographIdownloadedfromPixabay.com. Inthisfirst screenshotyouwillseeinStep1. ThisistheoriginalphotographI uploaded. InStep2. Iwillclicktheaddlayers + toaddanadjustmentlayer asyouwillseeinthenextscreenshot.
AddNewAdjustmentLayer Thisscreenshotisgoingtobeverysimple. Step1. Asshowninthepreviousscreenshotclickon the +. Step2. Selecttheaddnewadjustmentlayerhighlightedinblue. Thiswillbecomelayer0. ThiswillbethelayerIusetoaddallthefilters. Youcanusedifferentlayersifyouwantwhen usingfilters. I'mgoingtoputallofmineon1layerbecauseitwillmakeiteasiertoseeallthe stepsinthescreenshots.
Filters TeStep 1. This is the adjustment layer I will be working on. Step 2. Click on the add filters button. Step 3. As you can see this is the filters catalog. You can now see all the filters you can use in the dropdown menu. Step 4. Scroll down until you find the filters you want to use in the menu and click on each of them to add to your Custom Workspace area. The workspace area is where you do all the editing magic in luminar. I have selected the Hue Shift, Brightness/Contrast, Curves, Adjustable G di t Vi tt S Step1. ThisistheadjustmentlayerIwillbeworkingon. Step2. Clickontheaddfiltersbutton. Step3. Asyou canseethisisthefilterscatalog. Youcannowseeallthefiltersyoucanuseinthedropdownmenu. Step4. Scrolldownuntilyoufindthefiltersyouwanttouseinthemenuandclickoneachofthemtoaddtoyour CustomWorkspacearea. Theworkspaceareaiswhereyoudoalltheeditingmagicinluminar. Ihave selectedtheHueShift, Brightness/Contrast, Curves, AdjustableGradient, Vignette, Sunrays, Ortoneffect, and Denoisefiltersforthistutorial. AsyoucanseeintheworkspaceareainStep5. Thisiswhereyoumakeyour adjustments. O t ff t d
HueShift Step1. IhavetheHueShiftsetat -16. InStep2. Iknowitshardtoseeinthescreenshot, butIhaveallmy filtersturnedoff. Ihavealreadymadeallofmyfilteradjustmentsforthistutorialaheadoftime. Iamgoing toprogressivelyturneachfilteronsoyoucanseeeachstageoftheprocess. Keepinmindthateveryphoto isdifferentandthesesettingsmightnotberightforyourphotograph. IchosethissettingbecauseIwanted themodelsskinandlipstohavemoreofacoolpinktonetothemasyouwillseeinthefinished photograph. Steps3. and4. ShowyouhowtocollapseyourfilterslikeIhavethem. Youdon'thavetodo this, Ijustdiditbecauseitwaseasiertoseethefiltersinthescreenshots.
BrightnessAndContrast Step1. Ihavethebrightnesssetas -24andthecontrastsetat100. Step2. Takenotethisisoneofthosefilters thatdoesn'tmakesenseyet. ThereasonIchosethesettingsforthisfilteristodarkentheshadowsand contoursinthemodelsneckandface. Italsodarkensthehairandmakesherhighlightsstandoutmore. Withoutthisfilterthefinishedphotographwouldn'thavethedramaticeffectthatIwant. Don'tworryI'm goingtotonedowntheexcessiveredtoneswiththenextfilter.
Curves Step1. Youwillsee4coloredcirclesonthetopofthefilter. Youwillneedtoselectthecolorsseparatelytoadjusteachone. The whitecircleisselectedbydefaultwhenyouopenthefilter. Step2. Whatyouwanttodoisrightclickyourmouseoverthedotat theendofthecurveslineanddragthelineupandtotheleftordownandtotherighttomakeyouradjustmentslikeIhaveinthe screenshot. Youcanonlysee3linesonthescreenshotbecausemyblueandwhitelinesarerightnexttoeachother. Sinceyour photographwillbedifferentthanmineyoumayneedtomakeadditionaladjustments. Step3. Nowyoucanseetheredtones fromearlierhavebeenadjustedandthemodelslipshaveanicepinkcolortothem.
AdjustmentGradient (Top) Step1. ClickontheTopbuttonontheadjustmentgradient. Step2. IhavesetExposureat0, Contrastat -37, Vibranceat -10, Warmthat -4, Orientationat25, Horizontalshiftat50, and Rotationat0. ThisparticularfilterIhavesetjustenoughtoaddasubtlehighlightmostlyinthe hairontherightwherethesunraysarecomingfrom.
ThankYou! WWW.BLUESNOW.COM AdjustableGradient (Bottom) Step1. ClickontheBottombuttonofthefilter. Step2. IhavetheExposure at0, Contrastat -3, Vibranceat -50, Warmthat13, Blendat25, Horizontal Shiftat50, andRotationat0. Step3. Thisfilterdoesn'tlooklikeitdoes much, butthesettingsIchosehelpbalancetheskintone.
Sunrays Step1. TheFiltersettingsXandYaregoingtobedifferentforyourphotographbecausetheycontrolthe positionofthesunrays. SetyourXandYaccordingtowhereyouwantthem. Step2. IhavethefilterAmount at38, lookat50, Numberat53, Lengthat65, Warmthat27, Radiusat40, Glowradiusat70, Glowamount60, Warmthat27, Penetrationat39, andRandomizeat0. Step3. InthescreenshotyoucanseethatmyXandY settingsputthesunraysinthetoprightcornerofmyphotograph.
OrtonEffect Step1. Youcanchooseeithertype1ortype2inthedropdownmenu. I reallylikedtheeffectthattype2givesthisphotograph. Step2. Ihavethe settingsAmountat50, Softnessat50, Brightnessat26, Contrastat34, and Saturationat -68. Ofcourseyoucanalwayscustomizethesesettingstoyour liking. Ireallylikethesoftlighteffectthefiltergivesthemodelsskinandhair inthisphotograph.
Denoise Step1. OnthefinalfilterIsettheLuminosityat24, Colorat65, andBoostat 58. Step2. Thefinishedimage. Iusedthisfiltertoaddsomeadditional softnesstothemodelsskin. Step3. IfyouliketheDramaticDreamEffect youcansaveitasapresetbyclickinghereandgivingyourpresetaname.
I Hope You Enjoyed This Tutorial! Thank You The contents of the book report, for a work of fiction, typically include basic bibliographical information about the work, a summary of the narrative and setting, main elements of the stories of key characters, the author's purpose in creating the work, the student's opinion of the book, and a theme statement summing up the main idea drawn from a reading of the book. To ease the process of writing the narrative and stories of the main characters, students may be advised to write sequence of action summaries. BLUESNOW 07/10
IfYouwouldliketoseemydesigns gototheaddressbelow https://teespring.com/stores/zen-logic-designz-1 The contents of the book report, for a work of fiction, typically include basic bibliographical information about the work, a summary of the narrative and setting, main elements of the stories of key characters, the author's purpose in creating the work, the student's opinion of the book, and a theme statement summing up the main idea drawn from a reading of the book. To ease the process of writing the narrative and stories of the main characters, students may be advised to write sequence of action summaries. BLUESNOW 07/10