Seismic Studio Tutorial - Part 4 “Stack QC”
Seismic Studio Tutorial - Part 4 “Stack QC”. Boulder, Colorado USA November, 2004. Overview . Stack slice QC generates arbitrary 2D lines, called “slices” from your 3D prospect.

Seismic Studio Tutorial - Part 4 “Stack QC”
E N D
Presentation Transcript
Seismic Studio Tutorial - Part 4“Stack QC” Boulder, Colorado USA November, 2004
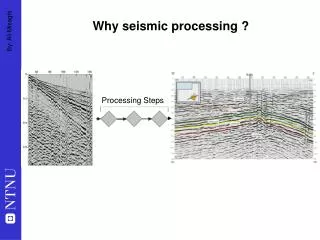
Overview • Stack slice QC generates arbitrary 2D lines, called “slices” from your 3D prospect. • You specify the CMP spacing and grab radius for each line. Traces can therefore be multiply assigned to CMP’s. This can take some time. • You pick a velocity field using semblance analysis for each stack. This velocity field is “throw-away”; it does not get exported. • You create stacks and can look at any two stacks from the current slice. • The traces you stack are the actual un-decon’d data you use for your refraction picking.
Stack QC Window Accessed under Stacks on the Menu Bar • The Stack Slice window provides a wide range of functionality: • Slice selection along any arbitrary line • Semblance velocity analysis • Stack with and without statics • Azimuthal limitation
Stack Slice Window • Works from slices you select from your data • Is map-driven • Drag a line on the map to create a slice • Set a CMP spacing and capture radius • Creates a 2D SEG-Y file for each slice • Slice Manager • Delete old slices • Select current slice from list
Control Pane 1 You drive the window from here Trace and Semblance Display Pane This is where you see everything Control Pane 2 This contains the map and map controls
Control Pane 1 • Stack display – provides control over stack trace display parameters: wiggle, fill color, trace excursion, etc. • Stack filter – for applying simple bandpass filter and some gain options • Salience – experimental – let’s not go there • Auto picker – experimental – we are developing some automatic velocity picking functionality • Azimuth – for azimuthally limiting traces in the semblance analysis and in the stack. • Semblance/Mute – for setting min/max velocities in the semblance and the stretch mute percentage (** Bold italics indicate important, often used tabs.)
Control Pane 1 • Slice Manager –this is where you select which slice you want to work on • Statics – for applying static corrections • Gather filter – for applying a bandpass filter and gain options • Stack manager – this is where you actually name your stacks and generate them • Gather display – provides control over stack trace display parameters: wiggle, fill color, trace excursion, etc.
Resize bars – click and drag Change map to any value in database
Here we have gone to the Slice manager and see a slice we created back in Feb, 2004. We have pulled up the resize bar to make the base map bigger. The black line shows the existing slice.
To create a new slice simply click and drag a line across the map.
You will see this dialog for creating a new 2D SEGY file. Then you see this information dialog.
This dialog comes up. There are two passes. The first pass counts. Then space is allocated. The second pass creates the actual SEG-Y file. The second pass can take a while for long lines with wide trace radii.
Click on these navigation buttons to move into the line. Select the line in the Slice manager, the line is highlighted in red on the map.
Once you see a CMP gather you like, you can pick velocities. As you move your mouse across the gather, the green line on the base map indicates the shot/receiver line for each trace.
Left click to set velocity points. Click “D” to delete the closest point to the mouse.
Click on Velocity display and push the Recompute velocity field from knees button.
Now you can “drive” the velocity analysis from this display. Left-click where you want to pick a new velocity point.
Go back to the Velocity display and click the Recompute button again.
Break time So, at this point we have: • Created a slice • Computed a velocity field. But our data have no statics applied, we will do that later. First, let’s create a stack with no statics applied.
Second, click on the Stack manager tab First, resize Control Pane 1 so you can see more controls.
1. Type in the name for your stack. 2. Type in the maximum time for your stack. The default is 1000 msec. 3. Click on Create new stack button
To see your stack, click on the View two stacks tab. Then click on the stack name in the drop down list, and click Load.
Applying statics • Now we will create a stack with statics applied.
Click on the Statics tab Click on the Apply statics from the selected header radio button. The default header location is Static Correction which is where your current refraction statics are stored.
Recompute stacking velocities Now you should repick your velocities, because they after refraction statics are applied they will change.
We recommend repicking the velocities at the previous locations. The best way to do this is to zoom in (right mouse button) on a previous location then left click. Click carefully on one of the dots
Conclusions • Slice stack QC is for checking the quality of your statics solution. • You can create as many stacks as you want. • The window only keeps one velocity field at a time. You cannot save a velocity field to retrieve it later. • You cannot export a velocity field to another processing system.