COMPOSITION AND FOCUS
COMPOSITION AND FOCUS. CAMERA FOCUS. Focus can be used a number of ways in photography. You may hear terminology that refers to the subject as being in focus or as the focal point . As the photographer , you get to make the choice of subject as well as

COMPOSITION AND FOCUS
E N D
Presentation Transcript
CAMERA FOCUS Focus can be used a number of ways in photography. You may hear terminology that refers to the subject as being in focus or as the focal point. As the photographer, you get to make the choice of subject as well as how much of the subject is in focus in the image. The only limiter may be your equipment.
CAMERA FOCUS The main equipment limitation on focus is your distance to the subject. The minimum focal distance you can achieve is going to depend on the camera (for point-and-shoot) or the lens (for dSLR). Refer to your camera or lens manual for specifications for minimum focal distance.
CAMERA FOCUS One useful way to better control focus is to fix the focus point in the camera to the center. The autofocus on most digital cameras selects any available focus point in the standard focus mode, and some autofocus modes even track faces. This can seem like a great help until the camera selects the wrong focus point, leaving your intended subject out of focus.
CAMERA FOCUS When you set your camera to a fixed focus point, you always know what point in your frame will be in focus. To create an interesting composition, however, you don’t normally want the subject or focus in the center. To use the camera with a fixed-center-focus point, and yet still attain interesting compositions, you can set focus and then recompose.
HOW TO FOCUS AND RECOMPOSE Set your focus point to the center. Put the subject that you want in focus in the center of the frame, and press the shutter button half way to fix the focus and exposure. Then, shift the camera while continuing to hold the shutter button half way, recomposing the image. When the image is composed as desired, press the shutter button down fully to release the shutter and capture the image.
RECOMPOSING At first the whole focus-and-recompose process may seem uncomfortable. It can be frustrating because you will forget a few times, and it may seem like it takes more time to capture an image. In most situations, however, this method is effective and quicker than trying to get the camera to select the desired focus point in the automatic mode or using manual focus. There are some situations where you will want to change this setting, such as when you are using a tripod, when the subject is moving, or when you are working with a very shallow depth of field.
COMPOSITION PICK YOUR SUBJECT When you are preparing to take a photograph, think about what you are trying to convey. Ask yourself, “What do I want to say?” The viewer will not have the context that you have at the time you take the photograph, so the subject must be clear. You want the subject to be the focal point of the image; the thing that catches the viewer’s eye. When you are setting up a photograph, keep it as simple as possible to bring your viewer’s eye to your subject. Eliminate distracting elements and visual information that is not useful to what you are trying to convey, either by zooming, moving angles, or physically removing the distracting elements
ORIENTATION DECIDE YOUR ORIENTATION Horizontal framing (also called “landscape” orientation) is the easiest to use, since the camera is made to naturally work in your hand in this orientation. It takes slightly more effort and intent to turn the camera vertically (or to “portrait” orientation), but vertical orientation may result in a better composition for your subject. Vertical images can emphasize long lines and height, while horizontal images can emphasize breadth and distance.
Fill the frame FILL THE FRAME Framing your subject in the image is one of the most important compositional principles. In general, you want to fill the frame with your subject, eliminating extraneous information. To fill the frame, zoom in with your camera or physically move in closer. You may need to change angles to fill the frame with the subject. When framing the photo, think also about what you are trying to convey. If you are taking a photo of a single tree, for example, are you trying to show the detail of the trunk and the shape of the branches? Or are you trying to show the loneliness of the tree in the field?
framing Consider using a “frame within a frame” to highlight a subject. Looking through trees, windows, doors, or into mirrors can all be effective "frame within a frame" techniques.
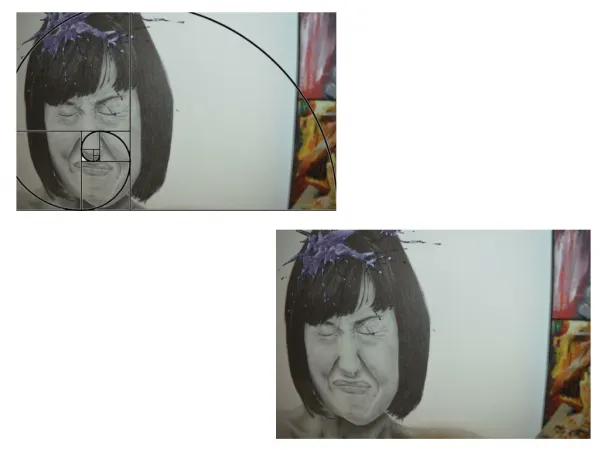
Rule of thirds “RULE” OF THIRDS Divide your frame into thirds, horizontally and vertically. Place your subject along one of the lines or at the intersection of the lines for more visual impact. It can be pleasing to the eye to have the subject off center by following the rule of thirds.
Symmetry There are two types of balance: symmetric, where the image is evenly balanced vertically or horizontally by the objects in the photograph, and asymmetric, where the image is balanced through the visual weight of the objects without regard to vertical or horizontal symmetry. Symmetric images can be calm and visually pleasing, while asymmetric images can be more dynamic and visually interesting.
Point of view POINT OF VIEW Sometimes you just need to change your point of view to achieve a creative composition. A change in perspective, whether up, down, or from a new angle, can completely change the effectiveness of an image. It is easy to get stuck in the eye-level perspective with your camera, because that’s how you typically experience the world. It can be refreshing to get a different angle on your images. Wear old or sturdy clothes, so you won’t be afraid to get down on the ground or climb up on something.