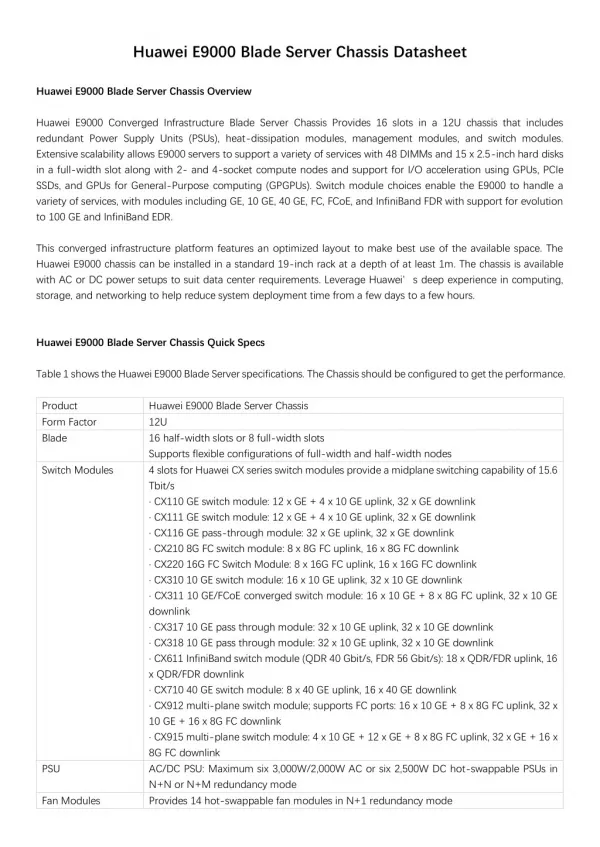
Installing the blade server in a BladeCenter unit
270 likes | 418 Views
Installing the blade server in a BladeCenter unit. Installing blade server. Installing blade server. Select the blade bay for the blade server; at least one blade bay is required .

Installing the blade server in a BladeCenter unit
E N D
Presentation Transcript
Installing blade server • Select the blade bay for the blade server; at least one blade bay is required. • When any blade server or device is in blade bay 7 through 14, power modules must be installed in all four power-module bays. • If you are reinstalling a blade server that you removed, you must install it in the same blade bay from which you removed it. • Some blade server configuration information and update options are established according to blade server bay number. Reinstalling a blade server into a different blade server bay number from the one which it was removed can have unintended consequences, and you might have to reconfigure the blade server.
Installing blade server • To help ensure proper cooling, performance, and system reliability, make sure that each blade bay on the front of the BladeCenter unit contains a blade server, expansion unit, or blade filler. • Do not operate a BladeCenter unit for more than 1 minute without a blade server, expansion unit, or blade filler in each blade bay.
Installing blade server • Make sure that the release handles on the blade server are in the open position (perpendicular to the blade server). • Slide the blade server into the blade bay until it stops. • Push the release handles on the front of the blade server to the closed position.
Installing blade server • After the blade server is installed, the service processor in the blade server initializes and synchronizes with the management module. • This process takes approximately two minutes to complete. • The power-on LED flashes rapidly, and the power-control button on the blade server does not respond until this process is complete. • Turn on the blade server
Turn on the blade server (1) • After you connect the blade server to power through the BladeCenter unit, the blade server can start in any of the following ways: • You can press the power-control button on the front of the blade server to start the blade server Let’s talk about the Blade server controls and LEDs
Blade server controls and LEDs • The following illustration identifies the buttons and information LEDs on the blade-server control panel.
Blade server controls and LEDs • Each blade server contains a front panel LEDs that helps determine if the server is operating properly as well as indicate any errors that occur: • Blade-error or Fault LED: This LED is also known as the blade system-error LED. When this amber LED is lit, it indicates that a system error has occurred in the blade server. The blade error LED will turn off only after the error is corrected.
Blade server controls and LEDs • Information LED: When this amber LED is lit, it indicates that information about a system error for the blade server has been placed in the management module event log. • Location LED: When this blue LED is on, it has been turned on in response to a programmed condition, or remotely by the system administrator, to aid in blade identification for maintenance. The location LED on the BladeCenter chassis will be illuminated as well. Turn off the location LED after maintenance is complete. • Blade-activity LED: When this green LED is lit, it indicates that there is activity on the hard disk drive or network.
Blade server controls and LEDs • Power-on LED: While the BladeCenter chassis has AC power, this green LED turns on in blinking mode and stays on when you power on your blade server. When the blade is first inserted, the LED will blink at a high frequency because the blade is being “discovered” by the Management Module (MM) at this time. As soon as the MM has logged the blade’s presence, it will decrease the frequency of the blinking, allowing for the power switch to function.
Blade server controls and LEDs • Wait until the power-on LED on the blade server flashes slowly before you press the power-control button. While the service processor in the blade server is initializing and synchronizing with the management module, the power-on LED flashes rapidly, and the power-control button on the blade server does not respond. This process can take approximately two minutes after the blade server has been installed. • While the blade server is starting, the power-on LED on the front of the blade server is lit and does not flash.
Turn on the blade server (2) • If a power failure occurs, the BladeCenter unit and the blade server can be configured to start automatically when power is restored through the Advanced Management Module
Turn on the blade server (3) • You can turn on the blade server remotely by using the management module.
Turn on the blade server (4) • If the blade server is connected to power (the power-on LED is flashing slowly), the blade server is communicating with the management module, the operating system supports the Wake on LAN feature, and the Wake on LAN feature has not been disabled through the management module, the Wake on LAN feature can turn on the blade server.
Installing blade server continued • Write identifying information on one of the labels that come with the blade servers and place the label on the BladeCenter unit bezel • Do not place the label on the blade server or in any way block the ventilation holes on the blade server.
Installing blade server continued • If this is the initial installation of the blade server in the BladeCenter unit, you must configure the blade server through the Setup utility and install the blade server operating system • If you have changed the configuration of the blade server or if you are installing a different blade server from the one that you removed, you must configure the blade server through the Setup utility, and you might have to install the blade server operating system. • If you have changed the configuration of the blade server or if you are installing a different blade server from the one that you removed, you must configure the blade server through the Setup utility, and you might have to install the blade server operating system.
Some issues that can happen with Installation • hen you are diagnosing a problem in the BladeCenter unit, you must determine if the problem is in the BladeCenter unit, one of the BladeCenter modules, or in a blade server. • If the BladeCenter unit contains more than one blade server and only one of the blade servers has the problem, troubleshoot the blade server that has the problem. • If all of the blade servers have the same symptom, it is probably a BladeCenter unit or module problem.
Exercise 1 • A blade server power-on LED flashes rapidly for an extended amount of time. • Identify the reasons
Exercise 2 • You installed a new blade server in, a blower module is running at full speed. • Identify the reasons
Exercise 3 • A blower module is not working.
Exercise 4 • A fan pack is running at full speed.
Exercise 5 • An I/O module will not turn on.
Exercise 6 • Cannot communicate with the external ports on an I/O module.
Exercise 7 • The keyboard, mouse, or pointing device is not working.
Exercise 8 • The keyboard, mouse or pointing device does not work after switching ownership of the KVM to a different blade server.