Download
1 / 25
250 likes | 304 Views
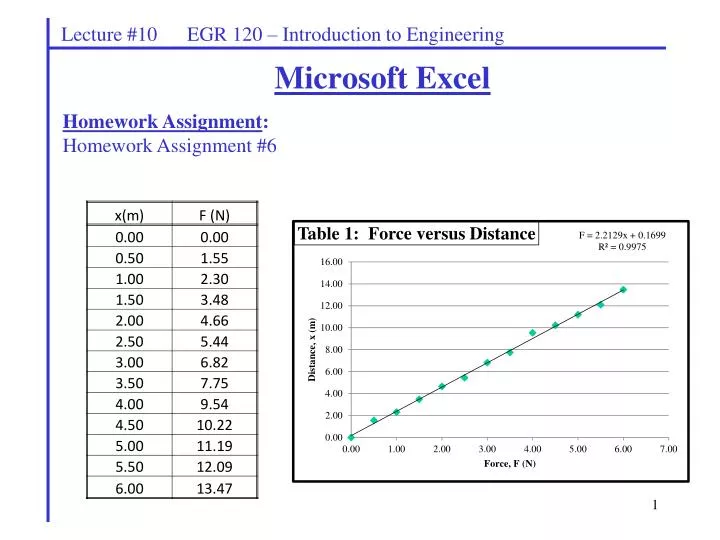
Lecture #10 EGR 120 – Introduction to Engineering. Homework Assignment : Homework Assignment #6. Microsoft Excel. Lecture #10 EGR 120 – Introduction to Engineering. Microsoft Excel

E N D
Lecture #10 EGR 120 – Introduction to Engineering Homework Assignment:Homework Assignment #6 Microsoft Excel
Lecture #10 EGR 120 – Introduction to Engineering Microsoft Excel Excel is a spreadsheet program. Spreadsheets are very useful to engineers and are easy to use. You will likely use Excel in many engineering courses as well as on the job as a working engineer. Why use a spreadsheet program? Tabulating data Performing repeated calculations, such as in a table Producing graphs (dozens of different types) Analyzing graphs (linear regression, statistical analysis, etc.) Matrix operations Performing parametric analyses (such as investigating the effect on a graph as quantities are varied) Presenting results in a professional manner for reports Much more
Lecture #10 EGR 120 – Introduction to Engineering Column D The address also appears here in the Name Box. Cell Addresses Spreadsheets contain a huge number of cells that are organized into rows and columns Rows are numbered (1,2,3,….) Columns are lettered (A, B, … Z, AA, AB, … AZ, BA, … BZ, … ZZ , AAA, AAB,… Each cell is identified by its row and column number, such as cells A1, Z4, and AA163. This is referred to as the address of the cell. Cell D7 Row 7
Lecture #10 EGR 120 – Introduction to Engineering Excel Worksheets Each Excel file may contain multiple worksheets that are labeled Sheet1, Sheet2, … by default. It is often convenient to use multiple worksheets for multiple problems. Note that the spreadsheet below was changed from having three worksheets named Sheet1, Sheet2, Sheet3 to 6 worksheets named Problem 1, Problem 2, …, Problem 6. Right-click on Sheet1 to rename it Click here to add a new worksheet 6 spreadsheets set up for 6 homework problems
Lecture #10 EGR 120 – Introduction to Engineering Moving around the spreadsheet Arrows – for general movement Scrollbars – for general movement PageUpP/PageDown – moves up or down one screen at a time Home – move to column A Ctrl + Home – move to cell A1 Ctrl + G - Pulls up the GoTo Window. Enter the cell address that you wish. See example below to go to cell A17. • How many cells are in a spreadsheet? • Try using Ctrl + G to go to cell XFD1048576 and you will find the lower right hand corner of the spreadsheet (see image on right above) • Row XFD indicates that there are 24(262) + 6(26) + 4(1) = 16384 (=214) • The total number of cells is (16384)(1048576) = (214)(220) = 234 = 17,179,869,184 so you could store over 17 billion pieces of information in each worksheet!
Lecture #10 EGR 120 – Introduction to Engineering Entering data into a spreadsheet Cells in a spreadsheet can contain numbers, text, or formulas Numbers: Examples include 50, 3.75, and 1,000 (commas not recommended, but work) Scientific notation: 1.26e-3 or 1.26E-3 (representing 1.26 x 10⁻³) No spaces allowed (or will be treated as text) Leading 0’s ignored (007 appears as 7) Text: Examples include John Doe, 123-45-6789 (a SSN maybe), m3 Formulas: generally begin with =, although beginning with + or – work also Formula appears on formula bar, result appears in cell Double-click on cell to reveal formula or look 0n formula bar Examples (more on this later): =50 + 100 (displays the results) =A6 + D7 (add the cell contents and display the results) = 50^3 + 100^2 (503 + 1002) = 50*sin(3*pi()*A4) (using Excel functions for sin(x) and
Lecture #10 EGR 120 – Introduction to Engineering Select or highlight cells. Appears when you move over a cell. Used to select or highlight cells. Move cells. Appears when you move over the edge of a cell or a highlighted group of cells (such as a table). Used to move (drag) the cell or group of cells. AutoFill. Appears when you move over the lower right-hand corner of a cell or a highlighted group of cells. Dragging the corner over new empty cells uses AutoFill to fill out those cells. Cursors in Excel
Lecture #10 EGR 120 – Introduction to Engineering • AutoFill • Excel can detect patterns in your entries and help you fill out columns or rows of cells with numbers. • Example: • Enter the number 1 in one cell and 2 in the cell under it. • Highlight both cells. • Move the mouse over the lower right corner until the + symbol appears. • Drag the corner downward.
Lecture #10 EGR 120 – Introduction to Engineering AutoFill – More examples Drag lower right corner downward
Lecture #10 EGR 120 – Introduction to Engineering • Formatting Data – Demonstrate various types of formatting in class, including: • Numeric format – try various numeric formats, including: • 2 digits after the decimal point • Scientific notation with 3 digits after the decimal point • Currency • Date formats Select the “quick format” box for many popular formats (the box may list “Number” or the last format used). Right-click on highlighted cells or pick the “quick format” box and More Number Formats to access the Format Cells window
Lecture #10 EGR 120 – Introduction to Engineering • Alignment format – try various numeric formats, including: • Quick alignment tools - located on the Home ribbon • for left justification, right-justification, centering, etc. • Center an entire column by selecting the letter at the top of the column and then selecting the desired alignment type • For more alignment control: • Right-click on highlighted cells • Select Format Cells • Select Alignment – many options are available here • Example: Center a heading across the top of a table with 3 columns: • Highlight cells E3:G3 below, right-click on cells, select Format Cells, select Alignment, select Center Across Selection under Horizontal text alignment.)
Lecture #10 EGR 120 – Introduction to Engineering • Borders – try various border formats, including single lines, double lines, colored lines, … • Quick Border Tool - located on the Home ribbon. Highlight the desired cells and then select this tool. • For more border control - use Format Cells window (2 methods): • select More Borders on the bottom of the quick Border tool: • Use the Format Cells window: • Right-click on highlighted cells • Select Format Cells • Select Border Quick Border Tool Right-click
Lecture #10 EGR 120 – Introduction to Engineering Shading (Fill) – similar to Borders (use quick tool on Home menu or Format Cells window) Fonts – similar to Borders (use quick tool on Home menu or Format Cells window) Quick Font Tool Quick Fill Tool
Lecture #10 EGR 120 – Introduction to Engineering • Adjusting Column and Row Width – try each of the following • Adjusting a single column • Select the letter at the top of the column • Move the mouse to the edge of the letter until a double-arrow appears • Hold down left mouse button and adjust width • Adjusting a single row • Similar to adjusting a column • Changing font size will typically result in new row size • Auto-adjusting rows and columns • Similar to above except double-click with the double-arrow appears • Making multiple columns the same width • Select multiple columns by highlighting the letters at the top of the columns • Adjusting any one column will result in all columns having the same width • Auto-adjusting any one column with auto-adjust them all • Spillover • If the contents of a cell are too wide for a column, they will spill over into the cell to the right if it is empty. • If the cell is not empty, the cell contents are truncated. • A number will change to ##### if there is not enough room to display it.
Lecture #10 EGR 120 – Introduction to Engineering • Superscripts and Subscripts – try several examples of superscripts and subscripts • Think of a superscript or a subscript as a font change • Procedure: • Type the desired quantity without the superscript or subscript • In the formula area, highlight the portion that is to be changed to a superscript or subscript and then right-click in the highlighted area (see figure on left) • Select superscript or subscript in Format Cells window (center figure). • Note that when selecting cell A4 below, the superscript appears in the spreadsheet, but not in the formula line (see figure on right).
Lecture #10 EGR 120 – Introduction to Engineering • Greek letters – two methods: • Select Insert – Symbol(be sure Symbol font is listed) • Use the Symbol Font. Enter regular text (any font) and then change the font to the Symbol font using the table shown to the right (this is convenient in many programs or in places where Insert – Symbol isn’t available). Try it! Create the table heading shown to the left.
Lecture #10 EGR 120 – Introduction to Engineering • Equations in Excel – Demonstrate each of the following in class • Entering formulas (always begin with =) • Formulas and functions names are not case sensitive • Editing formulas (use the formula bar) • Exponentiation - use the caret symbol (^) • Survey of functions in Excel • Using functions – 3 methods: • Type in the name • Select Formulas – Insert Function • fx(next to the Formula Box on the Home ribbon) • Trigonometric functions • work with radians, not degrees (also true of MatLab, C++, MathCAD, etc) • Two convenient functions in Excel: • Radians(x) – converts x from degrees to radians • Degrees(x) – converts x from radians to degrees • Example: =sin(radians(30)) is used to calculate the sin(30) • Example: =degrees(asin(0.5)) is used to calculate the sin-1(0.5) - (result is 30) • Function for : pi()
Lecture #10 EGR 120 – Introduction to Engineering Equations in Excel – Examples: Mathematical Formula: Formula in Excel: 3x2 (where x is the value stored in cell B2) =3*B2^2 5e-2x (where x is the value stored in cell B2) =5*EXP(-2*B2) (where x is the value stored in cell B2) =3*SQRT(B2) (where x is the value stored in cell B2) =10*B2^(1.0/3.0) 4cos(30) =4*COS(RADIANS(30)) ln(x) (where x is the value stored in cell B2) =LN(B2) 2px (where x is the value stored in cell B2) =2*PI()*B2 Average of the values stored in B2 through B10 =AVERAGE(B2:B10) sin-1(x) (with the result expressed in degrees =DEGREES(ASIN(B2)) and x is the value stored in cell B2) log(x) (base 10 implied, with value stored in cell B2) =LOG10(B2) log3(x) (where x is the value stored in cell B2) =LOG(B2,3) = 5*3/(4*7) or = 5*3/4/7
Lecture #10 EGR 120 – Introduction to Engineering • Equations in Excel – Demonstrate each of the following in class • Function for : pi() • Moving a table with formulas – all cell addresses are updated • Relative versus absolute addresses • Examples: • A6 relative address (row and column updated when copied or moved) • A$6 absolute address (row will not be updated) • $A6 absolute address (column will not be updated) • $A$6 absolute address (neither column nor row will be updated) • Example using an absolute value for a tax rate • AutoSum • Displaying formulas • Showing sample formulas under Excel tables – highly recommended (and required in homework assignments)
Lecture #10 EGR 120 – Introduction to Engineering • Excel - copying formulas • By default, Excel automatically updates cell addresses as they are copied. • If a table is moved to another location in the spreadsheet, the formulas are updated and the table should still be correct. • You simply need to enter a formula in a table once - and then copy it to the other locations (or use AutoFill). • See the example shown.
Lecture #10 EGR 120 – Introduction to Engineering • Try it! • Create the spreadsheet shown below. • Simply type the values into columns A and D as given values. • Use Excel formulas to perform the calculations required in columns B, E, F, and G by entering each formula only once and then copy it (use AutoFill) into the remaining table locations. • Check with the instructor if you have trouble duplicating these answers.
Lecture #10 EGR 120 – Introduction to Engineering Excel - relative addresses and absolute addresses We have already seen that Excel will automatically update cell addresses when formulas are copied or tables are moved. The cell addresses that were used in these cases are referred to as relative addresses. Sometimes it is desirable to have a cell address that will not be updated, such as when a cell is used to hold an important constant. An address that will not be updated is referred to as an absolute address. There are four ways that an address can be expressed: B2 - relative address (will be updated when copied in any direction) B$2 - absolute address (the column may be updated but not the row) $B2 - absolute address (the row may be updated, but not the column) $B$2 - absolute address (neither the row nor the column may be updated)
Lecture #10 EGR 120 – Introduction to Engineering • Example – Relative versus Absolute Addresses • The top table uses a relative address for the tax rate and produces incorrect results. • The lower table uses an absolute address for the tax rate and produces the correct results.
Lecture #10 EGR 120 – Introduction to Engineering • Microsoft Drawing Tools and Microsoft Equation 3.0 • As with Microsoft Word, we can use Microsoft Drawing Tools and Microsoft Equation 3.0 to add sketches, diagrams, or equations to enhance our data and calculations in Excel. • Try several examples in class or on your own. Excel - more information Study the following Excel Examples (in the Course Documents section of BlackBoard or on the instructor’s course web site). They contain detailed comments that should be helpful. Example: Using Tables in Microsoft ExcelExample: Using Trigonometric Functions in Microsoft ExcelExample: Using Special Symbols in Microsoft Excel
Lecture #10 EGR 120 – Introduction to Engineering Sample Homework Problem using Excel