Download

1 / 6
0 likes | 1 Views
See the benefits of red light therapy at Turbo Tan in Concord, New Hampshire, enhancing recovery. Feel the results fast.

E N D
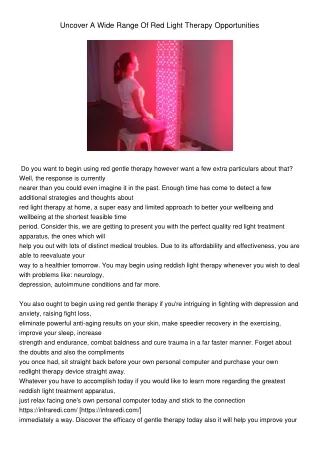
Finding a studio for red light therapy near me is the easy part. Squeezing the most value from each session, that is where experience pays off. Whether you are chasing faster muscle recovery, clearer skin, deeper sleep, or a general lift in energy, the way you prepare, position, and progress your treatments makes a measurable difference. I have worked with clients in small-town clinics, high-end spas, and performance gyms, including several studios offering Red Light Therapy in Concord and other parts of New Hampshire. The hardware matters, yes, but what you do before and after a session often determines whether you see modest change or real progress. This guide focuses on practical decisions that shape results: wavelengths, intensity, distance from the device, treatment schedules, skin prep, hydration, and how to avoid the common mistakes that sabotage outcomes. Along the way, I will highlight what to look for when searching Red Light Therapy near me so you can distinguish a thoughtful provider from a sales pitch. What red light therapy actually does Red light therapy, often called photobiomodulation, uses specific wavelengths of visible red and invisible near-infrared light to influence cellular function. The most studied wavelengths cluster around 630 to 680 nanometers in the red range and 800 to 880 nanometers in the near-infrared range. These photons are absorbed by chromophores, most notably cytochrome c oxidase in the mitochondria. When you deliver a therapeutic dose, you typically see more ATP production, shifts in nitric oxide, and changes in reactive oxygen species that trigger downstream repair and anti-inflammatory signaling. The results show up in everyday language as quicker recovery from exercise, calmer joints, improved skin tone, and in some people, better sleep quality. Skin responds particularly well to red light, while joints, muscles, and deeper tissues often benefit from near-infrared’s longer reach. If a studio only offers red, that is not a dealbreaker for skin goals, but for knee pain, hip mobility, or hamstring recovery, you want near-infrared in the mix. Dose makes the difference The two variables that matter most are power density and total energy delivered. Power density is how much light hits a given area, usually expressed in milliwatts per square centimeter. Energy dose is the power density multiplied by time, typically recorded in joules per square centimeter. For most skin-related goals, a session dose in the range of roughly 3 to 8 J/cm² on the face tends to be sufficient. For muscle or joint work, 10 to 30 J/cm² is common. These are ranges, not rules, and your tolerance, skin type, and goal will all influence the sweet spot. Here is where real-world constraints appear. Most studios do not publish joules per session, and even when they do, angles, distance to the device, and how much skin you expose change the actual dose dramatically. If you want reliable outcomes, use consistent positioning and timing, and ask the staff for the device’s power density at your chosen distance. If they cannot answer, that is a sign to treat the first few sessions as tests and adjust based on how you feel within 24 to 48 hours. Choosing a provider: what to look for when searching locally
If you are typing Red Light Therapy near me and evaluating options, ignore hype and zero in on five things. This short checklist keeps you from wasting months on subtherapeutic sessions. Wavelength transparency: Ask what wavelengths their device emits. Look for ranges around 630 to 680 nm and 800 to 880 nm, with some clinics offering both in one panel. Vague answers like “it’s red, it’s strong” do not inspire confidence. Intensity and distance guidance: A reputable provider can explain power density at common distances and advise on how close you should stand or sit. They should also talk about session length relative to your goals. Session hygiene and skin prep policy: Clean panels, disposable eye shields on request, clear guidance on makeup removal and sunscreen. Good studios mention photosensitivity risks. Progress tracking: Before-and- after photos under similar lighting for skin goals, simple range-of-motion checks for joint issues, or training logs for athletes. Without tracking, you are guessing. Realistic scheduling: Providers who suggest daily sessions for months on end without tapering or reassessment are usually selling packages, not care. If you are in the Northeast, you will find a mix of fitness-focused studios and wellness spas that offer Red Light Therapy in Concord and surrounding towns in New Hampshire. In smaller markets, providers often share space with massage therapists or chiropractors. That can work perfectly well, provided they meet the criteria above. Preparing your skin and body for a better session I have watched clients turn a middling routine into a powerful one by fixing the basics. Four details make a noticeable difference: clean skin, hydration, smart timing with workouts, and medication awareness. Clean skin is not just about courtesy. Makeup, heavy moisturizers, self-tanner, and mineral sunscreens can reflect or scatter light, lowering the effective dose. If you aim to treat acne, fine lines, or sun spots, arrive with a freshly washed face, no occlusive products, and skip retinoids or AHAs that day if your skin is reactive. For body sessions, avoid thick lotions and let deodorants dry fully before stepping in. If a studio requires eye protection, use it. For facial work aimed at the eye area, you can gently lift the shield borders briefly during the session if the provider allows, but do not stare into the LEDs. Hydration makes cells more responsive and helps with thermoregulation. Drink water beforehand and lightly afterward. You do not need to chug a liter at the door, but walking in dehydrated will not help. For athletes and anyone with sore joints, pairing red light with your training schedule pays dividends. If inflammation is high after a brutal session, immediate red and near-infrared exposure can reduce soreness and may speed recovery, but be cautious during peak adaptation windows. Strength athletes sometimes prefer light before training to improve range of motion and again 6 to 12 hours later, rather than right after, to avoid blunting the acute inflammatory signal that drives adaptation. Endurance athletes tend to tolerate post-workout sessions well. Photosensitivity matters. Some antibiotics, isotretinoin, and herbal compounds like St. John’s wort can increase sensitivity to light. If you are on photosensitizing medications, talk to your clinician first and inform the studio. If you have active skin cancers or a history of lupus or porphyria, you need medical guidance before you start. Finding the right distance and duration Clients often ask, how close should I stand, and for how long? Here is how I approach it in practice. For facial skin goals, I generally start at 6 to 12 inches from the panel for 8 to 12 minutes, three to four times per week for the first month, then taper to two or three times weekly. If the device is lower power, you may stand closer. If it is a high-output medical panel, you may step back or shorten the session. Keep the angle perpendicular to the skin when possible. Tilting your face 30 degrees away can cut effective intensity dramatically. For deeper tissue targets like knees, shoulders, or hips, near-infrared is your friend. Position the joint as close as comfort allows, often 2 to 6 inches, for 10 to 15 minutes. Rotate slightly to expose different aspects of the joint. For back or hamstrings, consider two angles in the same session: first, direct exposure to loosen fascia and improve circulation; second, a lateral or oblique angle to hit fibers that sit in the panel’s shadow.
Whole-body sessions look impressive, but dose uniformity can suffer if you are too far away. If the studio uses a full- length panel wall, stand close enough to feel gentle warmth, not heat, and rotate every few minutes. Skin should never feel hot or irritated. If it does, step back and cut time. How often to go: building a schedule you will actually keep Frequency depends on your goal and your tolerance. I like to think in phases. A ramp-in phase for two to three weeks sets the baseline. For skin concerns and low energy, go three or four times weekly. For acute aches, you might do five shorter sessions per week. If your skin flushes or feels tight afterward, back off slightly on time or distance. A build phase over weeks four through eight consolidates gains. Keep frequency steady and adjust dose based on what you see. Fine lines and pigmentation changes usually appear gradually, often noticeable at six to eight weeks with
consistent use. Soreness tends to respond within days. A maintenance phase stabilizes results. For skin, twice weekly is often enough, sometimes even once per week after a few months. For training support, match sessions to your heavier training days, not rest days. If you are using Red Light Therapy in New Hampshire where winter days are short and dry indoor heat is the norm, the maintenance phase may need a slightly higher cadence from November through March, especially for skin hydration and mood support. The goal is to keep benefits with the least time investment that still works. What results to expect, and when The most satisfying transformations I have seen shared a few traits: realistic expectations, diligent routine, and one primary goal at a time. Stacking five goals into one protocol invites confusion. Pick your priority. For skin tone and texture, expect subtle improvements within two to three weeks and clearer differences by week six. Pore appearance tightens modestly, redness softens, and fine lines look smoother. Hyperpigmentation lightens slowly and unevenly at first. Red light is helpful, but pairing it with sunscreen in daylight hours and a non-irritating retinoid at night accelerates change. For acne, consistency matters more than intensity. Many clients see fewer inflammatory papules within three to four weeks. If you are on benzoyl peroxide, consider separating it from red light sessions by several hours to reduce potential irritation. If breakouts spike after the first week, rethink skin prep and product layering rather than abandoning therapy entirely. For joint pain or post-exercise soreness, meaningful relief can show up after a handful of sessions. Chronic issues respond, but they respond to persistence. Use the time after sessions to move. Gentle range-of-motion work while tissues feel warm and pliable compounds the effect. For energy and mood, half the value comes from routine. Clients often report better sleep onset and slightly higher morning energy within a couple of weeks. Light at night can be stimulating for some people, so if evening sessions leave you wired, switch to morning or early afternoon.
A story from the field A masters swimmer I worked with in Concord carried chronic shoulder tightness through winters, the kind that blurs the line between stiffness and pain. He started with two short whole-body sessions per week at a local studio offering Red Light Therapy in Concord, added a targeted near-infrared session focused on the shoulder and lat insertions, and shifted his dryland work to follow immediately after. The difference was not dramatic overnight. By week three, his overhead reach had improved by five degrees on a simple wall test, and his post-workout soreness dropped enough that he skipped his usual ibuprofen on hard days. The key was not more minutes in front of the panel. It was sequence and consistency: light first, mobility work second, then swim mechanics attention during practice. Thin slices of advantage add up. Common mistakes that blunt results Two patterns keep showing up. The first is inconsistent dosing. People hop between studios, vary distance day to day, and then wonder why outcomes feel random. Pick one setup and stick with it long enough to evaluate, at least three to four weeks. The second is product overload. Those 12-step skin routines look great on a shelf. On your face before a session, they are a problem. Heavy layers scatter light and increase the chance of irritation. Keep it simple: cleanse, dry, light exposure, then a basic moisturizer afterward if needed. Other pitfalls include chasing heat as proof of efficacy, treating during peak sun exposure and forgetting SPF afterward, and ignoring photosensitizers like certain fragrances and essential oils. Gentle warmth is fine, but if it feels hot, you are too close or staying too long. As for sun, red light is not a substitute for sunscreen. How to get more from every minute you spend under the lights If you want simple, high-yield steps, this is the short plan I give new clients. Use it as a template, then customize as you learn your responses. Before: hydrate, cleanse the treatment area, remove makeup and heavy products, and avoid fresh acids or retinoids if you are easily irritated. Position: set distance consistently, aim the target area perpendicular to the panel, and expose clean skin. For joints or large muscle groups, treat from two angles. Dose: start with conservative times, then titrate up by a minute or two based on skin feel and next-day response. Keep a simple log. Pairing: do gentle mobility or massage immediately after for musculoskeletal goals; apply a bland moisturizer for skin about 10 minutes post-session. Progress: reassess every two to four weeks with photos, range-of-motion checks, or training notes; taper frequency when results stabilize. Safety and edge cases Most healthy adults tolerate red light therapy well. Eye protection is a good habit, especially with high-output panels. Even if red light is not known to damage retinas at typical doses, bright LEDs can be uncomfortable and potentially risky for sensitive individuals. If you have migraines triggered by bright light, start with shorter sessions and lower intensity, and avoid direct facial exposure at first. For pregnancy, data is limited. Many providers allow peripheral use for aches, but if you are pregnant, discuss it with your obstetrician and avoid direct abdominal exposure. For active cancer treatment, particularly skin cancers in the treatment field, get explicit clearance from your oncology team. If you are prone to melasma, red light is generally friendlier than heat-heavy devices, but any stimulus can aggravate pigment in susceptible skin. Start slow, protect from sun, and monitor closely. Diabetics should inspect skin after sessions to watch for irritation, especially on the shins and feet where skin can be fragile. For autoimmune conditions, some clients feel better with lower doses and more rest days. The rule is the same across categories: test, observe, adjust. Comparing at-home devices and studio sessions At-home panels and masks have improved. They win on convenience and routine adherence. Most are less powerful than professional setups, which means longer sessions or more days per week. That is not necessarily a disadvantage for skin goals, where lower intensity can still produce steady change without the risk of overtreatment.
Studios shine when you need high output for deeper tissues, larger coverage, or when you want coaching on positioning and progress. If you are in a place with seasonal swings like New Hampshire, a hybrid approach works well: studio sessions during heavy training blocks or flare-ups, then at-home maintenance in between. When comparing costs, do the math in months, not weeks. Two studio sessions per week might cost more than an entry-level home panel within three months. For someone who thrives on structure and accountability, the studio’s routine may be worth every dollar. What to expect from providers in Concord and across New Hampshire Regional differences matter less than the individual studio’s standards. That said, I have noticed a few practical trends when looking for Red Light Therapy in New Hampshire: Fitness-forward spaces often pair red light with infrared saunas or compression therapy. These can complement each other, but avoid stacking everything at once when you are starting. If you do both, I usually prefer red light first, sauna second, to avoid dilating vessels and heating skin before a light session. Smaller clinics may rotate equipment between rooms. Confirm you are using the same device each visit if you are tracking progress. Winter popularity can create wait times. Book recurring slots for consistency during January and February when demand spikes. In Concord, look for studios that publish their device specs and train staff to set distance and duration per goal, not just per package tier. The best places will help you identify a narrow target, build a simple schedule, and track outcomes. Wrapping the details into a routine you will follow You can build a plan in an afternoon. Decide your primary outcome, map your schedule for four weeks, and lock in session times like any training appointment. Keep your set-up identical each visit: distance, angles, order of body parts, and duration. Use a phone timer and a plain notebook. Two lines per session are enough: what you treated, how long, and how you felt the next day. If the goal is clear skin, pre-cleanse and keep products minimal. If the goal is recovery, treat before mobility work and after your hardest training days. If the goal is energy and sleep, start with morning sessions and shift later only if needed. Every two weeks, scan your notes for patterns. If something consistently feels off, change one variable at a time. The biggest mistake is waiting for motivation to arrive before you show up. Build the habit, then let the benefits reinforce the habit. When you search Red Light Therapy near me and commit to a studio, you are trading time for potential energy, better skin, or fewer aches. Make the trade count by turbotan.org red light therapy controlling the parts that you can: the cleanliness of your skin, the distance to the device, the regularity of your appointments, and the honesty of your tracking. The rest follows.


![[PDF] DOWNLOAD Guide to Red Light Therapy 2021: How to Use Red and Near-Infrared Light](https://cdn7.slideserve.com/12519347/slide1-dt.jpg)
![[PDF] Guide to Red Light Therapy 2021: How to Use Red and Near-Infrared Light Th](https://cdn7.slideserve.com/12522755/slide1-dt.jpg)