Download
1 / 7
70 likes | 285 Views
Spanish Rebus Story. Title:. Type your name and class period here: by: period:. Main character Type a sentence below in Spanish to introduce your character using “Hay un…” or “Hay una …” Description: alto / bajo / alta / baja

E N D
Spanish Rebus Story Title: Type your name and class period here: by: period:
Main character • Type a sentence below in Spanish to introduce your character using “Hay un…” or “Hay una…” • Description: alto / bajo / alta / baja • Type a sentence below in Spanish describing your character using “El ____es ___.” or “La _____es ____.” • Is s/he… sitting? standing? jumping? walking? • Where is s/he?_______________________________________ • Type a sentence below in Spanish that tells what s/he is doing and where:
Use the directions on the handout to type out the rest of your story (lines 4, 5, 6):
Put it into pictures • Move the clip art around on the next slide to make your story into a rebus (a picture story). • Copy and paste the pictures and text boxes you need to use more than once. • Delete the ones you are not using. • Match the story you wrote out on slides 2 and 3. • Your rebus (picture story) goes on the next slide…
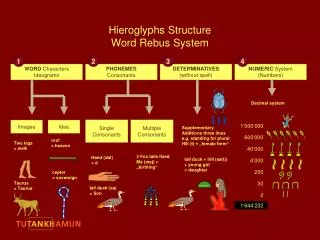
& el la Hay una Hay un es al un una El fin.
SAVE YOUR WORK! Click SAVE right now!! • If you are done – SAVE SAVESAVE! • Ask Mrs. Heaning if you can print – ONLY if you are done!! • After you have read all directions, you are going to delete this slide! • When you print, you are going to select “6 slides horizontal” under the “SETTINGS” tab. • Delete slides 4 and 7. (slide 4. = put it into pictures, slide 7. = save your work) • Print, make sure your name is on it , hand it in… • If you are not done – SAVE SAVESAVE!