Download
1 / 2
20 likes | 31 Views
3D character modeling is a skill that not many people know how to do. In this step-by-step tutorial, you'll learn how to build a neck joint from scratch in photoshop. This is a great way to improve your skills and impress your friends with your realistic 3D renderings.

E N D
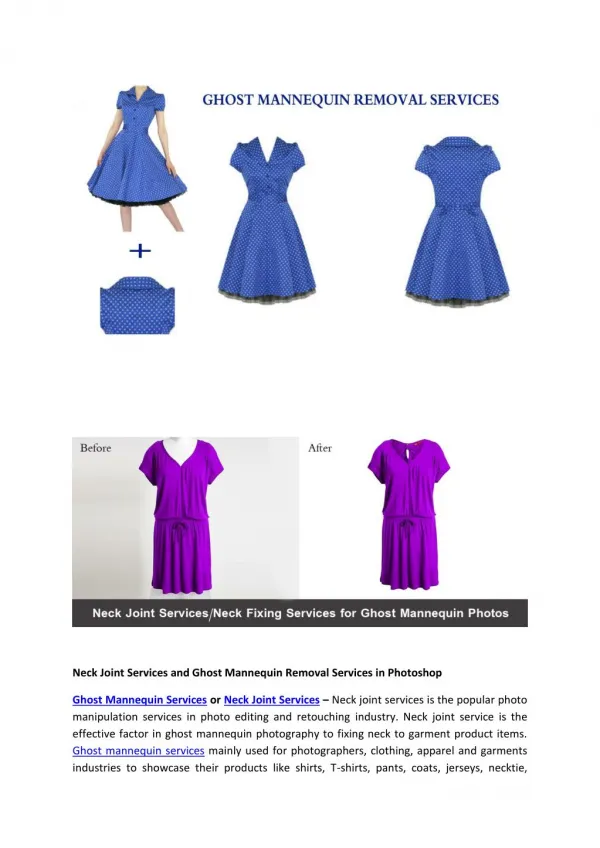
Photoshop Neck Joint: The Secret Technique for Creating Realistic 3D Images in Photoshop 3D character modeling is a skill that not many people know how to do. In this step-by-step tutorial, you'll learn how to build a neck joint from scratch in photoshop. This is a great way to improve your skills and impress your friends with your realistic 3D renderings. What Is a Neck Joint? In designing a 3D character in photoshop, you'll often need a neck joint. This is a smooth, fluid connection between two or more objects, and is essential for the visualization of an entity's internal anatomy. How to Create a Neck Joint in Photoshop In this tutorial, you'll learn how to create a neck joint in Photoshop with a program called Unity. 1. Create a Body Object Step 1 To begin, create a body object in Photoshop, fill it with a color and size you like, and save it to a new file. We're going to make two neck joints from this object. Step 2 Use the command menu and drag it to the corner of the canvas. Drag it slightly towards the camera, and in the direction it faces. This will give you the center of gravity for your character. Create the 3D Extrusion in Photoshop Sometimes, one of the most challenging parts of creating a 3D image in Photoshop is the ability to translate and extrude an object. This tutorial will show you how to accomplish the tricky feat. Create a 3D Face in Photoshop This tutorial is for the truly creative mind. You can't make a photo realistic without incorporating that into a 3D scene. In this tutorial, you'll learn how to create a 3D face in photoshop. Realistic 3D Faces Photoshop is a versatile and powerful program, but when it comes to creating realistic 3D images, it isn't easy. This
tutorial will show you some easy tips and tricks to create a very realistic-looking face. Gather the Materials By now, you should have an idea of what kind of images you want to create. Rounding the Base of the Neck Photoshop's core features are well known for creating digital versions of photographs. However, there are tons of features hidden within Photoshop that only enthusiasts would know about. Create the Spine of the Neck In order to create a realistic 3D character, you have to study the anatomy of a real human body. This tutorial will help you get familiar with the skeletal system and you'll learn how to identify the correct bones for the neck. Trace the Bones Make a skeletal grid with the help of silhouette illustrations. Then add the corresponding bone numbers to it, starting from one (A). Create the Front and Back of the Neck After assigning the spine numbers to the skeleton, open your neck in photoshop. In order to be able to see what the inside of the neck looks like, click the pinhole icon in the upper left corner. Trace the Space Between the Nipples To create the space between the nipples, you need to use two circles. Creating a Foreshortened Side View of the Neck Joint This is the first of two videos about this neck joint that show you how to bend and snap the model, so that it can move. To understand how you can do this, you need to understand how the model was built. Creating a Topview Model This is the second video in this series, and this time, we'll look at how to create a model with a three-dimensional neck joint. This process allows you to simulate bending, snapping, and swinging the model in all directions. Placing the Head on Top of the New Modeled Neck Joint In this tutorial you will be creating a complex 3D model and placing the head on top of it. This tutorial will guide you step by step through creating a skeletal head by creating a model with a neck joint. Then the tutorial will show you how to re-use the model to create another model by taking the existing bones, creating a skeleton and modeling them on top of the neck joint model. For the neck model, you will be using a simplified snake model, that has a flat design and does not have much detail. Step-by-step Tutorial for Creating 3D Model of a Decayed Corpse Using FEA Algorithm In this tutorial you will create a detailed and realistic 3D model of a decaying corpse using a combination of physical and digital modeling techniques. Colorizing and Adding Details to Your 3D Rendering There's no reason your photoshopped 3D renders should look dull. You can make them look better with the help of these simple tricks. In this tutorial, you'll learn a few quick and simple tips for achieving the right look. Making a Micro 3D Model in Photoshop The number of 3D models made in Photoshop has increased drastically over the last years. This means you're bound to get a lot of requests to make a 3D model from scratch. With a little preparation, you can save time and effort for custom design work. How to Create 3D Texture with Gimp There are tons of plugins and techniques for creating 3D textures in Photoshop, but there are also many drawbacks when it comes to learning how to use them. One of the problems is that Gimp isn't a convenient tool for 3D textures.