Download
1 / 4
40 likes | 55 Views
Use this simples guide to work on how to connect brother MFC l2700dw printer to wifi and How To Use Non-Genuine Ink in Epson printer.

E N D
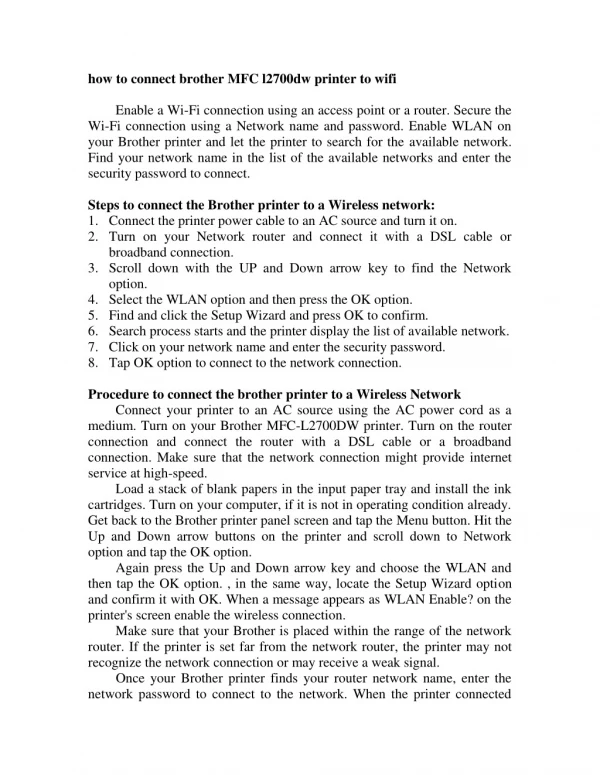
how to connect brother MFC l2700dw printer to wifi Enable a Wi-Fi connection using an access point or a router. Secure the Wi-Fi connection using a Network name and password. Enable WLAN on your Brother printer and let the printer to search for the available network. Find your network name in the list of the available networks and enter the security password to connect. Steps to connect the Brother printer to a Wireless network: 1.Connect the printer power cable to an AC source and turn it on. 2.Turn on your Network router and connect it with a DSL cable or broadband connection. 3.Scroll down with the UP and Down arrow key to find the Network option. 4.Select the WLAN option and then press the OK option. 5.Find and click the Setup Wizard and press OK to confirm. 6.Search process starts and the printer display the list of available network. 7.Click on your network name and enter the security password. 8.Tap OK option to connect to the network connection. Procedure to connect the brother printer to a Wireless Network Connect your printer to an AC source using the AC power cord as a medium. Turn on your Brother MFC-L2700DW printer. Turn on the router connection and connect the router with a DSL cable or a broadband connection. Make sure that the network connection might provide internet service at high-speed. Load a stack of blank papers in the input paper tray and install the ink cartridges. Turn on your computer, if it is not in operating condition already. Get back to the Brother printer panel screen and tap the Menu button. Hit the Up and Down arrow buttons on the printer and scroll down to Network option and tap the OK option. Again press the Up and Down arrow key and choose the WLAN and then tap the OK option. , in the same way, locate the Setup Wizard option and confirm it with OK. When a message appears as WLAN Enable? on the printer's screen enable the wireless connection. Make sure that your Brother is placed within the range of the network router. If the printer is set far from the network router, the printer may not recognize the network connection or may receive a weak signal. Once your Brother printer finds your router network name, enter the network password to connect to the network. When the printer connected
with the wireless network connection, the printer starts to print the Wireless Network Report. If the wireless network connection is successful, the printer LCDs a message as connected. But if the connection fails the printer prints to the error code on the network report. Connect to the Brother support site and download the updated Full Driver &Software package for your Brother MFC-L2700DW printer. Uninstall the previously installed outdated driver software and install the latest version on your computer. Choose the network connection as Wireless network connection if prompted during the installation. Connect the USB cable if prompted during the driver set up. If you find any network connection issues, use the troubleshooting tool to find and resolve the issue automatically. Restart your network router and enable the Wi-Fi connection from a different broadband connection. To get more information regarding the printer wifi connection: goto: 123.hp.com/setup
How To Use Non-Genuine Ink in Epson Due to the pricing rates are higher than the reasonable standard, most of the Epson printer users move away from the original cartridges. The moved customers preferred to buy cloned or some other third party ink cartridges. It is necessary to reconfigure some settings to install the third party cartridges. Steps to install Non-Genuine Ink cartridges: 1.Turn on your Epson printer and computer. 2.Try to install the cloned ink cartridge and printer might show an error message. 3.Find your Epson printer in the devices and then right-click on it. 4.Select the Printer Preferences option. 5.Select the Speed and Progress tab. 6.Switch off the ink monitor when the screen shows Disable Epson Status Monitor message. 7.Tap the Save option and close the window. 8.Find the non-genuine cartridges are installed and now ready to work. Make the Epson printer recognize cloned ink cartridges: Connect your printer to a power source using a power cord and turn on your Epson printer. Turn on the network router and establish a network connection. Connect your printer and computer to the network connection. Make sure that the network connection has a speedy internet connection. Connect to the Manufacturer site and download the latest version of driver software that supports your printer model. Install the newest version of print driver software on your computer. Update the firmware to the latest version. Open the scanner lid and access to the ink cartridge access door. Wait until the cartridge cradle remains idle and becomes silent. Take out the empty ink cartridge from its slot. Install the cloned cartridges in its slot, and that should match the color code printed on the slot. Drop the ink cartridge access door and wait for sometimes until the printer starts to cycle the installed cartridge. The computer connected to the same network of the printer shows some error message like cartridge not appropriately installed or Disable Epson Status Monitor. Click the Start option on your computer screen and then tap the All Apps icon in the lower left side of the screen. Tap the link for the Epson Print Utility or Epson Status Monitor. Tap the Maintenance tab in the Epson print application and then click on the Speed and Progress option. Check off
the box that is next to the Disable EPSON Status Monitor option. Tap the OK or Save option and then close the Epson Print Utility application. Open the document or photo that you need to print and choose the print option from the File menu. If the Epson printer prints your document or photo without showing any error messages, you can conclude that the cloned ink cartridges are compatible. If it shows an error message, then try to remove the ink cartridge and re- install the non-genuine ink cartridges. Make sure that the ink cartridges are fitted into the slot. Reconfigure the network setting and properly install the updated version of driver software. For more information regarding the printer queries in all printer models goto 123.hp.com/setup