Download

1 / 24
240 likes | 381 Views
Cisco Device Configuration. (To Facilitate Monitoring ) Network Monitoring and Management Workshop@APRICOT 2011. Topics. CLI modes Accessing the configuration Basic configuration (hostname and DNS) Authentication and authorization (AAA) Log collection

E N D
Cisco Device Configuration (To Facilitate Monitoring) Network Monitoring and Management Workshop@APRICOT 2011
Topics • CLI modes • Accessing the configuration • Basic configuration (hostname and DNS) • Authentication and authorization (AAA) • Log collection • Time Synchronization (date/timezone) • SNMP configuration • Cisco Discovery Protocol (CDP)
CLI Modes • User EXEC • Limited access to the router • Can show some information but cannot view nor change configuration rtr> • Privileged EXEC • Full view of the router’s status, troubleshooting, manipulate config, etc. rtr> enable rtr#
Accessing the router • Before setting up SSH • telnet 10.10.x.254 • login “cisco” and “cisco” (user and password) • Privileged user can go to privileged mode: • rtr>enable (default password is “cisco”) • rtr#configure terminal • rtr(config)# • Type in configuration commands • Exit and save the new configuration • rtr(config)#exit • rtr#write memory
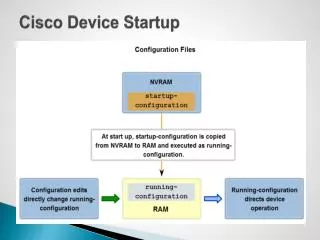
Accessing the configuration • There are two configurations: • Running config is the actual configuration that is active on the router • Stored in RAM (will be gone if router is rebooted) rtr# configure terminal rtr(config)#end rtr# show running-config • Startup config • Stored in NVRAM (Non-Volatile RAM) rtr# copy running-config startup-config (or) rtr# write memory rtr# show startup-config (sh start)
Basic configuration (hostname and DNS) • Assign a name • rtr(config)# hostname rtrX • Assign a domain • rtr(config)# ip domain-name ws.nsrc.org • Assign a DNS server • rtr(config)# ip name-server 10.10.0.241 • Or, disable DNS resolution • rtr(config)# no ip domain-lookup
Authentication and authorization • Configure passwords in the most secure manner. • Use the improved method which uses hash function • Example: #enable secret 5 wer56$21 #user admin secret 5 sdf!231
Authentication and authorization • Use SSH, disable telnet (only use telnet if no other option) #line vty 0 4 #transport input ssh • Configuring with a 2048 byte key: #aaa new-model #crypto key generate rsa modulus 2048 • Verify key creation: #show crypto key mypubkey rsa • Restrict to only use SSH version 2. Optionally register events: #ip ssh logging events #ip ssh version 2
Log collection (syslog) • Send logs to the syslog server: #logging10.10.x.x • Identify what channel will be used (local0 to local7): #logging facility local5 • Up to what priority level do you wish to record? #logging trap <logging_level> <0-7> Logging severity level emergencies System is unusable (severity=0) alerts Immediate action needed (severity=1) critical Critical conditions (severity=2) errors Error conditions (severity=3) warnings Warning conditions (severity=4) notifications Normal but significant conditions (severity=5) informational Informational messages (severity=6) debugging Debugging messages (severity=7)
Time synchronization It is essential that all devices in our network are time-synchronized In config mode: # ntp server pool.ntp.org # clock timezone <timezone> To use UTC time # no clock timezone If your site observes daylight savings time you can do: # clock summer-time recurring last Sun Mar 2:00 last Sun Oct 3:00 Verify # show clock 22:30:27.598 UTC Tue Feb 15 2011 # show ntp status Clock is synchronized, stratum 3, reference is 4.79.132.217 nominal freq is 250.0000 Hz, actual freq is 249.9999 Hz, precision is 2**18 reference time is D002CE85.D35E87B9 (11:21:09.825 CMT Tue Aug 3 2010) clock offset is 2.5939 msec, root delay is 109.73 msec root dispersion is 39.40 msec, peer dispersion is 2.20 msec
SNMP Configuration • Start with SNMP version 2 • It’s easier to configure and understand • Example: rtr(config)#snmp-server community public ro 99 r10(config)#access-list 99 permit 10.10.0.0 0.0.0.255 r10(config)#access-list 99 permit 10.10.254.0 0.0.0.255
Checking SNMP configuration • From a Linux machine (once snmp utils are installed), try: snmpwalk –v2c –c public 10.10.x254 sysDescr
Configuring Cisco Discovery Protocol (CDP) • Enabled by default in most modern routers • If it’s not enabled: • cdp enable • cdp run in older CISCO IOS versions • To see existing neighbors: • show cdp neighbors • Tools to visualize/view CDP announcements: • tcpdump • cdpr • Wireshark
Accessing • Using telnet or ssh (telnet by default) • By default, no user, only a password: • Password: ****** • SW1# • Menu mode: not all options available! • Shell mode: similar to Cisco IOS shell • i.e.: spanning-tree not enabled by default, and cannot be enabled via the menu: • SW1# conf t • SW1(config)# spanning-tree
Hostname • Like Cisco, but specify FQDN: • SW1# conf t • SW1 (config)# hostname sw1.mgmt • SW1 (config)# ^Z • SW1#
DNS • HP layer 2 switches don't support DNS resolution
NTP • SW1# conf t • SW1 (config)# sntp server 192.168.80.5 • SW1 (config)# sntp server unicast • SW1 (config)# ^Z • SW1#
SW1 (config)# crypto key generate ssh Installing new RSA key. If the key/ entropy cache is depleted, this could take up to a minute. • SW1 (config)# ip ssh • SW1 (config)# no telnet-server • SW1 (config)# ^Z • SW1# write mem • SW1# • SSH is now enabled – by default the user you log in as is ignored, only the password matters. TELNET IS DISABLED!
Syslog • SW1 (config)# logging 192.168.10X.30 • SW1 (config)# logging facility local5 • SW1 (config)# ^Z • SW1# write mem
snmp • SW1 (config)# snmp-server community xxx • SW1 (config)# ^Z • SW1# write mem • By default, community is RO (read only)
CDP and LLDP/802.1ab • HP equipmentt supports both Cisco's discovery protocol (CDP) as well as the open standard 802.1ab (LLDP – Link Layer Discovery Protocol) • By default, CDP is enabled • SW1 (config)# cdp run • SW1 (config)# cdp enable 1-24 • SW1 (config)# ^Z • SW1# write mem
Simple Exercise • Install Telnet • $ sudo apt-get install telnet • Connect to router in your group • $ telnet 10.10.x.254 • username: cisco • password: cisco • Display information about your router • r6.ws.nsrc.org>enable (default pw “cisco”) • r6.ws.nsrc.org#show run (space to continue) • r6.ws.nsrc.org#show int FastEthernet0/0 • r6.ws.nsrc.org#show ? (lists all options) • r6.ws.nsrc.org#exit (log off router)