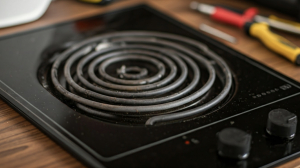
A working cooktop is the center of any kitchen. But what do you do if one of the heating parts stops working? Don’t worry; changing a broken cooktop surface part is usually easier than it looks. This complete guide will help you through the steps on how to replace a broken cooktop surface element. You will feel more confident in fixing this common appliance issue. Let’s get your cooktop heating well again! Understanding Your Cooktop’s Surface Element The surface element is essential for your KitchenAid cooktop or other brand. It changes electrical energy into heat. It sits under the cooktop surface and sends heat straight to your pots and pans. If the surface element stops working, you won’t be able to cook. There are different types of cooktop surface elements, and each has its good and bad sides. The most common types are coil elements, smoothtop elements, and induction elements. In this guide, we will look at how to replace a regular coil element. The same basic ideas will also work for other types. Identifying Signs of a Broken Element Detecting a bad cooktop element early can save you time and prevent cooking problems. Watch out for these clear signs: Inconsistent Heating: If your food cooks unevenly or takes longer than normal, a broken element could be the reason. No Heat: If the element doesn’t heat up at all, even when it is turned on, that’s a strong sign it is broken. Visible Damage: Look for cracks, blisters, or discoloration on the element’s surface. These signs show you need to replace it. If you see any of these warning signs, please fix the issue quickly. This will help you cook safely and effectively. Safety Precautions Before You Begin Working with any electrical appliance needs you to think about safety first. Before you start replacing anything, always: Disconnect the Power: Turn off the circuit breaker for your cooktop. This will help avoid electric shock. Let it Cool: Make sure the cooktop surface and the broken part are cool before you touch them. Work in a Dry Environment: Stay away from wet or damp places to reduce electrical dangers. Your safety is the most important thing. By taking these steps, you minimize risks and help make the repair easier. Preparing for Replacement Before starting the replacement process, spend some time to gather the tools and materials you need. This will help the task go smoothly and reduce any interruptions. It is important to have the right replacement part for your cooktop model. If you have a KitchenAid cooktop, make sure to order a KitchenAid replacement part that will fit. Tools and Materials Needed Replacing a cooktop element is easier than you might think. You don’t need many specialized tools. Here’s a list to help you get ready: New Cooktop Element: Check that it matches your cooktop model. If you have a KitchenAid appliance, look for a KitchenAid replacement element. Screwdriver: You may need a common screwdriver, either Phillips or flathead, depending on your cooktop model. Work Gloves: Use these to keep your hands safe from cuts or scrapes. With these simple tools and items ready, you can make the replacement smoother and quicker. Now you are set to start this DIY project! Step-by-step Guide to Replacing the Element Replacing your cooktop element is easy. Just follow these simple step-by-step instructions. You will get your cooktop working again quickly. Each step helps you do this safely and easily. Take your time and use these tips. They will make replacing the element smooth. Let’s begin! Step 1: Disconnecting the Power Supply Safety is very important when using electrical appliances. The first and most important step is to disconnect the power to your cooktop. Do not ignore this safety measure! Find your home’s electrical panel. Look for the circuit breaker that controls power to your cooktop. Switch the breaker to the “off” position to turn off the electricity. Check again by trying to turn on another part of the cooktop to ensure it is off. Now that the power is safely off, you can continue to the next step without worry. Step 2: Removing the Broken Element With the power off, you can take out the broken element. How it is held in place depends on your cooktop model. It may be held with clips or screws. If your cooktop has clips, lift the element a little and pull it away from the cooktop. If it has screws, use a screwdriver to loosen the screws. Then, lift the element gently. Be careful when you handle the element. It could be weak, especially if it has been used too much or is damaged. Now say goodbye to that old broken element! Step 3: Installing the New Element Take your new cooktop element and match it with the terminals or receptacles from the old element. Gently push the new element until it fits flat against the cooktop surface. If your cooktop model has screws for the element, tighten them carefully. Don’t tighten too much, or you could hurt the element or the cooktop. If it uses clips, make sure the clips snap in place correctly. Now, take a minute to look at your work. Ensure the element is level and secure, so it can heat efficiently. Step 4: Restoring Power and Testing The moment of truth has come! When you feel sure about the installation, it’s time to turn the power back on to your cooktop and check your work. First, make sure the element is correctly in place. Go back to your home’s electrical panel. Switch the circuit breaker back to the “on” position. Then, return to your cooktop and turn on the new element at a low setting. Watch the element for a few minutes. Make sure it heats up evenly and has no problems. If everything looks good, congratulations – you have successfully replaced your cooktop surface element!