Download
1 / 41

E N D
GG 450 April 16, 2008 Seismic Reflection 1
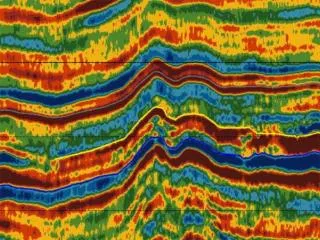
Reflection seismology is the primary method of exploration for oil, constituting about 95% of all prospecting efforts and oil field evaluation. As hydrocarbons get increasingly scarce, the importance of this method will increase until there’s nothing important left to look for (which is pretty close to NOW…). • Why is reflection so valuable? • •Higher frequency sources - better resolution • •smaller sources - less problem in populated areas and lower cost • •shorter spread lengths for equivalent depths • •no problems with low velocity layers • •results are easier to interpret geologically than other methods
Problems with reflection method: • •intense processing required– processing costs are equivalent to acquisition costs. • •reflections are never first arrivals - difficult to see Basic formula: The reflection path E-A-G, is symmetric, thus the time it takes to travel from the surface to the reflector and back is: V1
Since x and t can be measured directly, there are two unknowns in the above equation – the layer thickness and the layer velocity. Thus we need more information to solve for thickness and velocity. We can plot distance vs. time to see how the reflection arrival time changes with distance:
The reflection (red) is a hyperbola with an asymptote that can be found by looking at the limit as x gets very large: t=x/V1. Which is the formula for the direct arrival (green). This type of plot is called a “GATHER”, containing all seismograms we will gather together later. In reflection processing gathers (like the one on the left) are usually plotted with time positive downwards, since the later arrivals are coming from deeper in the earth.
Why don't we use the reflection method at Kualoa where the velocity change is near 10’ deep? • Here's what the reflection looks like from our layer using a MAC program "ReflectModel" (Included with Burger text) for an approximate Kualoa structure (v0=300 m/s, v1=1000 m/s, h= 3m). • That looks pretty good! We should be able to see that reflection very well. What's the problem? • Let's add the direct wave and the refraction:
Now we see the problem. The upper layer is so thin that the reflection is pretty well lost in the direct arrival. Not only that, we haven’t even plotted the surface waves that come in almost immediately after the direct arrival at short distances. What if we used shorter geophone spacing and a higher frequency source?
Not bad.... but not easy to do in practice. Our best distance range for study of the reflection appears to be from normal incidence to before the refraction forms at the critical distance (red box).
Can you tell what the signal frequency is in the plot above? • Why is it difficult to use such high-frequencies? • What is the slope of the reflection when x=0? • How does the reflection arrival change as the layer 1 velocity increases? • How does the reflection change as the depth of the reflector increases? • How does the ray parameter of the reflection arrival change with increasing distance? • What happens if the layer is dipping?
Reflection Processing – Motivation • One feature of seismic reflection is that we can obtain very accurate models of the interior for relatively shallow structures, but it takes some work. Because these models look like geological profiles, there is a strong - and sometimes unjustified – tendency to interpret them directly as geology. It’s important to understand the assumptions that go into the generation of these models and how the models can differ from “geology”.
One of the reflection processes is “stacking” seismograms together to improve the signal-to-noise ratio between the reflections and other arrivals. Shot seismograms in a gather are stacked.
Normal Move-Out The object of stacking is to combine all of the data reflected from a single point into a single seismogram (or trace) in such a way that reflections will be emphasized. One way to do this is to process using NORMAL MOVE-OUT. Normal move-out corrections change the time of arrival of reflections, which would normally fall on hyperbolas, so that they fall on horizontal straight lines. We can then add the traces together at equal times to form a single “stack” seismogram that appears as though it were recorded at the shot point (x=0).
The normal move-out is the time difference between the arrival at x=0 and the arrival at x. To correct for normal move-out, the “NMO” time is subtracted from each trace: where h1 is the layer depth, V1 is the layer velocity, and x is the distance from the source to the geophone. Since 2h1/v1 is the time required for a normal incidence reflection, TNMO is the EXTRA time needed if the receiver is not directly over the reflection point. If we subtract TNMO from each trace, the time of arrival at each distance should be the same at each geophone, and is what it would be if each geophone were at the shot point. For the models shown below v=1400 m/s and h=15 m.
Notice the big assumptions here: to correctly apply a normal move-out correction we need to know both the layer thickness and the velocity of the layer above. When we apply the correct values for normal move-out, subtracting the travel times from those observed, our reflection gather will no longer be curved, but will be a horizontal straight line: This is fine as long as we know the velocity and depth to the layer. What if the “move-out velocity” we use for the correction is too high or too low?
no moveout Remember the true velocity is 1400 m/s and depth is 15 m. The curvature of the reflection is changed by normal move-out. If the velocity used in the correction is too high, the correction is less than needed and the curve still curves upwards, if the velocity is too low the correction is too much, and the curve bends downwards.
How do we find layer depths? Since the normal-incidence 2-way travel time of a ray is given by t=2h/v, the y intercept of the travel time curve defines this ratio. The change in curvature of the reflection as distance increases is a measure of the velocity, so, once the velocity is determined, we should be able to easily get the depth. How does this process improve signals? Since each reflection has a different move-out depending on its depth and velocity, and other arrivals, like refractions, have different shapes, other arrivals will NOT ADD when we stack the traces, but the desired reflections will.
x2-t2 : Another step to make things easier is to plot the reflections on axes where the distance and travel times are SQUARED. This helps because squaring the coordinates makes transforms hyperbolae into straight lines. To find TNMO we need to know the layer velocity and the depth. We can get these values from the equation for reflection time. Note what happens when you square this equation:
If we the reflection arrivals on x2 vs. t2, the resulting curve is a straight line with a slope of 1/V12, and a y intercept of 4h12/V12. Thus, for any reflection from a (flat) layer where the velocity above is constant, we can solve for the velocity above and the thickness. For shallow simple structures, the x2t2 method works well. Plotting x2 vs. t2 and measuring the slope and y intercept of the resulting straight line:
The slope of the x2t2 reflection arrival line is 1/v2 and the depth is given by h= t0v/2, where t0 is the square root of the y intercept. What about reflections from deeper layers?The move-out of reflections higher in the section will change the move-out of lower reflections. What about noise? Noise comes in many forms – wind, ships, rain, traffic, are “environmental” noises, and surface waves, diffractions, refractions, and multiple reflections are signal-generated noise. What is this “move-out velocity” when we’re dealing with layers BELOW the first reflection? What about dipping layers?
Previously we worked with a single layer over a half space. Now we will look at many layers of different velocities. Unlike refraction, the velocities won’t be directly obtained from the slopes of travel time curves, since we don’t have the advantage of head waves and the knowledge that our ray is horizontal in the deepest layer. We also need to deal with the fact that the rays aren’t straight as we go to deeper layers, but they bend (refract) as velocities change at and (in between) each layer boundary. We will have to make approximations to deal with these complexities.
Another fact to keep in mind is that the velocity between two layers does not need to change to observe a reflection. The reflection amplitude is a function of acoustic impedance: velocity times the density. Thus, a reflection can be observed even if only the density changes from one layer to another. But, we need the velocities between each layer boundary to get accurate estimates of depths to those boundaries. There are several ways to estimate the propagation velocities, each with its own advantages and problems. We’ll look at two of these methods.
Green's Method: Assumption- Green’s Method assumes that there is no refraction (bending) along the ray from the source to the reflector. Solve directly for the velocity from knowing the velocity of the layers above and “stripping off” higher layers. Use x2t2 plot to determine the velocities. Problem: There IS refraction, and this method only works when spread lengths are very short compared to depth of the reflectors, and not very well even there. Velocities come out considerably higher than reality leading to thickness estimates that are too large.
In the above plot the true ray displays refraction, while the ”Green” ray does not. The velocity and depth of the first layer will be correctly determined (assuming it has a constant velocity) from the reflection off the 2nd layer, but velocity for the 2nd layer will not be. The result is that the lower layer thickens’ and velocities will be over estimated.
Dix Method: • The Dix method is much better than the Green approximation, but Dix also assumes that the source-receiver distances are small relative to the depths to reflectors. • Dix (1955) showed that a sequence of constant-velocity layers will have reflections such that: The rms velocity is the same as that obtained from the x2t2 slope, and ti is the intercept time from the x2t2 reflector:
which is approximately the square root of the sum of the squares of the reflector velocity estimates multiplied by the interval times of each layer above divided by the sum of the interval times. The vi‘s in this equation are also the velocities obtained from x2t2 for each layer in succession, and the ti’s are the ONE-WAY vertical travel time through the layer: ti = (t0i -t0i-1 )/2 (t0i is the square root of the y-intercept of the x2t2 for the nth reflector.)
This is Dix’ Method, and it turns out to be a considerably better approximation than the no-refraction assumption, although it still works best for short spread lengths relative to the reflector depth. • Note that Vrms , ti, and vi* contains information about ALL layers above the reflector, so they don’t do us much good. We need the velocity of the interval between each reflector, called the interval velocity. • By manipulating the equation above, stripping off the layers above the one of interest, we can determine that:
This is often called the Dix equation. Vn is the INTERVAL velocity between the n-1 and nth reflector. Once we have velocities, thickness’ are easy to obtain by:
While the Dix method works quite well when the depth to the layer is large relative to the spread length, the curves representing the arrival times are no longer hyperbolae as x increases, and thus x2t2 plots are no longer straight lines. Errors will result if the best fit to the whole x2t2 plot are used. One should take the slope near x=0 to be most accurate.
Reflections from three layers are shown in the this x-t plot.
This plot shows the SAME reflections as above on an x^2t^2 plot. Note that the lines are CURVED, and thus the slope must be measured close to the y-intercept to get a reasonably accurate velocity estimate. (Different colors!)
This table shows ‘model’ errors expected from Green’s Method and Dix’ Method for obtaining interval velocities.
Reflections from a single dipping layer We can model reflections from a flat layer using the image source geometry. How does this geometry change if the layer is dipping?
E G N Q For a dipping layer, the image source is placed at twice the depth to the layer along the perpendicular to the boundary, Notice that the travel times of reflections from the dipping layer will be identical to the case where the shot is above the image source and the layer is horizontal. I.e. the reflections are symmetric around the minimum time.
There are several important observations to be made from this construction: • • The angle of incidence equals the angle of reflection from the layer, so Snell's law is obeyed, • •The length QN equals the length EN, so that the length of ray ENQ is identical to the length QG, • •The shortest reflected ray (least-time) is the one that hits the surface directly above the image source, • • The shape of the travel time curve for the reflections is independent of the dip - but the location of tmin changes with dip. • •The reflection arrival is no longer asymptotic to the direct arrival.
The indication that dip is present in travel time data is the offset of the shortest reflection time from directly below the shot point.
Curves above are for constant depth to the interface measured perpendicular to the interface at the shot point. Dip is in degrees. Note that the reflection at high dip is shown coming in before the direct arrival. This cannot happen. In this case, the thickness of the layer below the geophone is less than zero. The dip of the layer can be calculated from: The depth to the interface measured perpendicular to the interface at the shot point, j, is:
where j is the distance to the reflector measured perpendicular to the reflector, as contrasted to the depth h, which is the depth to the interface measured perpendicular to the surface of the earth: Unfortunately, dips are often small enough that the values of t0 and tmin cannot be measured accurately enough to determine dip with adequate precision, so.... What if we use x2t2 for this dipping layer? Since tmin is no longer at the shot point, our up-dip and down-dip values will be different. If we AVERAGE the up-dip and down-dip values (using a least-squares fit), we get a very good approximation for V and j.
But... to automate the process of dip determination, and to make the results useful in reflection processing, we need to look at the effects of dip on normal move-out. Recall that our desire is to be able to apply the normal move-out correction to our data so that we can later add together seismograms at various x distances to emphasize reflection arrivals. It's clear that if we apply normal move-out to dipping reflectors, the result will NOT be the horizontal line required if we want to preserve this reflection when we stack.
If we look at NMO again, we can re-write TNMO as: Using the first two terms of a binomial expansion. We can then define a dip move-out as: Dip moveout is the difference in travel time between the plus and minus x (equal distances from the source).
So, if we can determine the dip and velocities, we can correct our dipping reflections with move-out. Modern software accomplishes these tasks by drawing interactive hyperbolae on pre-stack data so that the operator can pick the best hyperbola to fit a particular arrival – including velocity, depth, and dip. The chosen parameters are then used in removal of moveout and stacking. We will see this during our data processing lab.