Download
1 / 7
70 likes | 226 Views
Sametime Connect / Instant Messaging. Loging On. Adding Coworkers to your List. Adding A Personal Group. 1. Open up your Windows Start Menu and select Sametime under Programs.

E N D
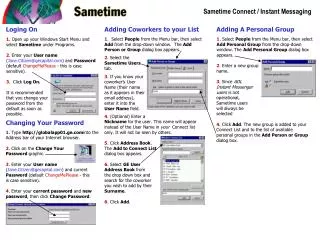
Sametime Connect / Instant Messaging Loging On Adding Coworkers to your List Adding A Personal Group 1. Open up your Windows Start Menu and select Sametime under Programs. 2. Enter your User name (Jane.Citizen@gecapital.com) and Password (default ChangeMePlease - this is case sensitive). 3. Click Log On. It is recommended that you change your password from the default as soon as possible. 1. Select People from the Menu bar, then select Add from the drop-down window. The Add Person or Group dialog box appears. 1. Select People from the Menu bar, then select Add Personal Group from the drop-down window. The Add Personal Group dialog box appears. 2. Select the Sametime Users tab. 2. Enter a new group name. 3. If you know your coworker’s User Name (their name as it appears in their email address), enter it into the User Name field. 3. Since AOL Instant Messenger users is not operational, Sametime users will always be selected 4. (Optional) Enter a Nickname for the user. This name will appear instead of the User Name in your Connect list only. It will not be seen by others. Changing Your Password 4. Click Add. The new group is added to your Connect List and to the list of available personal groups in the Add Person or Group dialog box. 1. Type http://globalapp01.ge.cominto the Address bar of your Internet browser. 5. Click Address Book. The Add to Connect List dialog bos appears. 6. Select GE User Address Book from the drop down box and search for the coworker you wish to add by their Surname. 6. Click Add. 2. Click on the Change Your Password graphic. 3. Enter your User name (Jane.Citizen@gecapital.com) and current Password (default ChangeMePlease - this is case sensitive). 4. Enter your current password and new password, then click Change Password.
Send a Message to a Coworker on your List Participate in a Conversation Save a Conversation Transcript 1. When a person sends you a message, a message window opens allowing you to respond. 2. Type your message in the Type your text area. 3. Click Send. 1. Once you have finished your conversation or while you are in the midst of a a conversation select Message from the Menu bar and select Save As. • 1. Double click on a name in your Connect List. • Or... • Select a name in your Connect List and select People from the Menu bar and select Message. 2. The Save As dialog box appears. • Or... • Right click on a name and select Message. 3. From the drop down box, choose the location where you wish to save the transcript. Sending Messages to Multiple Users Note: You can only send a message to a person on your Connect List who is on-line (their name will appear in green if they are). 1. Hold down Ctrland select multiple users and/or groups. 2. Select People from the Menu bar and select 2. The Send Message dialog box appears. 3. Enter your message. 4. Click Send. 4. Enter a File name and select the appropriate file type (e.g. txt, doc). Message or right click and select Message. 5. Click Save. 3. (Optional) Click the Secure messages check box for message encryption. 4. When the invitee list is complete, click Send. (Refer to the Invitee Tip on the next slide).
Share an Application Invitee Tip:You can add people by clicking Add Invitees. An alternative is to use the ‘drag and drop’ method - select the person you wish to add from your Connect List with your mouse, drag them across to the ‘Invitees’ box, then release your mouse button. You can remove people from your Invitee list by selecting the Invitee and pressing the delete key. 1. Select a user or hold down Ctrl and select multiple users and/or groups. • 2. Select People from the Menu bar then select Share Application 5. Once you click Send, your Internet browser will pop up and begin to load a Sametime Meeting session (without the Whiteboard). • Or... • Right click on a name and select Share Application. 6. You will be presented with a dialog box asking you what you want to share. Select the appropriate option, then click OK. 3. The Invite to Share an Application dialog box appears. 4. Once you have finished adding invitees, click Send.
Attending a Meeting Entering the Meeting Center... Select A Meeting to Attend (cont’d)... Participating In a Meeting (cont’d)... 1. Type http://ausmeeting01.ge.com into the Address bar of your Internet browser. 2. Click Meeting Center. 3. If you are attending an unlisted meeting click Attend Unlisted Meeting near the top of the Meeting Center.The Unlisted Meetings window appears. 4. Enter the meeting name and click OK. 5. The meeting will be loaded into your browser. 5.You can use ‘mark up’ (drawing) tools on the Whiteboard if you wish to illustrate a concept to meeting participants. • 6.The Participant List distinguishes the moderator from other active participants. It also indicates who can ‘drive’. • 7.The buttons at the bottom of the Participant List tab permit changing moderators and giving or removing permission from participants. 32. Enter your User name (Jane.Citizen @gecapital.com) and Password (default ChangeMePlease - this is case sensitive). 4. The Meeting Center window appears. Participating In a Meeting... 1. There are three tabs within the meeting room. Application Sharing, Whiteboard and Participant List. 2. The meeting moderator will instruct you to select Application Sharing or the Whiteboard. 3. Files that have been attached to the Whitebaord are listed in a drop down box. 4. To scroll through the pages of the file being presented on the Whiteboard, you can select which page you wish to view or use the arrows (if you have been given permission by the moderator to do so). 8. If you scroll down to the lower portion of the meeting room, you will see meeting details and additional screen controls. Select A Meeting to Attend... 9. Float will convert the meeting screen so that it ‘floats’ on your desktop. You can reverse this by clicking Dock. 10. Click the icon in the lower right corner to maximize the three tabs and utilise your entire screen as a viewing area. You can reverse this by clicking on this icon once again. 1. If you wish to view future scheduled meetings click Scheduled under the Meeting Center heading. 2. Select the meeting you wish to attend from the Active meeting list (current day’s meetings that have commenced).
To get the most out of your Sametime Meeting session… • If you wish to share static information (e.g. a PowerPoint pitch, Meeting Agenda, Word or Excel document) post it to a Quickplace and instruct meeting participants to download the document before the meeting commences (or as the meeting starts). • This avoids slow network connections during your Sametime Meeting. • Once the meeting commences, talk participants through the pitch/document that you are sharing. • If you wish to demonstrate the functionality of an application/software program or conduct software/application training, use the Application Sharing option. • If you wish to update a shared document (of any type) with meeting participants, attach the document to the Whiteboard as you schedule your meeting.
Scheduling A New Meeting Enter the Meeting Center... Setup a New Meeting (cont’d)... Setup a New Meeting (cont’d)... Repeat the steps listed on the previous slide for ‘Enter the Meeting Center’. 7. If you wish to update a document, of any type, with the assistance of meeting participants using the meeting room’s Whiteboard, click Attach a File, click Browse and find the file you wish to attach to the Whitebaord/update during the meeting. Repeat this process for each file you wish to attach to the Whiteboard. 8. Click Done once the file path appears for each document you wish to attach to the Whiteboard. Once the meeting begins, the files you have ‘attached’ will appear on the Whiteboard. Note: During the meeting, you cannot post additional documents/files to the Whiteboard and documents/files on the Whiteboard cannot be downloaded or modified by meeting participants. • 9. (Optional) To invite participants click Add participants. Your meeting can not be accessed by anyone not on the attendee list. • 10. (Optional) To password protect your meeting, enter a password and re-enter to verify. Remember to give the password to all participants. • 11. Scroll down to the last entry sections. Indicate whether or not: • You want your meeting to be encrypted; • You want your meeting to appear on the Sametime Meeting list; or • You want participants to actively participate • or only to watch. • Note: If you have elected not to have your meeting displayed on the calendar, notify participants of the scheduling details and let them know that the meeting is unlisted. • 12. Click Save when you • have provided all the required • details. The Meeting • Details window appears. • Check the details to • ensure that the information • you have entered is correct. Setup a New Meeting... 1. Click New Meeting and the New Meeting window will appear. 2. Enter the name of your meeting and a brief description. 3. Enter the start and end date and the time at which you wish to run your meeting. Your meeting can be set to start immediately or scheduled for a later time. 4. To setup a series of recurring meetings click repeat. 5. Select Share an Application or give a presentation using the Whiteboard. NetMeeting is currently not available. 6. Scroll down to the next entry sections. If you have participants from other GE locations be sure to check ‘People can attend from Sametime Servers…’.
Application Sharing 1. If you wish to demonstrate software/ application functionality or conduct software/ application training , click the Share an Application button once the meeting has commenced. The Share an Application dialog box will appear. 2. Share your entire screen, Share part of your screen, or select an open window* from the drop down menu under Share this window. 3. Indicate whether only you can drive or others can drive. 4. Click OK and meeting participants will be able to view part of, or your entire screen, or the open window you have selected, in their Application Sharing tab. All actions performed by the driver can be seen by all participants. * A window is a program you have open on your PC. These windows/programs are usually listed along the bottom of you screen.