Download
1 / 31
310 likes | 428 Views
Learn about creating Aussie-style banners with tips on size, shape, poles, fabric, design graphics, and more. Discover the best practices and tools for banner making.

E N D
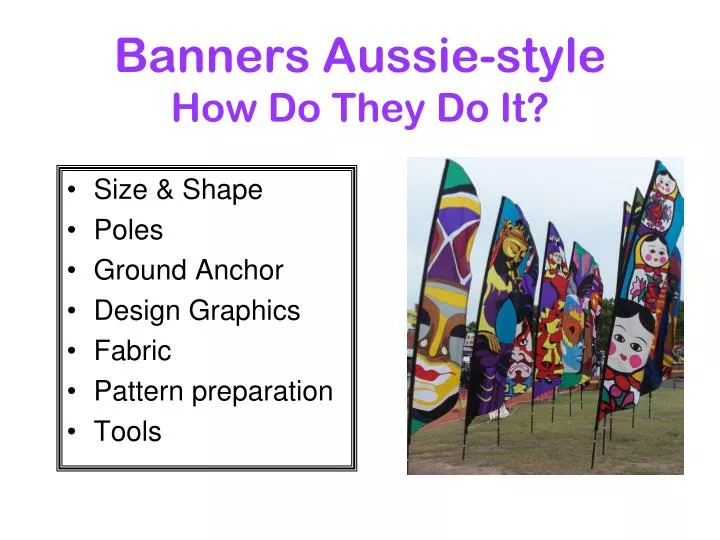
Banners Aussie-styleHow Do They Do It? • Size & Shape • Poles • Ground Anchor • Design Graphics • Fabric • Pattern preparation • Tools
Shape • Rectangular – top corner flop, bottom corner flick (children) • Flat/rigid – message always readable but no pizzazz! • Feather – smooth edge, waving and attractive
Size • Too small = difficult to cut & sew • Too large = weight / gravity issues, strain on the pole system • Our optimum is now 5:87/1 height to width • Banner weight 450gm
Bamboo Temporary Sharp edges (snags) Single length (hard to transport) Cheap for some PVC tube / plumbing Cheap Softens in summer Bends unevenly, looks drunk Not conveniently collapsible Requires modified sleeve top Heavy, users unhappy Poles
Fishing rod blanks Whippy tips Poke through sleeve tops Top section too weak for banner nylon Alternative = remove thinnest section Add vinyl tip to prevent poke through Poles cont…
Banner Poles • Specific for banners • Use load-spreading tips, no more poking through • Top section reinforced, thicker, withstands strain • Often in a carry bag • Ideally with clip for bungee
Bungee • Bungee acts as a shock absorber • Pre-test for optimum length to fit pole being used • NOT taut, NOT loose, slight tension • Bungee clip prevents fly-away banners
Ground Anchor Maintain flex by inserting only 20cm • Wooden broomstick, sharpen one end, 1m long • Solid fibreglass ideal, 12mm diameter, 1m long • Insert no more than 20cm, leave 80% exposed • NEVER use metal – it erodes inside of pole
Design Graphics • For own use, Microsoft ClipArt or own drawn • With computer software, need Vector graphic to manipulate • With photo or image can project onto wall, trace around.
Design Tips #1 • Keep designs away from uppermost trailing edge – area of high waving • Be mindful of too many stitch holes near high-speed waving • Avoid too many seams in near proximity to each other • Keep each component as large as possible
Design Tips #2 • Bleed images over edges, or • Crop or enlarge to avoid pea-on-a-drum effect • Duplicate single image to create impression of fullness
Design Tips #3 • Add black outline on all lettering / art to show where stitch lines will be • Too many lines causes sewing MAYHEM! • Simplify as much as possible to create less mess
Design Tips #4 • Best effects are darker backgrounds • Lighter letters/images show in sunlight like a neon sign
Design Tips #5 • Know hot colours vs. cool colours • Select colours from opposites • Cool colours hold vibrancy longer • Similar colour shades offer a 3D look • Dark backgrounds make good contrasts
Design Tips #6 Font styles • Simpler reads better • Waving fabric creates mystique so make message readable • Too many fonts confuse • Think - newspapers overload
Design Tips #7 Horizontal layout is how we’re trained to read. Top to bottom is better on FIXED signage. Never mix upper & lower case!! Leave correct spacing between words.
Design Tips #8 Zoom in & crop or focus on a definitive feature (e.g. dress frills)
Design Tips #9 Simplify drawings, remove excess lines, reduce colours to basic
Design Tips #10 Create designs from photographs or amend existing drawings
Design Tips #11 Simplify!
Design Tips #12 • Always check outlines by zooming in then reduce as many direction changes as possible • What looks good in small scale could be a nightmare at full size
Fabrics • Banner nylon, 200 denier, SolarMax UV-inhibitor coated to resist fading • Cut darker colours first. Lift. Cut lighter colour then replace darker colour • Hot dot, zig zag from reverse side. Easier to sew from lighter side
Finishing Off • Top Cap is 1000D Cordura • Edging is 20mm edge binding (awning tape, UV-stabilised). • Sleeving is banner nylon cut to suitable width for widest part of pole • Or, can be 1½ oz. ripstop cut to width & length • Your choice: bungee threaded through a loop at base of sleeve, or length of cord for tying.
Pattern Preparation options • Individual sheets A4 stuck to right size • Transparency, overhead projector onto full-size paper pattern (B&W) • Opaque Projector / Epidiascope onto full-size paper pattern (Colours) • Printshop, print out full size paper pattern ($$) • Wide format printer, print full size paper pattern • Laser cutting machine directly cuts fabric pieces