Download
1 / 58
580 likes | 754 Views
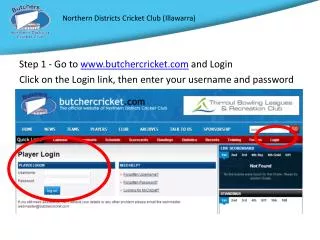
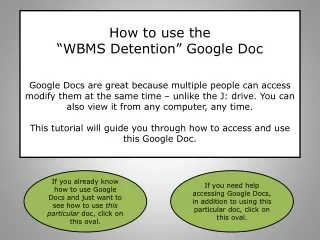
Log into Sites by Either Accessing the LCSS Homepage and Selecting Webmail and then selecting Sites or…. ..... go to Google and login and then select Sites. Creating pages within a site. From your homepage, click the "Create page" button.

E N D
Log into Sites by Either Accessing the LCSS Homepage and Selecting Webmail and then selecting Sites or…. ..... go to Google and login and then select Sites
Creating pages within a site • From your homepage, click the "Create page" button. • Choose High School Template. You can change this after you create the site, but for training purposes use this template. • Name your page. Google Sites will generate a URL (web address) based on the name you choose, but you can alter it by clicking Change. • Choose where to locate your page within your site: • Put page at the top level: Top-level pages are the most general in your site's hierarchy. They exist at the same level as your homepage, and it's easy to create subpages beneath them. They are best for main categories of your site's content. • Put page under {current page}: The second option is to place your new page as a subpage of the page you were on when you clicked "Create page". • Choose a different location: Choose to nest your page under any other page in your site. • Click "Create page".
Guide to different page types • Web pageA web page is the simplest kind of page; you can write content, embed gadgets, and arrange it however you like. The web page has standard formatting controls like bold, italic, and underline, bullets, and more. You can attach documents from your hard drive to the bottom of the page, and you can let other site collaborators comment on your pages. Google Sites periodically saves versions of your page as you make edits, so it’s easy to go back to earlier versions of the page to make comparisons or undo changes. • AnnouncementsMuch like a blog, announcement pages display posts you make to the page in chronological order, starting with the most recent. For example, an announcement page would be great for keeping a record of homework assignments and class notes, while providing quick access to the most recent info. • File cabinetFile cabinet pages let you store and organize files from your computer’s hard drive, making it an easy way to share files with other users of your site. Anyone subscribed to the page will be notified when files are added, changed, or removed. • List pageList pages let you make and organize lists of information. Items on the list are easy to add, edit, and remove, and viewers of the list can sort it by any column. Like the file cabinet page, subscribers are notified when items are added, changed, or removed. • Start page (Google Apps Premier users only)A start page is a page that can be customized by each of its viewers (a little bit like an iGoogle page for your site!) to show a personalized set of gadgets. Site collaborators can still add content that all viewers see, but that section remains separate from the section that can be personalized.
Editing Your Site 2 Click the pencil icon to edit your page. Now you can type whatever you wish on the Home Page. 3 Now select each page on the sidebar and edit it 1 Click on “show all content”
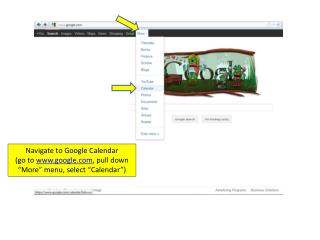
Inserting Google Calendars • Navigate to the page where you want to embed your calendars and click " Edit page." • Place the cursor where you would like to insert your calendars. • From the Insert menu, select Calendar. • Click the name of the calendar you would like to embed, then click "Select". • If you would like to display another calendar in the same gadget (as opposed to a separate gadget), click Display another Calendar. • Click the name of another calendar you would like to embed, then click "Select". Repeat these last two steps until you have added all the calendars you want in your gadget. Choose how you would like your calendars to be displayed by choosing among the gadget options, then click "Save". A box should now appear on your page that reads Google calendar and the name of your calendar. Continue editing your page or click "Save" and you're done
Adding Images to Your Site • Navigate to the page where you would like to place your image on it and click " Edit page." • From the Insert menu, select Image. • If you have your image on your computer, click "Choose file" and navigate your computer to select the image. If you want to use an image you found online, click on the radio button next to Web address (URL) and then enter the URL of the image in the box next to Image URL. • Click "OK." • If you would like, you can then make changes to the size or position of the image or you can choose if you want text to wrap around the image. • Continue making changes to your page or click "Save" to preserve all changes to the current page.
Image Size and Alignment • Navigate to the page with the image on it and click " Edit page." • Click on the image you would like to customize. • Change the size of the image by clicking S for small, M for medium, L for large, or Original for the full size of the uploaded image. • Alter the position of the image in the page's text box by clicking L for left, M for middle, or R for right. • If you want text to go around your image, select Wrap On. • Click off the image to continue making changes to the page or click "Save" to preserve all changes to the current page.
Adding links to your page • Highlight the text you would like to turn into a link and click Link. • You can choose whether you want to link to a page on another site, a page that already exists on your site, or a new page on your site: • External page: If you want to link to a page on another website, select the Web address tab and enter the URL of the page you want to link to in the box below Link to this URL. • Existing internal page: If you would like to link to an existing page on your site, select the Existing page tab. You can then find the page you want by searching for its name, looking through your site map, or, if you have edited it recently, finding it in your list of recent changes. • New internal page: If you would like to link to a new page on your site, select the Existing page tab and click " Create new page." You will then be prompted to give the page a title, choose what type of page you want it to be, and choose where to place the page. • Regardless of what type of link you choose, if you would like the linked page to open in a new browser window or tab when a visitor clicks on it, check the box next to Open this link in a new window. • Click "OK." • Continue editing your page or click "Save" to preserve your changes.
Attaching a document • You can attach files within the attachments section at the bottom of any page or within a File Cabinet page. To attach a document to a standard page, click Browse next to Attach a file, browse for the file, select it, and click Open. There is a limit of 20MB per file on uploads. • To attach documents to a File Cabinet, create a new File Cabinet page and upload your files there using folders as desired to organize the contents.
Inserting Google Maps • Click the Edit Page button. • Click the Insert menu and select Map. A window with a map appears. • Type in an address or location in the search box and click Search. Your location appears in the map, marked with a red placemark. • Inside the map, there are three options you can select: map, satellite map, and a hybrid of both. Click one, then click Select. Note: if you have an existing Google Map you'd like to add, simply add the link to the box below the map and click Select. • In the next window that appears, you can add a title to the map, choose to display a border around the map, or change its size. • Click Save at the bottom of the window after selecting your options, and Save again at the top of the page to save all your changes.
Giving Access to Your Site You can give access to anyone who has the link by selecting Share at the top right corner and clicking on “Public on the Web.”
Optimizing sites for mobile devices • In the top right of your window, click the More actions button. • Select Manage site from the drop-down menu. • On the left side of your window, click General. • In the Mobile section of this page, select the checkbox next to the "Automatically adjust site to mobile phone" option. • Click Save changes. • After you've enable this feature, you can preview what your site will look like on a mobile device. Click the More actions, and select Preview page as viewer from the drop-down menu. Then, select the Mobile option in the yellow bar at the top of the page.
Add Subpages Below Main Pages • On the left side of any page, click the page to which you'd like to add a subpage. • Click Create Page. Make sure you select the radio button next to Put page under (name of the top level page). Repeat this for each subpage under each main page. • Your main pages will appear on the left side of the page with arrows to open up subpages.
Changing a Page’s URL • Navigate to the page whose URL you want to change. • From the "More actions" drop-down menu, select Page settings. • In the box below Page URL, type in what you want the last part of the page's URL to be. (Note, the beginning part of the URL is dictated by the structure of your website. For example, if you want to add a page URL of "cousins" to your site, which you called "familyblog," the page's full URL would be http://sites.google.com/site/familyblog/cousins). • Click "Save."
Changing Your Page Name • Changing your page name • Navigate to the page whose title you want to change and click " Edit page." • Your page title will be in the top text box in your page's main content area. Change this to be whatever you want your page to be named. • Click "Save.“
Hiding Your Page Name • If you do not want your page name to appear at the top of the page and as part of the name on your browser window, you can turn your page name off: • Navigate to the page whose title you want to turn off. • From the "More actions" drop-down menu, select Page settings. • Uncheck the box next to Show page title. • Click "Save.“
Recovering a deleted page • If you accidentally delete a page, you have 30 days to recover the deleted page and restore its sub-pages and attachments. To recover a deleted page: • Select Manage site from the "More actions" drop-down menu. • Select the Deleted items tab. • Click the box next to the page you would like to recover. • Click "Recover.“ • On the Deleted items tab, you can also see how long each page has left before it will be deleted permanently by looking under the Delete permanently column. If you want to delete a page permanently right away, you can click the box next to the page and click "Delete permanently." Be careful, though – you cannot undo this action.
Deleting a page • Go to the page you want to delete. • Click the "More actions" menu. • Select Delete page. • Confirm you want to delete the page by clicking "Delete". • If you delete a page, its sub-pages and attachments will be removed. If you accidentally delete a page, you have 30 days to recover the deleted page, which will automatically restore its sub-pages and attachments.
Adding links to subpages • Navigate to the page where you'd like to add the list of subpages. • Select Page settings from the "More actions" drop-down menu. • Check the box next to Show links to sub-pages. • Click "Save." • Repeat for all pages that you would like to change.
Selecting a page location • From your homepage, click "Create page." • Choose where to locate your page within your site: • Put page at the top level: Top-level pages are the most general in your site's hierarchy. They exist at the same level as your homepage, and it's easy to create subpages beneath them. They are best for main categories of your site's content. • Put page under {current page}: The second option is to place your new page as a subpage of the page you were on when you clicked "Create page." • Choose a different location: Select the page that you want this page appear under, then click "Select." • Click "Create page".
Selecting location after a page has been created • From the More actions menu, click Move page. • Select the page where you want this page appear under. • Click "Move."
Reverting to earlier versions of your page • Navigate to the page that you want to change. • From the "More actions" drop-down menu, select Revision history. • To look at a previous version of your page, click on the version number (for example, Version 2). While looking at this version, you can replace your current page with this version by clicking Revert to this version. In addition, you can compare any version of your page to any other version of your page (including the current page) by clicking Compare two versions and then choosing the two versions you would like to compare. • If you are done looking at a version of your page and want to choose other versions to look at, click << back to version history listing.
Comments and attachments • Site owners can enable a setting that lets editors of their site upload attachments or comment on a site page. Anyone viewing the site can download and view attachments, as well as view comments made on a page. The owner can leave these comments and attachments for others to view, or the owner can delete them. • Enabling comments and attachments • To enable comments or attachments for a particular page: • Navigate to the page that you'd like to change. • Select Page settings from the "More actions" drop-down menu. • Check the boxes next to Allow attachments or Allow comments. • Click "Save."
Adding and Deleting Comments • Navigate to the page that you'd like to change. • Click the plus icon next to the Comments at the bottom of the page. • Type your comment in the text box. • Click "Add comment." • Only the creator of the comment or attachment, or an owner of the site may remove comments and attachments. • To delete a comment or attachment, these users can navigate to the page where the comment or attachment is located, then click the Remove link next to the comment or attachment.
Viewing and Sharing Attachments • Select Manage site from the "More actions" drop-down menu. • Select the Attachments tab from the Site content section. • You'll be taken to a list of all of your attachments for the site. Here, you can rename, move, delete or replace your attachments • If you would like to share attachments from you site, you must have the person you are sharing the attachment with visit the page that the attachment is on, then click to download the attachment. That means that the person you are sharing the attachment with must have access to your site. • In order to keep your site secure, you cannot just provide a link directly to the attachment.
Linking to files or text within your site • Navigate to the page containing the file you want to link to. • Right-click or control-click on the file's link and select Copy Shortcut or Copy Link Location. • Navigate to the page where you want to link to the file from and click " Edit page." • Highlight the text to be linked and click Link. • Select the Web address tab and enter the copied link shortcut or location in the box below Link to this URL. • Click "OK.“ • Continue editing your page or click "Save" to preserve your changes.
Create Links to Areas on Your Page part 1 • If you want to quickly and automatically create links to significant areas on your page -- often called anchor links -- you might consider adding a table of contents to your page. However, if you want to customize these anchor links or use them to link to areas that are not formatted as text headers, you'll need to add these links individually: • Navigate to the page that you want to be the destination of your anchor link and click " Edit page." • Click "Edit HTML" on the formatting menu. • In your page's HTML, you'll need to surround the text that you want to be the destination of your link with a snippet of HTML. For example, if you wanted the destination of your link to be a line of text talking about your dog, Fido, it would look like this:< a name="AnchorName">The early years of Fido the magnificent</a>In this example, you'll want to replace AnchorName with a name that reflects this link's destination. • Click "Update" to return to your page, then click "Save" to preserve your changes to the page.
Create Links to Areas on Your Page part 2 • Navigate to the page where you want to place the link and click " Edit page." • Highlight the text you want to turn into a link and click Link. • Select the Web address tab and enter the full URL of your new anchor link in the box below Link to this URL. If you use Google Apps, the full URL of your anchor link will be http://sites.google.com/a/DomainName/YourSite/Page#AnchorName, where DomainName is the name of your organization's domain, YourSite is the name of your site, Page is the page that contains the destination of your link, and AnchorName is the name you used to mark the destination of your anchor link. If you are not a Google Apps user, the full URL of your anchor link will be http://sites.google.com/YourSite/Page#AnchorName, where YourSite is the name of your site, Page is the page that contains the destination of your link, and AnchorName is the name you used mark the destination of your anchor link. • Click "OK." • Continue editing your page or click "Save" to preserve your changes.
Adjusting Tables Within a Site • The only way to adjust the size of one row or one column within a table is to edit the HTML. • Click on the HTML icon on the tool bar within the Page Editor. • Replace the "60px" with whatever number you want the size to be for whichever column or row you want to edit. • Once you've finished making your changes click "Update" and your changes should appear. • Please keep in mind that the table feature auto sizes depending on what content you place in it. In most cases, the table will resize proportionally correct for what has been input and shouldn't require manual re-sizing. • Also, if you remove the width attribute from every cell in a column, the browser will automatically resize the cells based on content width.
Embedding a Single Photo from Picasa • Click Insert and select Picasa Photo. • Click the album from which you'd like to pick a photo, and once it loads, select the picture you want to insert. • Click Select and the picture will be added your page. • Click Save.
Inserting a Web Album from Picasa Click Insert and select Picasa Web slideshow. Paste the URL of the album you'd like to insert. Select the size of the slideshow and how you want to display it on the page. Click Save.
Inserting Google Docs, Spreadsheets, Presentations, and Forms • Click the “Edit page” button to open the site editor. • Place the cursor where you would like to insert the object. • From the Insert menu, select the object you wish to insert. • Note: The inserted object will be view-only to the public. However, when the contents of the objects are updated at its source and published, it is updated automatically within your site. • Anyone with collaborator access to your site will be able to view a link under each embedded object that will allow them to pop out an editable version of the object.
Configuring your sidebar and navigation gadget – part 1 • If you want more control over your navigation gadget, you can manually organize your pages: • From the Site layout tab, click edit on your sidebar navigation gadget. • Make sure the box next to Automatically organize my navigation is unchecked. • To add a page from your site to your navigation gadget, click Add page. Then locate your page in the pop-up window and click "OK." • To add a page from another site or an email address to your navigation gadget, click Add URL. In the pop-up window, enter the URL of the page and the name you'd like to give to the link, then click "OK."
Adding a table of contents - part 1 • A table of contents is a great way for you to organize your content and an easy way for visitors to navigate your page. All you have to do is mark the text you want for your table of contents with a heading tag, then add a table of contents to your page. • Marking your text as a header • Navigate to the page where you want to embed your table of contents. • Click the “Edit page” button to open the site editor. • Highlight the text you want to appear in the table of contents. • From the Format menu, choose either Heading (H2), Sub-heading (H3) or Minor heading (H4) depending on what style you want. The lower the heading number, the more pronounced the text will be. • Repeat these last two steps for all the text you want to appear in your table of contents.
Adding a table of contents - part 2 • Adding the table of contents • Place the cursor where you would like to insert your table of contents. • From the Insert menu, select Table of Contents. • Set the width of your table of contents and choose how many levels of headings you want to show. (For example, if you have a list that has text formatted as H2, H3 and H4, choosing to show only two levels would mean that only the text formatted as H2 and H3 will appear in your table of contents.) Then click "Save" and a box marking your table of contents will appear on your page. • On the page you are editing, click "Save" and you're done! Your new table of contents will now appear on your page.
Adding Items to Your Horizontal Navigation Bar • On the Site layout tab, click edit content under the Horizontal navigation bar section. All pages currently listed in your horizontal navigation bar will appear in the box beneath Select pages to show. This is where you can add, delete, and organize your menu items: • Adding menu itemsTo add a page from your site as a menu item in your horizontal navigation bar, click Add page, then locate your page in the pop-up window and click "OK." To add a page from another site or an email address as a menu item, click Add URL. In the pop-up window, enter the URL of the page and name of the menu item you would like to appear, then click "OK." • Deleting menu itemsTo delete a page as a menu item in your horizontal navigation bar, select the page in the Select pages to show box, then click on the remove icon. • Adding drop-down menu itemsTo create a drop-down menu, a page must have other pages listed underneath it in the Select pages to show box. To make a page a drop-menu item, select the page in the Select pages to show box, then click the right arrow. (It will then appear indented in the Select pages to show box.) To change a page from a drop-down menu item to a top menu item, select it and click the left arrow.
Organizing Your Menu Items • To change the order in which your menu items appear, select the page in the Select pages to show box, then click the up arrow or down arrow. The top items in the Select pages to show box will be your left-most horizontal menu items. This organizational structure applies to drop-down menus too. • If you would like your sitemap or recent site activity to appear in your horizontal navigation bar, check the boxes next to Sitemap or Recent site activity. • If you want to leave your horizontal navigation bar its current style, click "OK" then click "Save changes" on the Site layout tab. Otherwise, read on to learn more about and see a preview of the navigation bar styles.
Adding a horizontal navigation bar • Click the "More actions" menu and select Manage site. • Select the Site layout tab and then click "Change site layout". • Select the checkbox next to Horizontal navigation bar. If you want to remove the side navigation bar, deselect the checkbox next to Sidebar. • Click "OK" to return to the Site layout page. • If you already have pages added to your horizontal navigation bar and want to return to your site, click "Save changes" then Return to site.
Customizing the Sidebar • Click Edit sidebar at the bottom of your site's sidebar. • Click Change site layout. • If you do not want the sidebar, uncheck the box next to Sidebar. • If you want to keep your sidebar, you can choose where it will appear by selecting the radio button next to on the left or on the right. You can also change the sidebar width by entering a new number of pixels in the text box. • Once you are on the "Site Layout" tab, you can add various gadgets to your sidebar by clicking Add a sidebar item, then selecting a gadget from the list. • You can edit or delete any item in your sidebar by clicking on edit or delete below the item.
Configuring your sidebar and navigation gadget – part 2 • To delete a page from your navigation gadget, select the page in the Select pages to show box, then click on the remove icon. • To change the order in which your pages appear, select the page in the Select pages to show box, then click the up arrow, down arrow, right arrow, or left arrow. Your pages will appear in your navigation gadget in the same order in which they appear in the Select pages to show box. • You can also choose to include a link to your sitemap (which displays the hierarchy of your site) and your recent site activity by checking the box next to those options. • If you want, you can type a name for the navigation gadget in the box next to Title and check the box next to Display title to have that name displayed at the top of your navigation gadget.
Turning Off Your Sidebar • From the "More actions" menu, select Manage site. • Select the Site layout tab and then click "Change site layout." • Uncheck the box next to Sidebar. • Click "OK" to return to the Site layout page. • Click "Save changes" then Return to site.
Adding and Reordering Sidebar Gadgets • You can add, delete and reorder your sidebar's gadget by choosing "Manage site" from the "More actions menu, and selecting the Site layout tab on the left-hand-side. • Adding gadgets: To add a gadget, click Add a sidebar item in the Sidebar area. Then, find the gadget in the list you want to add and click "Add." • Reordering gadgets: To reorder your gadgets, click on the gadget you want to move and drag it to the position where you want it to appear. • Deleting gadgets: To delete a gadget, click delete on the gadget. • Make sure to click "Save changes" when you are done modifying your sidebar. • You can add pages to, delete pages from and organize your sidebar's navigation gadget in two different ways. Automatic organization takes less time, but manual organization gives you greater control over how your navigation is structured.
Automatic organization • From the Site layout tab, click edit on your sidebar navigation gadget. • Make sure the box next to Automatically organize my navigation is checked. • Choose how many levels of pages you want to be included in the navigation gadget by choosing a selection from the drop-down menu. For example, if you choose 2, the navigation gadget will display any top-level pages and pages listed under them, but will not display any subpages listed under those second-level pages. • You can also choose to include a link to your sitemap (which displays the hierarchy of your site) and your recent site activity by checking the box next to those options. • If you want, you can type a name for the navigation gadget in the box next to Title and check the box next to Display title to have that name displayed at the top of your navigation gadget. • Click "OK." • If you have chosen to have your navigation gadget automatically organized and you want to change the order of pages, you must change the location of your pages.
Editing Navigation Settings • If don't see this new organization in the sidebar, you'll need to edit you navigation settings. Here's how: • Click More actions > Manage site. • Select Site layout under 'Site appearance.‘ • Click the edit link under Navigation, in the Sidebar section. • Select the option 'Automatically organize my navigation.‘ • Choose how many levels of pages you want to display. • Click OK. • Click Save changes.
Add a Subpage Listing • Click the top level page in the sidebar, then click the Edit page button. • Click Insert > Subpage listing. • Enter the title of the main page in the Title field. Select the appearance of the listing and click Save. • You'll now have sub-menus for your pages. You can repeat this for all top level pages and subpages.
Creating a Site Footer • A footer is a section that appears at the bottom of every page on a site and typically contains information, such as a contact email address or phone number, that is useful or applicable no matter which page your visitor is viewing. To add a footer: • Select Manage site from the "More actions" drop-down menu. • Select the Site layout tab. • Click "Change site layout.“ • Check the box next to Footer. • Select one of the two radio buttons under the Footer section to control whether the footer's height is a specific number of pixels or is automatically adjusted according to the size of the content inside the footer. • Click "OK." • Click "Save changes." • When you would like to add or edit content in the footer, go back to the Site layout tab and click edit footer content. You can then use the pop-up editor to add or edit text, images, links and more. To preserve your changes, make sure to click "OK" and then "Save changes."
Setting a landing page • From the More Actions menu, select Manage Site. • Click the General tab. • Choose the page you would like for your landing page (the default is "/home"). • Click Save Changes.
Changing your site's layout – part 1 • Select Manage site from the "More actions" drop-down menu. • Select the Site layout tab under the Site appearance section. • By clicking "Change site layout," you can change several aspects of your site: • Site width: You can set your site's width to a specific number of pixels or to the default width of your theme. • Header: You can check the box next to Header if you would like to have a header for your site. If you choose to have a header, you can specify the header's dimensions and how it should be aligned.
Changing your site's layout – part 2 • Horizontal navigation bar: If you would like a horizontal navigation bar, click the box next to Horizontal navigation bar. Usually, a site has either a horizontal navigation bar or a sidebar. • Sidebar: You can choose whether you want a sidebar on your site by checking or unchecking the box next to Sidebar. If you choose to have a sidebar, you can also set its width and choose whether it should be on the left or right side of your site. • Footer: You can choose whether you want a footer on your site by checking or unchecking the box next to Footer. If you choose to have a site footer, you can also set its height or have Google automatically adjust its height according to the footer content. • To modify the options for searching your site, click "Configure Search." You can then choose between several options: • Enable search: This option turns search on or off.