Laptop/PC GPRS Configuration for Windows XP
250 likes | 445 Views
Laptop/PC GPRS Configuration for Windows XP. Ways of Connecting your laptop. Using Bluetooth Using data cable Using infrared link. Before starting…. Subscription to GPRS is a prerequisite Confirm that the handset supports IR reception and same is available on your laptop

Laptop/PC GPRS Configuration for Windows XP
E N D
Presentation Transcript
Ways of Connecting your laptop • Using Bluetooth • Using data cable • Using infrared link
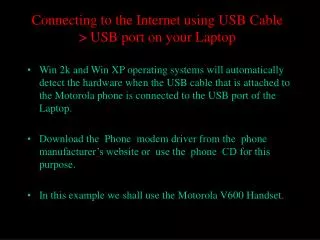
Before starting… • Subscription to GPRS is a prerequisite • Confirm that the handset supports IR reception and same is available on your laptop • In case of connecting through data cable, make sure the data cable is attached and the mobile is detected by the computer
Laptop settings • Click on to my computer and then control panel Click here
In printer and hardware option • Click on to phone and modem setting Click on phone & modem
Phone and modem tab • In the modem tab select standard modem over IR link
Phone and modem option • Click on to dialing rules tab in the phone and modem option • Press edit button Edit button
Edit location • In the edit location window, click on to the general tab • Select tone option • Press ok Select tone
Phone and modem tab • Click on the modem properties Click on to properties
Modem properties • Select maximum port speed
Modem properties For Post Paid AT+CGDCONT=1,"IP",“ufone.internet”;+CGQREQ=1,3,4,3,2,31;+CGQMIN=1,3,4,3,2,31 For Pre Paid AT+CGDCONT=1,"IP",“ufone.pinternet”;+CGQREQ=1,3,4,3,2,31;+CGQMIN=1,3,4,3,2,31 For U-Mail Account AT+CGDCONT=1,"IP",“umail.internet”;+CGQREQ=1,3,4,3,2,31;+CGQMIN=1,3,4,3,2,31 Click on to the advance tab and enter the extra initialization commands: NOTE: Please do not copy paste the mentioned string, Only manual typing is required. If your system is not being supported the above string then type the following string. For Post Paid AT+CGDCONT=1,"IP",“ufone.internet” For Pre Paid AT+CGDCONT=1,"IP",“ufone.pinternet” For U-Mail Account AT+CGDCONT=1,"IP",“umail.internet”
Modem properties • Confirm the correct initialization string, in order to avoid any errors while connecting • Click on to the advance port settings Click here
In the advance port settings uncheck the use FIFO buffers • Select the com number currently in use • Press ok button COM in use
Click on to change default preferences button • Select port speed to maximum • Select hard ware flow control to none • Press ok and exit modem properties Max port speed Flow control to none
Setting up a new dial up connection • Go to my computer control panel • Click on to network and internet connection Click here
Click on to network connection Click here
Click on to create a new connection Click here
Click on to the next button on the new connection wizard Click next
Select connect to the internet option • Press next button
Select “set up my connection manually” • Press next button Select Press next
Select “connect using a dial up connection” • Press next select Press next
Enter Ufone as ISP name • Press next Enter Ufone Press next
Enter *99***1# in the phone number field • Press next
Uncheck the options and leave the fields blank • Press next
Press next button to finish to complete the connection wizard