Download
1 / 22
220 likes | 337 Views
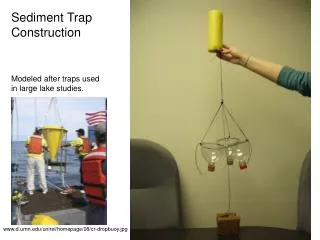
Sediment Trap Construction. Modeled after traps used in large lake studies. 3 Deck Screws for wrapping Support Wire spaced 0, 12 and 20 in. Ca. 34in fence wire. www.d.umn.edu/unirel/homepage/08/cr-dropbuoy.jpg. Goal of the Grant.

E N D
Sediment Trap Construction Modeled after traps used in large lake studies. 3 Deck Screws for wrapping Support Wire spaced 0, 12 and 20 in Ca. 34in fence wire www.d.umn.edu/unirel/homepage/08/cr-dropbuoy.jpg
Goal of the Grant • In collaboration with CNU faculty, NNPS teachers(me) and (CNU graduate student) Resident Scientists (Mr. Maxwell) will guide their students in an inquiry-based field sampling and GIS spatial analysis project to address critical ecological issues impacting the local Chesapeake Bay watershed.
3 Deck Screws for wrapping Support Wire spaced 0, 12 and 20 in
Pull the wire tightly around the screws – making sure the end remains in-between the screws (and not sticking out the other side!)
Continue to bend the wire tightly around the screws another 2 full turns.
To remove backbone from jig, unscrew 2 of the 3 wood screws in each set.
To make the funnels, center a 2 liter bottle in the 1 quart cup and scribe a line around the top. Measure 1 cm above this line for cutting.
Use a hole-punch to make 1 single hole just at the solid line. Insert a tie-wrap (large) through the center loop of the backbone and through the funnel hole. *Make sure the funnel cap is pointed toward the “long end” of the backbone. Pull the tie wrap tight.
Attach the other two funnel traps to the loop. **Also make sure that the cap ends are all pointed toward the “long-end” of the backbone. Clip off all the tag ends of the tie-wraps with a wire cutter. Be careful of flying pieces of tie-wrap.
Where the funnels meet at their edges - clip through another hole – and use the small tie- wraps to attach the funnels to each other.
At a point opposite the center-loop attachment on the backbone, clip another hole into each funnel. This will be where the support lines will be tied.
Take 30 in of braided fishing line – double it and make a loop around the top backbone loop. Tie the line to the outer hole in the funnel. Make sure the funnels are level when lines are tight.
Attach a 6in piece of pool-noodle as the float with a 36 in braided fishing line – doubled up. Float should be about 8in from the top backbone loop. Use superglue to seal each of the knots and then trim.
Attach a brick anchor to the bottom loop of the backbone with a 18in wire fishing leader. Depending on the depth of site – attach a small (1 in thick) noodle piece with fishing line - length can vary (2ft or greater…..) as a top marker float.