Download
1 / 40
400 likes | 433 Views
Explore different types of machine stitching, hand sewing methods, pressing fabric tips, and garment construction techniques in this comprehensive guide with step-by-step instructions. Perfect for both beginners and experienced sewers.

E N D
Stitching by Machine Part 4
Stitching Lengths • Basting • Temporarily holds • Very long, 6 stitches per inch • Standard • Permanent seams • 10 – 12 stitches per inch • Reinforcement • Add strength to areas • Very short stitch ( 15 – 20 per inch)
Types of Machine Stitching • Stay-stitching • Prevents stretching as you handle fabric • Placed on bias and curved edges • Directional stitching • Prevents seam from stretching or changing as you stitch • Stitch with the grain
Standard seam stitching • 5/8 of an inch • Almost all patterns • Backstitching • Secures ends of a row of stitching • Stitch back and then forward again
Understitching • Keeps facing from rolling out • 1/8 inch • On right side of fabric, see figure 12-5 page 503 • Topstitching • Decorative and functional • Outlines seams, secures facing, holds hems • See Figure 12.6 Page 503
Edge stitching • Holds fabric and seams in place • Topstitching very close to finished edge • Zippers and neck edges figure 12.8 • Stitch-in-the-ditch • Holds two or more layers together • Secure neckline, armhole, etc • On the outside in the groove of the seam line
Zigzag stitching • Used to finish seams, buttonholes, attach cording • Decorative designs • Specialty stitches • Decorative
Before You Sew • Practice sewing on scrap material • Is the stitch length correct? • Are stitches correct width? • Is the tension right? • Needle smooth and straight? • Presser foot firm and tight? • Handwheel tightened after winding the bobbin?
Unit Construction • Unit construction – complete individual parts as fully as possible before sewing them together • Complete stay stitching etc
Removing Stitches • Mistakes happen • Remove with seam ripper, thread clippers or small scissors
Hand Sewing • Thread a needle • Usually single thread • Make a knot as shown on page 506 figure 13.1
Types of Hand Stitching • Basting stitch • Temporary stitching that marks or holds pieces together • Removed when permanent stitching is done • Two types • Uneven and even
Running stitch • Simplest • Gather, ease, tuck, quilt • Use where little or no strain See figure 13.4 Page 507 • Backstitch • Strongest hand stitch • Repair machine stitch seams and fasten thread ends
Pick stitch • Variation of the backstitch • Used to insert zippers • Slip stitch • almost invisible • Can attach one folded edge to another • Patch pockets, hems, linings, etx
Over cast • Prevents raw edges from unraveling • Diagonal stitches over edge of fabric • Hemming stitch • Slanted stitch • Finishing stitch
Blind stitch • Barely visible from garment’s right side • Hemming and holding facings down • Catch stitch • Criss-cross stitch holds two layers together • flexible
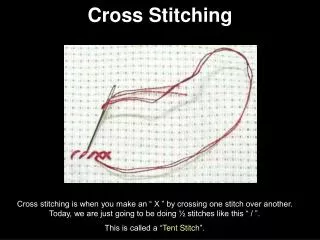
Cross-stitch • Decorative stitch • Center back of pleat jacket • Buttonhole stitch • Handworked buttonholes • Attaching hooks and eyes • Decorative finish
Blanket stitch • Thread loops, eyes and belt carriers • Decorative finish • Chain stitch • Forms thread loops, eyes and carriers • Double thread to form a series of loops
Pressing Fabric • Press (raising and lowering iron )rather than iron (slides back and forth) • Use correct temperature setting • Always test your fabric to see reaction • Press on wrong side whenever possible • When pressing on right side, always use a press cloth
Never press over pins • Always press seams and darts before other seams are stitched across them • Press directionally with the grain • Press seams flat before you press them open
Press curved areas over a curved surface • Tailor’s ham • Prevent press marks on right side, slip pieces of paper under the edges of the seam • Check the fit of the garment before you press sharp creases, pleats
Don’t over press • When pressing an entire garment • Start with small areas first • Collars, cuffs, yokes • Later press large flat areas
Pressing Techniques • Flat areas • Place garment on ironing board with both seam allowances to one side • Open the fabric and place over board
Curved areas • Darts, curved seams (tailor’s ham) • Press darts and seams flat to blend stitches • Place fabric wrong side up on tailor’s ham
Enclosed Seams • Press seam flat • Press seam open • Turn right side out, gently push out corner or point • Press garment section flat on ironing board
Gathered areas • Press seam allowances together flat • Slip garment over end of ironing board • Press direction up into the gathers with the point of the iron
Shrinking in Fullness • Hold the iron above the fabric to allow steam to penetrate before pressure • Use your fingers to pat out any folds • Press edge of the fabric to shrink in fullness
Final Pressing • While constructing garment • Light pressure will remove wrinkles • Light touch up at end
Making Darts • Fold the dart with right sides together matching stitching lines • Stitch from the wide end to the point • Stitch the last two stitches as close to the fold line as possible • Tie the thread ends
Pressing Darts • Always press dart before crossing it with another seam
Gathering and Easing Fabric • Adjust stitch length to 6 – 8 stitches • Stitch the first row of basting next to the seam line • Leave the threads long • Stitch second row ¼ inch away and leave thread long
Pin the fabric edges matching, notches, seams, etc • Pull up both bobbin thread from one end • Gently slide the fabric along the stitching • Wrap ends around a pin • Distribute gathers evenly and pin • Stitch with standard stitching along stitch lines
Shirring is formed by several rows of gathers • Easing most often used at shoulder seams • See page 518 figure 16-7
Sewing Plain Seams • Stay-stitch any bias or curved areas • Pin baste fabric layers together • Raise the needle and take up lever • Position fabric under needle • Lower presser foot • Backstitch for ½ inch and then forward • Stitch forward slowly and evenly
Clip threads at the seam end and beginning • Finish the seam edges if necessary
Turning a corner • Stitch to within 5/8 inch stop with needle in fabric • Lift presser foot • Turn fabric • Lower presser foot and continue
Turning a Sharp Point • Take one or two diagonal stitches across the corner • Raise presser foot, leave in needle and stitch diagonal
Reinforcing • Reinforcement stitches on side of each point • Prevent fabric yarns from pulling out
Special Seam Treatments • Trimming • Seam allowance in cut to ¼ inch (evenly) • Grading • Trim each layer of the seam allowance to a different width (reduces bulk) • Clipping • On curved seams, making tiny clips or snips (1/4 to ½ inch)
Notching • Curved seams with too much fabric • After being trimmed or graded • Cutting out tiny wedges no more than 1/8 to seam line