Mastering Ext JS: JavaScript Framework Essentials
710 likes | 857 Views
Learn the basics of Ext JS - a JavaScript framework for interactive web applications. Understand DOM manipulations, event handling, and Ext JS architecture. Practical examples and key functionalities covered.

Mastering Ext JS: JavaScript Framework Essentials
E N D
Presentation Transcript
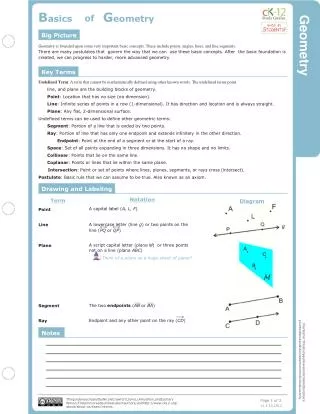
JAVASCRIPT • Client scripting language • Make website interactive and programmable • DOM manipulations • The Document Object Model is a platform- and language-neutral interface that will allow programs and scripts to dynamically access and update the content, structure and style of documents. • One of the functions mostly used in DOM work is: getElementById,getElementsByTagName • Events Handling • EX: <script type="text/javascript"> alert("Hello"); <script>
Javascript Framework • Collection of reusable codes to help you code JavaScripts. • Better DOM manipulations, eventhandling, etc. • This describes a given structure of "how" you should present your code. Like code-template ex:EXTJS
EXTJS • Ext JS is a pure JavaScript application framework for building interactive web applications • Originally built as an add-on library extension of YUI by Jack Slocum • Latest version Ext JS 5.1 • Best cross-platform applications/cross browser • Ext can run against any server platform that can process POST requests and return structured data. common choices include PHP, Java, .NET and many more. • Extensible, object-oriented architecture • Good Documentation • Look and feel • Important clients verizon,IBM,Motorola,Panasonic
OUTLINE • Download www.sencha.com • Include ext-all.css and ext-all.js • Ext.onReady(function(){ });
FORM Ext.onReady(function(){ Ext.create('Ext.form.Panel', { renderTo: 'container' }); });
TEXTFIELD • Ext.form.field.Text • xtype is a symbolic name given to a class xtype : 'textfield', fieldLabel : 'Firstname', id :'firstname', name :'firtsname', value :'yamuna'
END OF SESSION1 • QUESTIONS • Here the activity for you • A form with name, DOB, phone number, comments with two buttons submit and reset • Basic validation • View data entered through alert when submit button is clicked
MODEL • A Model represents some object that your application manages. For example, one might define a Model for Users, Products, Cars, or any other real-world object that we want to model in the system. Models are registered via the model manager, and are used by stores, which are in turn used by many of the data-bound components in Ext. • Models are defined as a set of fields and any arbitrary methods and properties relevant to the model. Ext.define('User', { extend: 'Ext.data.Model', fields: [ {name: 'corpName', type: 'string'}, {name: 'corpId', type: 'int'} ] });
STORE var myStore = Ext.create('Ext.data.Store', { model: 'User', data : [{"name":"Infiniti Software","empId":"1"}, {“name”:”Infiniti Travels”,”empId”:”2”}] });
STORE var myStore = Ext.create('Ext.data.Store', { model: 'User', proxy:{ type : 'ajax',url : '/users.json', reader: { type: 'json', root: 'users' } } });
STORE var myStore = Ext.create('Ext.data.ArrayStore', { model: 'User', data : [{"Infiniti Software","1"}, {”Infiniti Travels”,”2”}] });
COMBO BOX xtype : 'combobox', fieldLabel : 'Corporate Name', id :'corporateName', name :'corporateName', displayField :'name', valueField : 'corpId', store : 'myStore'
CONTAINER • An Ext JS application UI is made up of Components • A Container is a special type of Component that can contain other Components. • A typical Ext JS application is made up of several layers of nested Components. • Containers handle the basic behavior of containing items, namely adding, inserting and removing items. • The most commonly used Container classes are Ext.panel.Panel, Ext.window.Window and Ext.tab.Panel.
LAYOUT • The layout system is one of the most powerful parts of Ext JS. • Every container has a layout that manages the sizing and positioning of its child Components • A Container’s Layout is responsible for the initial positioning and sizing of all of the Container’s children. • Internally the framework calls the Container’s doLayout method which triggers the Layout to calculate the correct sizes and positions for all of the Container’s children and update the DOM.[LAYOUT WORK FLOW]
TYPES OF LAYOUT • Absolute • Accordion • Anchor • Border • Card (TabPanel/Wizard) • Column • Fit • Table • vbox • hbox
ABSOLUTE • This is a simple layout style that allows you to position items within a container using CSS-style absolute positioning via XY coordinates. layout: 'absolute', items:[{ title: 'Panel 1', x: 50, y: 50, html: 'Positioned at x:50, y:50' }]
ACCORDION • Displays one panel at a time in a stacked layout. No special config properties are required other than the layout — all panels added to the container will be converted to accordion panels. layout: 'accordion', items:[{ title: 'Panel 1', html: 'Content' }
ANCHOR • Provides anchoring of contained items to the container's edges. This type of layout is most commonly seen within FormPanels (or any container with a FormLayout) where fields are sized relative to the container without hard-coding their dimensions. layout: 'anchor', items: [{ title: 'Panel 1', height: 100, anchor: '50%' }
BORDER • This Layout Browser page is already a border layout, and this example shows a separate border layout nested within a region of the page's border layout. Border layouts can be nested with just about any level of complexity that you might need. • Every border layout must at least have a center region. All other regions are optional. layout:'border', defaults: { collapsible: true, split: true, bodyStyle: 'padding:15px' }, items: [{ title: 'Footer', region: 'south', height: 150, minSize: 75, maxSize: 250, cmargins: '5 0 0 0' }
CARD • The TabPanel component is an excellent example of a sophisticated card layout. Each tab is just a panel managed by the card layout such that only one is visible at a time. In this case, configuration is simple since we aren't actually building a card layout from scratch. Don't forget to set the activeItem config in order to default to the tab that should display first. • You can use a Card layout to create your own custom wizard-style screen. The layout is a standard CardLayout with a Toolbar at the bottom, and the developer must supply the navigation function that implements the wizard's business logic
CARD WIZARD layout:'card', activeItem: 0, // index or id bbar: ['->', { id: 'card-prev', text: '« Previous' },{ id: 'card-next', text: 'Next »' }], items: [{ id: 'card-0', html: 'Step 1' }]
CARD TAB xtype: 'tabpanel', activeTab: 0, // index or id items:[{ title: 'Tab 1', html: 'This is tab 1 content.' }]
COLUMN • This is a useful layout style when you need multiple columns that can have varying content height. Any fixed-width column widths are calculated first, then any percentage-width columns specified using the columnWidth config will be calculated based on remaining container width. Percentages should add up to 1 (100%) in order to fill the container. layout:'column', items: [{ title: 'Width = 25%', columnWidth: .25, html: 'Content' },{ title: 'Width = 75%', columnWidth: .75, html: 'Content' },{ title: 'Width = 250px', width: 250, html: 'Content' }]
FIT • A very simple layout that simply fills the container with a single panel. This is usually the best default layout choice when you have no other specific layout requirements. layout:'fit', items: { title: 'Fit Panel', html: 'Content', border: false }
TABLE • Outputs a standard HTML table as the layout container. This is sometimes useful for complex layouts where cell spanning is required, or when you want to allow the contents to flow naturally based on standard browser table layout rules. layout: { type: 'table', columns: 4 }, items: [ {html:'1,1',rowspan:3}, {html:'1,2'}, {html:'1,3'}, {html:'2,2',colspan:2}, {html:'3,2'}, {html:'3,3'} ]
VBOX • A layout that allows for the vertical and horizontal stretching of child items, much like the container layout with size management. layout: { type: 'vbox' align : 'stretch', pack : 'start', }, items: [ {html:'panel 1', flex:1}, {html:'panel 2', height:150}, {html:'panel 3', flex:2} ]
HBOX • A layout that allows for the vertical and horizontal stretching of child items, much like the column layout but can stretch items vertically. layout: { type: 'hbox', pack: 'start', align: 'stretch' }, items: [ {html:'panel 1', flex:1}, {html:'panel 2', width:150}, {html:'panel 3', flex:2} ]
VIEWPORT • A viewport is a special panel-like component that encloses the entire layout, fitting it into the whole visible area of our browser Ext.create('Ext.Viewport', { layout: { type: 'border', } });
END OF SESSION 2 • QUESTIONS • Here the activity for you • Viewport border display • Any three layouts useage inside viewport • Store concept implementation
GRID • Grids are an excellent way of showing large amounts of tabular data on the client side. • Essentially a supercharged <table>, GridPanel makes it easy to fetch, sort and filter large amounts of data. • Grids are composed of two main pieces - a Store full of data and a set of columns to render.
GRID Ext.create('Ext.grid.Panel', { title: 'Simpsons', store: myStore, columns: [ { header: 'Name', dataIndex: 'name' }, { header: 'Email', dataIndex: 'email', flex: 1 }, { header: 'Phone', dataIndex: 'phone' } ] });
GROUP GRID • Ext JS grid grouping is a common scenario in business applications where users need to analyze tabular data grouped by different attributes var groupingFeature = Ext.create('Ext.grid.feature.Grouping',{ groupHeaderTpl: 'Name }); Ext.create('Ext.grid.Panel', { features: [groupingFeature], store: myStore, columns: [{ dataIndex: 'student', text: 'Name' },{ dataIndex: 'mark', text: 'Mark' }] });
END OF SESSION 3 • QUESTIONS • Here the activity for you • A sample of grid • Group grid display
GRID EDITING - ROWEDITING • RowEditing plugin injects editing at a row level for a Grid. • When editing begins, a small floating dialog will be shown for the appropriate row. • Each editable column will show a field for editing. • There is a button to save or cancel all changes for the edit. • The field that will be used for the editor is defined at the editor. • If an editor is not specified for a particular column then that column won't be editable and the value of the column will be displayed.
GRID EDITING - ROWEDITING Ext.create('Ext.grid.Panel', { title: 'Simpsons', store: myStore, columns: [ {header: 'Name', dataIndex: 'name', editor: 'textfield'}, {header: 'Email', dataIndex: 'email', flex:1, editor: { xtype: 'textfield', allowBlank: false } }, {header: 'Phone', dataIndex: 'phone'} ], selType: 'rowmodel', plugins: [ Ext.create('Ext.grid.plugin.RowEditing', { clicksToEdit: 1 }) ] });
GRID EDITING - CELLEDITING • The CellEditing plugin injects editing at a cell level for a Grid. • Only a single cell will be editable at a time. • The field that will be used for the editor is defined at the editor. • If an editor is not specified for a particular column then that cell will not be editable and it will be skipped when activated via the mouse or the keyboard.
GRID EDITING - CELLEDITING Ext.create('Ext.grid.Panel', { title: 'Simpsons', store: myStore, columns: [ {header: 'Name', dataIndex: 'name', editor: 'textfield'}, {header: 'Email', dataIndex: 'email', flex:1, editor: {xtype: 'textfield',allowBlank: false} }, {header: 'Phone', dataIndex: 'phone'} ], selType: 'cellmodel', plugins:[ Ext.create('Ext.grid.plugin.CellEditing', {clicksToEdit: 1 }) ] });
PAGENATION • As the number of records increases, the time required for the browser to render them increases. • Paging is used to reduce the amount of data exchanged with the client. • Paging is typically handled on the server side. • The client sends parameters to the server side, which the server needs to interpret and then respond with the appropriate data. • Ext.toolbar.Paging is a specialized toolbar that is bound to a Ext.data.Store and provides automatic paging control. • This Component loads blocks of data into the store by passing parameters used for paging criteria.
PAGENATION var itemsPerPage = 2; // set the number of items you want per page var store = Ext.create('Ext.data.Store', { id:'simpsonsStore', autoLoad: false, fields:['name', 'email', 'phone'], pageSize: itemsPerPage, // items per page proxy: {type: 'ajax', url: 'pagingstore.js', // url that will load data with respect to start and limit params reader: {type: 'json',root: 'items',totalProperty: 'total' } } }); // specify segment of data you want to load using params store.load( {params: {start:0, limit: itemsPerPage} }); The packet sent back from the server would have this form: { "success": true, "results": 10, "rows": [ // ***Note:** this must be an Array { "id": 1, "name": "Bill", "occupation": "Gardener" }, { "id": 2, "name": "Ben", "occupation": "Horticulturalist" }, ... { "id": 25, "name": "Sue", "occupation": "Botanist" } ] }
PAGENATION Ext.create('Ext.grid.Panel', { title: 'Simpsons', store: store, columns: [ { header: 'Name', dataIndex: 'name' }, { header: 'Email', dataIndex: 'email', flex: 1 }, { header: 'Phone', dataIndex: 'phone' } ], dockedItems: [{ xtype: 'pagingtoolbar', store: store, dock: 'bottom', displayInfo: true }] });
DYNAMIC STORE CHANGES • Updating the existing value in store • Filter the existing value in store • Removing the existing value in store • Adding new row in store • Adding new column in store
TREES • Most versatile Components in Ext JS • Excellent tool for displaying heirarchical data in an application • Tree Panel extends from the same class as Grid Panel, so all of the benefits of Grid Panels - features, extensions, and plugins can also be used on Tree Panels. • Things like columns, column resizing, dragging and dropping, renderers, sorting and filtering can be expected to work similarly for both components.
TREES Ext.create('Ext.tree.Panel', { renderTo: Ext.getBody(), title: 'Simple Tree', width: 150, height: 150, root: {text: 'Root', expanded: true, children: [{text: 'Child 1',leaf: true}, {text: 'Child 2',leaf: true }, {text: 'Child 3',expanded: true, children: [ {text: 'Grandchild',leaf: true }] }] }});
END OF SESSION 4 QUESTIONS • Here the activity for you • Grid editing concepts • Trees
CHARTS • Charts provide a flexible way to achieve a wide range of data visualization capablitities. • Each Chart gets its data directly from a Store, and automatically updates its display whenever data in the Store changes. • In addition, the look and feel of a Chart can be customized using Themes. • Every Chart has three key parts - a Store that contains the data, an array of Axes which define the boundaries of the Chart, one or more Series to handle the visual rendering of the data points.
Creating a Store • The first step is to create a Model that represents the type of data that will be displayed in the Chart. • For example the data for a chart that displays a weather forecast could be represented as a series of "WeatherPoint" data points with two fields - "temperature", and "date": Ext.define('WeatherPoint', { extend: 'Ext.data.Model', fields: ['temperature', 'date'] }); var store = Ext.create('Ext.data.Store', { model: 'WeatherPoint', data: [ { temperature: 58, date: new Date(2011, 1, 1, 8) }, { temperature: 63, date: new Date(2011, 1, 1, 9) }, { temperature: 73, date: new Date(2011, 1, 1, 10) }, { temperature: 78, date: new Date(2011, 1, 1, 11) }, { temperature: 81, date: new Date(2011, 1, 1, 12) } ] });
Creating the Chart object Now that a Store has been created it can be used in a Chart: Ext.create('Ext.chart.Chart', { renderTo: Ext.getBody(), width: 400, height: 300, store: store });
Configuring the Axes • Axes are the lines that define the boundaries of the data points that a Chart can display. This example uses one of the most common Axes configurations - a horizontal "x" axis, and a vertical "y" axis: Ext.create('Ext.chart.Chart', { ... axes: [ { title: 'Temperature', type: 'Numeric', position: 'left', fields: ['temperature'], minimum: 0, maximum: 100 }, { title: 'Time', type: 'Time', position: 'bottom', fields: ['date'], dateFormat: 'ga' } ] });