Download

1 / 11
110 likes | 252 Views
Manual for Wireless Connection in Kyoto University. For Staffs -. 28 Dec, 2011. Flowchart of the network connection. Windows 7 / Vista / WinXP Connect to “MIAKO” wireless access point. Open “Connection Name” shortcut icon on your desktop.

E N D
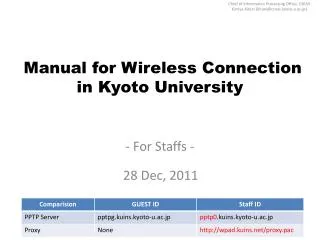
Manual for Wireless Connectionin Kyoto University For Staffs - • 28 Dec, 2011
Flowchart of the network connection • Windows 7 / Vista / WinXP • Connect to “MIAKO” wireless access point. • Open “Connection Name” shortcut icon on your desktop. • Click “Connection”.- In the first time, please check [SPS-ID or ECS-ID] and [SPS-ID or ECS-ID Password]. • MacOSX 10.5 / 10.6 / 10.7 • Connect to “MIAKO” wireless access point. • Open PPTP connection from the upper menu bar. • Select “Conection: Service Name”. - Check “Service Name”.
Troubleshooting • Why cannot my PC establish PPTP connection? • If all settings are right, please check your security software setting. • In case of ”Windows Live OneCare” , PPTP(VPN) connection is blocked in default setting. If you’d like to disable this setting, please try to change to the following setting. • Open Windows Live OneCare software, click View or change settings. • Click the Firewall tab. • Under Other settings, click Advanced Settings. • Click the Ports and Protocols tab. • Click to select the check box for VPN connection, and turn on it. • Click OK.
Manuals for setting up “PPTP” connection Windows 7, Vista, XP MacOSX 10.7 (Lion) / 10.6 (Snow Leopard) / 10.5 (Leopard)
Setting up “PPTP” for Staffs- Windows 7 / Vista (English) - • From the “Start” Menu, select “Control Panel”. • Select the link to “View network status and tasks” in the category of “Network and Internet”. • Select “Set up a connection or network” in the left sidebar of “Network and Sharing Center”. • Select “Connect to a workplace.” and click “Next”. • Select “Use my Internet connection (VPN)” and double click it. • Select “I’ll set up an Internet Connection later”. • Check the following Settings and click “Next”. • Internet address: pptp0.kuins.kyoto-u.ac.jp • Destination name: Understandable name like KUINS-PPTP • Check off “Allow other people to use this connection” • Check on “Don’t connect now”. • Check the following Settings and click “Create”. • Username: [Your SPS-ID or ECS-ID] • Password: [Your SPS-ID or ECS-ID Password] • Click Close. • Select “Manage network connections” in the left sidebar of “Network and Sharing Center”. • Right click in “KUINS-PPTP” (Destination name) and select “Create Shortcut”. • Click “Yes” on the alert of “Windows cannot create a shortcut here”. * In case of Windows7, please check the following settings. • Right click on “KUINS-PPTP” (Destination name) and Select “Properties“. • Click on “Security” tab and select “Point to Point Tunneling Protocol (PPTP)” in “Type of VPN:” menu.
Setting up “PPTP” for Staffs- Windows XP (English)- • From the “Start” Menu, select “Control Panel”. • Select ”Network (and Internet) Connections. • From the “File” menu, select “Create a new connection”. • “New connection Wizard” will be activated and click “Next”. • Select “Connect to the network at my workplace” and click “Next”. • Select “Virtual Private Network connection” and click “Next”. • In the “Connection Name” dialog box, please input it and click “Next”. - Understandable name like KUINS-PPTP • Select “Do not dial the initial connection” and click “Next”. • In the “VPN Server Selection” dialog box, please input the following name and click “Next”. - pptp0.kuins.kyoto-u.ac.jp • Check on “Add a shortcut to this connection to my desktop” and click “Finish”.
Setting up “PPTP” for Staffs- MacOSX 10.5/10.6 / 10.7 (English) - • From the “Apple” Menu, select “System Preferences”. • Select “Network”. • Click ”+” button. - If this button is disabled, please click “Key” icon and apply the administrator authorization. • Select the following new network. - Interface: VPN - VPN type: PPTP - Service Name: Understandable name like KUINS-PPTP • Check the following network setting.- Server Address: pptp0.kuins.kyoto-u.ac.jp - Account name: [SPS-ID or ECS-ID] - Check on “Show VPN status in menu bar”. • Select “Authorization settings” option and check the following setting. - Check on “Password”. - Input [SPS-ID or ECS-ID Password] in the dialog box. • Select “Advanced” option and check the following setting. - Check on “Send all traffic over VPN connection”. • Then, click “Apply”.
Manuals for setting up “Web Proxy” Windows 7, Vista, XP MacOSX 10.7 (Lion) / 10.6 (Snow Leopard) / 10.5 (Leopard)
Setting up “Web Proxy” for Staffs- Internet Explorer 8 / 9 - First, please try to update to the latest version (http://update.microsoft.com/microsoftupdate). • Windows • Push “Alt” key and click on “Internet Options” in “Tools” menu. • Click on “Connections” tab. • Click on “KUINS-PPTP” in dialog box called “Dial-up and Virtual Private Network settings:” and click on “Settings” button. • Check on “Use automatic configuration script” and input the following URL.Then,Check off other check boxes. • http://wpad.kuins.net/proxy.pac
Setting up “Web Proxy” for Staffs- Safari / Google Chrome - • Windows • Basically, Safari and Google Chrome refers to the setting of Internet Explorer. Therefore, please check the manual of “Internet Explorer”. • MacOSX (Safari) • Basically, Google Chrome refers to the setting of Safari. Therefore, please check the manual of “Safari” • Click on “System Preferences” in Apple menu. • Click on “Network”. • Select “KUINS-PPTP” in the left side menu. • Click on “Advanced” button. Then, click “Proxies” tab. • Select “Using a PAC file” and input the following URL.Then,Check off other check boxes.* In case of MacOSX 10.5, “Using a PAC file” selection is in “Configure Proxies” menu. • http://wpad.kuins.net/proxy.pac
Setting up “Web Proxy” for Staffs- Firefox 9 - First, please try to update to the latest version (http://mozilla.org). • Windows • Click on “Options” in “Tools” menu. • Click on “Network” tab in “Advanced” menu. • Click on “Settings” button • Check on “Automatic proxy configuration URL” and input the following URL. • http://wpad.kuins.net/proxy.pac • MacOSX • Click on “Preferences” in Firefox menu. • Click on “Network” tab in “Advanced” menu. • Click on “Settings” button • Check on “Automatic proxy configuration URL”and input the following URL. • http://wpad.kuins.net/proxy.pac