Virtual Learning Environment
6. Virtual Learning Environment. An Instructor’s Guide to Managing Courses with the Control Panel. Click your left mouse button ONCE now to move on. Introduction. This is a self-paced slide show. On each slide, text boxes containing useful information will appear:. An information text box.


Virtual Learning Environment
E N D
Presentation Transcript
6 Virtual Learning Environment An Instructor’s Guide to Managing Courses with the Control Panel Click your left mouse button ONCE now to move on
Introduction This is a self-paced slide show. On each slide, text boxes containing useful information will appear: An information text box You need not do anything until an instruction to click the left mouse button appears at the bottom of the page: An instruction box You may move on after you have finished reading what is on screen by simply clicking the mouse. When you are ready click the left mouse button to continue
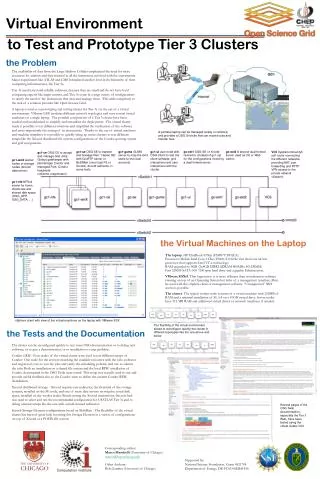
Overview of the Control Panel This screent shot shows the Control Panel, which contains all the tools necessary for Instructors to manage Course Modules. This presentation provides an overview of the main tools used to: • Upload Course Content • Manage Students • Communicate with Students • Conduct Assessments • Customise the Structure and Appearance of Modules When you are ready click the left mouse button to continue
Managing Content The Content Areas Section is where you can upload material into Blackboard. Course Documents is the most important part of the Content Areas. When you click the link you are taken to the Course Documents Page where you can manage your content. When you are ready click the left mouse button to continue
Managing Course Documents This is the Course Documents Page. You can add and structure content here as follows. When you are ready click the left mouse button to continue
Managing Course Documents Add content items here. Most file types are supported. When you are ready click the left mouse button to continue
Managing Course Documents Add Folders to organise your content in a structure. When you are ready click the left mouse button to continue
Managing Course Documents Add web links (or Favorites) in order to guide students round the Web When you are ready click the left mouse button to continue
Managing Course Documents Add links to other sections of the Module When you are ready click the left mouse button to continue
Managing Course Documents Add a test that you have previously created in the test manager. When you are ready click the left mouse button to continue
Managing Course Documents This Drop Down Menu provides quick links for you to add Learning Units (sequentially ordered content), Surveys, Assignments and Microsoft LRN Packages For more information about Microsoft LRN Packages visit http://www.microsoft.com/elearn/ When you are ready click the left mouse button to continue
Managing Course Documents The Drop Down Menus allow you to manipulate the order in which your content is displayed on the page. These buttons allow you to Modify, Copy or Remove different content areas. When you are ready click the left mouse button to continue
Further Features of the Control Panel The rest of this presentation gives you an overview of the remaining features for on offer in the Control Panel When you are ready click the left mouse button to continue
Course Tools This section contains all the important Communication Tools: e-Mail, Chat Rooms, Discussion Boards and File Exchange. You may also contact students through Announcements or the Calendar. When you are ready click the left mouse button to continue
Course Options • This section lets you: • Change the course menu buttons • Add or remove content areas • Archive a whole course • Set Course Properties When you are ready click the left mouse button to continue
User Management This section allows you to list users by Surmame or e-Mail address. You can also remove students from your Module or create Groups for collaborative work. When you are ready click the left mouse button to continue
Assessment Here you can create on-line quizzes or surveys. You can also access results and mark quizzes. When you are ready click the left mouse button to continue
Support This contacts Blackboard External Support or loads an On-line Help Manual When you are ready click the left mouse button to continue
Further Information This is the end of the overview of how to use the Control Panel for managing Modules in Blackboard. We hope that it has answered some of your questions and left you feeling ready to get started! For further information and training, please contact Cardiff Blackboard Support: blackboard@cf.ac.uk Please Wait When you are ready click the left mouse button to continue